


Get to Know Your Spinach Plant Through Photos and How to Use Them
Discover 7 spinach pictures of the plant arranged to cover every key growth and diagnostic stage. From tender microleaf harvests to fully mature Savoy leaves ready for picking, this visual guide pairs each image with concise care notes and real-life examples to show you exactly how to manage each phase.
What you’ll learn:
- 7 essential plant photos showing stages from Flat-Leaf seedling to Bolting spinach
- Practical tips on timing harvests, managing nutrient deficiencies, and preventing downy mildew
- Variety insights, including heat-tolerant New Zealand spinach and space-saving cultivars
Visual references let you spot problems early, adjust feeding schedules, and fine-tune environmental conditions. Each stage features specific care steps to optimize yield and flavor. By comparing these spinach pictures of the plant side by side, you’ll quickly recognize nutrient issues like iron or nitrogen chlorosis, identify bolting signs, and choose the right harvest window.
1. Mature Savoy Spinach - Harvest Ready
Mature Savoy Spinach represents the peak harvest stage of crinkled-leaf spinach at 40–50 days after planting. Dark green, deeply wrinkled leaves with prominent veins form a dense rosette that maximizes leaf count per square foot. This stage delivers the highest nutrient density for fresh dishes and commercial sales.
In spinach pictures of the plant galleries, Mature Savoy Spinach stands out for its visual texture and robust color. This leaf structure signals peak flavor and crispness for salads, smoothies, and stir-fries.
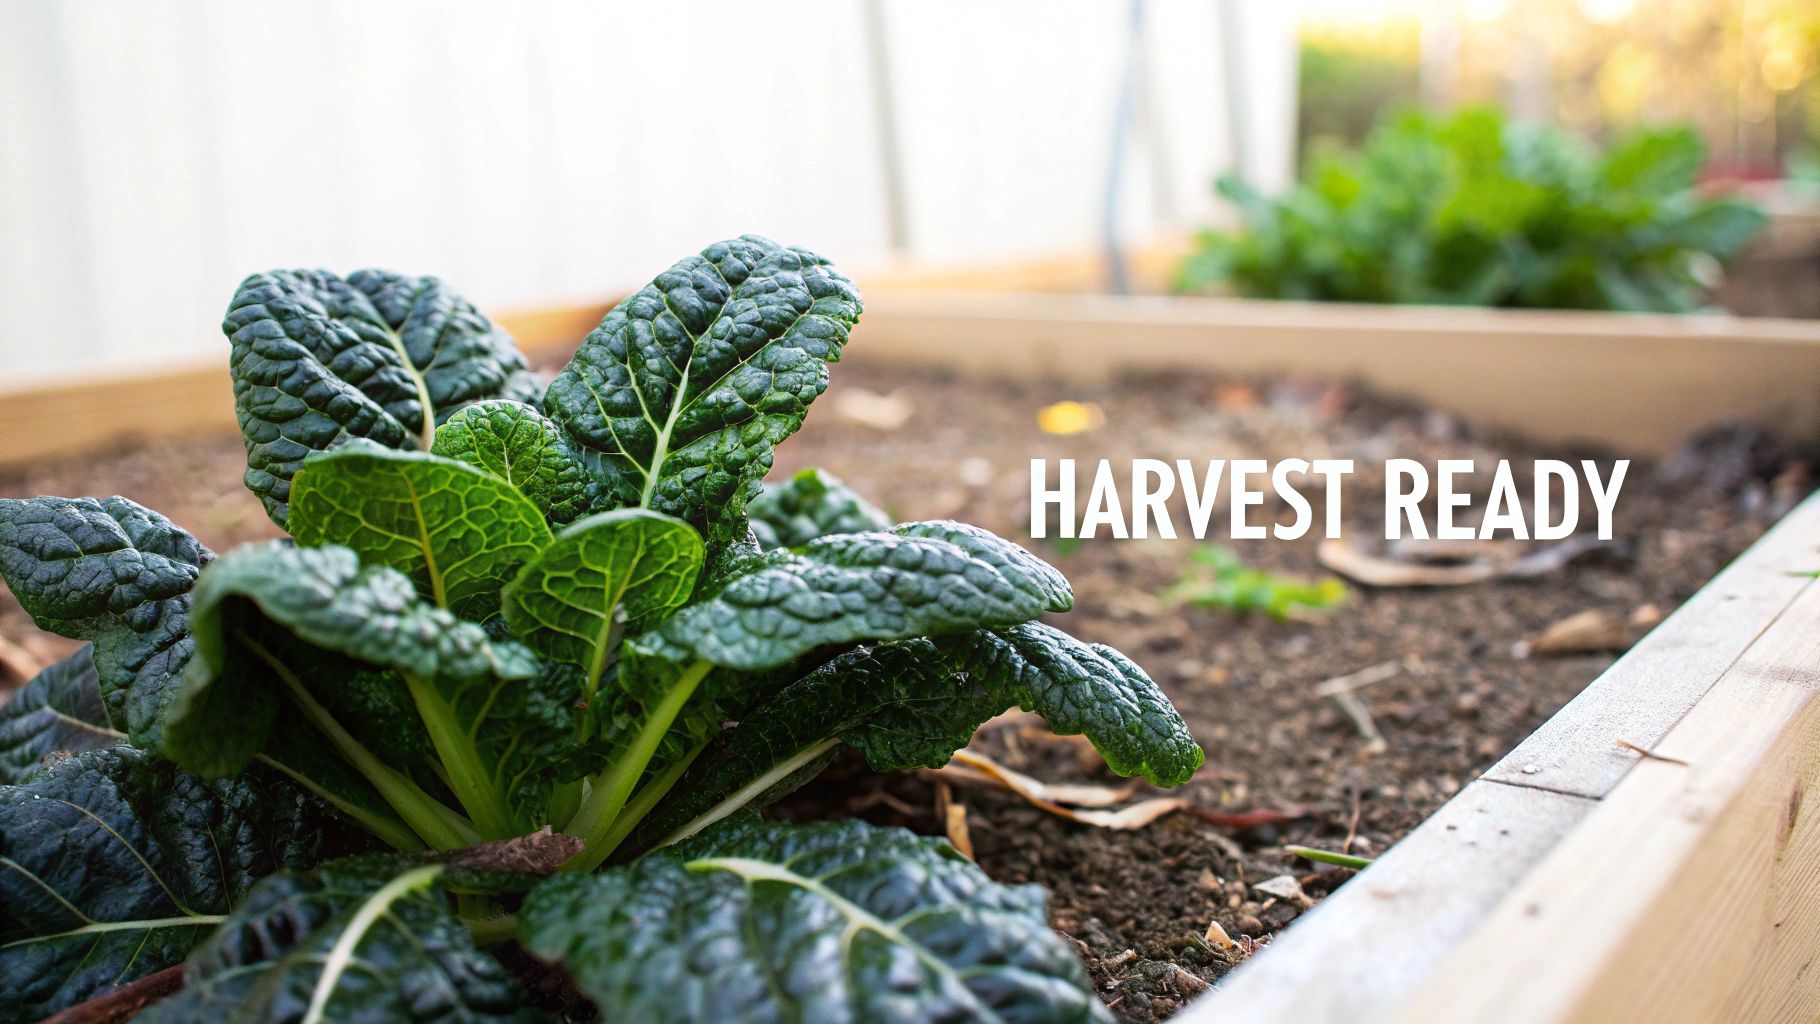
Harvesting Savoy spinach at its peak ensures the richest flavor and highest vitamin content.
Real-World Examples
- Johnny’s Selected Seeds offers bulk Savoy seed packs ideal for commercial growers (https://www.johnnyseeds.com).
- Central Valley, California farms use drip irrigation and raised beds to optimize water use and yield.
- Organic operations in the UK plant Savoy under polytunnels for extended winter harvests.
Actionable Tips
- Harvest in early morning for best crispness and shelf life.
- Use sharp scissors to cut leaves cleanly above the soil line.
- Check soil moisture daily during the final week to avoid stress.
- Monitor daytime temperatures below 75°F to prevent premature bolting.
When and Why to Harvest
Harvest mature Savoy spinach when leaves reach 4–6 inches wide and exhibit the darkest green hue. This timing maximizes flavor, nutrient density, and market quality for both home gardeners and commercial producers.
2. Flat-Leaf Spinach (Space Saver) - Early Growth Stage
Flat-Leaf Spinach (also called Bloomsdale Long Standing) at 3–4 weeks displays smooth, tender leaves without the crinkled texture of Savoy types. In this early growth stage, a compact rosette of 4–6 true leaves emerges, making it ideal for space-constrained container gardens and small raised beds. The transition from seedling to juvenile plant is clearly visible in spinach pictures of the plant galleries, highlighting the uniform leaf shape and vibrant light green color.
In spinach pictures of the plant collections, the Space Saver variety stands out for its low-profile habit and clean foliage. These images help gardeners assess uniformity and vigor before full canopy development.
Succession planting every two weeks ensures a continuous supply of tender outer leaves without overcrowding young plants.
Real-World Examples
- Urban balconies using 6-inch pots with 3–4 inches spacing for salad greens
- Hydroponic NFT systems maintaining constant water flow and 60–65°F root temperatures
- Mediterranean home plots under shade cloth to moderate midday heat
Actionable Tips
- Space seedlings 3–4 inches apart for optimal air circulation
- Start new trays every two weeks for a rolling harvest
- Maintain consistent 60–65°F daytime temperatures
- Harvest outer leaves at 4 weeks to encourage new growth
When and Why to Harvest
Begin harvesting when outer leaves reach 3–4 inches long, about four weeks after sowing. Early picks deliver the sweetest flavor and tender texture for salads, smoothies, and light sautés, and they prevent overcrowding as the center rosette expands.
3. Bolting Spinach - Advanced Flowering Stage
Bolting Spinach - Advanced Flowering Stage captures the moment when spinach prematurely switches to reproductive growth. You’ll see elongated central flower stalks pushing up through the rosette as the plant redirects energy to seed production. Leaves shrink, become tougher, and develop a bitter flavor when day length exceeds 14 hours and temperatures climb above 75°F.
In spinach pictures of the plant galleries, Bolting Spinach stands out for its stark contrast to lush leafy stages. Thin, upward-reaching bolts signal a growth failure that warns gardeners about planting windows and climate limits. This image serves as a key reference to avoid quality losses in home and commercial plots.
Preventing bolting ensures tender sweet leaves and maximum harvest yield.
Real-World Examples
- Summer beds in the Pacific Northwest often bolt within weeks under long days.
- Unmonitored greenhouse setups can trigger flowering as heat builds.
- Small farms face climate change–driven heat spikes that force early seed stalks.
Actionable Tips
- Monitor day length and daytime temperature continuously
- Plant cool-season varieties during summer heat
- Provide 30–50% shade cloth when temps exceed 70°F
- Choose bolting-resistant cultivars like Bloomsdale
- Harvest before any 6-inch bolt appears
- Never allow spinach to bolt when quality harvest is required
When and Why to Manage
Prevent bolting by scheduling fall and spring plantings when days are under 14 hours. Use shade cloth or quick-maturing varieties if heat spikes occur. Recognizing this stage helps you adjust schedules and protect crop quality.
Learn more about Bolting Spinach - Advanced Flowering Stage on homegrown-garden.com
4. Baby Spinach – Microleaf Harvest Stage
Baby Spinach at the microleaf stage is harvested as early as 2–3 weeks after sowing, producing tender, bright green leaves measuring 1–3 inches that command premium market prices.
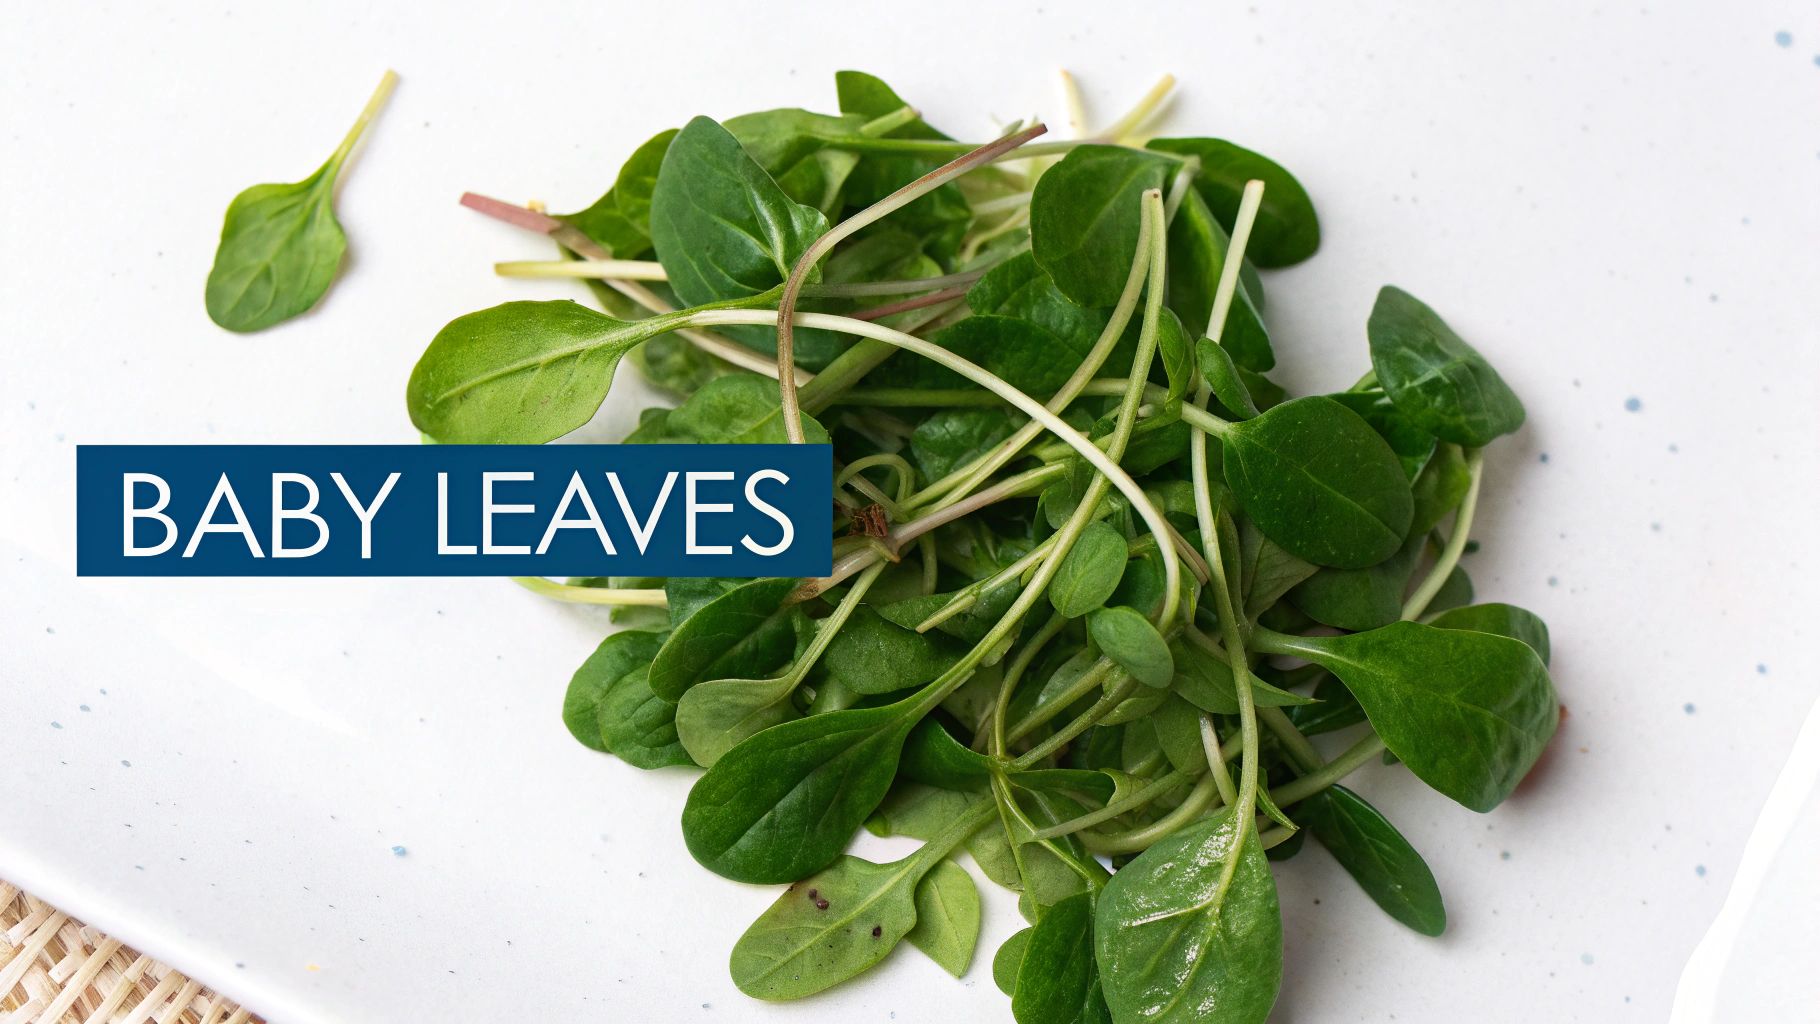
In spinach pictures of the plant galleries, this microleaf harvest stage is prized by salad blend operations, specialty markets, and high-end restaurants seeking mild flavor and silky texture.
Harvesting microleaf spinach at the peak stage delivers unmatched tenderness and value.
Real-World Examples
- Fresh Express and Dole Salad Company supply prewashed baby spinach to major retailers (https://www.freshexpress.com).
- European ready-to-eat spinach producers in the Netherlands package microleaf mixes under polytunnels.
- Japanese specialty vegetable farms integrate microleaf beds into greenhouse kits for compact yields.
- Michelin-star restaurants in New York and London rely on same-day microleaf harvests for peak freshness.
Actionable Tips
- Harvest in early morning for best crispness.
- Use specialized baby-leaf harvesting equipment or sharp scissors.
- Chill cut leaves immediately in ice water.
- Package in modified-atmosphere sealed bags within 30 minutes.
- Market within 1–2 days to preserve flavor and texture.
- Succession sow every 7–10 days for continuous supply.
When and Why to Harvest
Harvest baby spinach when leaves reach 1–3 inches and show uniform color. This 2–3 week window optimizes tenderness, mild flavor, and premium pricing for salad bars and specialty markets.
5. Nutrient Deficiency - Iron/Nitrogen Chlorosis
Nutrient Deficiency – Iron/Nitrogen Chlorosis is a diagnostic stage marked by interveinal chlorosis, where leaf tissue between veins turns yellow while veins stay green. This symptom signals insufficient iron (Fe) or nitrogen (N) uptake, often in alkaline soils (pH > 7.5) or poorly fertilized beds. Early detection is vital to prevent stunted growth and reduced yields.
In spinach pictures of the plant galleries, chlorotic leaves contrast sharply with healthy foliage, making this condition unmistakable. Visual guides help growers identify nutrient gaps and implement fixes before significant crop losses occur.
Catching chlorosis early can restore vigor and protect your harvest.
Real-World Examples
- Spinach fields on limestone-rich farmland in Colorado exhibiting severe yellowing
- Organic market gardens in California overliming soil without added compost
- Midwestern farms that applied excess lime for pH control then saw nitrogen lockout
- Visit the Homegrown Garden blog for deeper soil test advice: Learn more about Nutrient Deficiency - Iron/Nitrogen Chlorosis on homegrown-garden.com
Actionable Tips
- Conduct a full soil pH and nutrient panel before planting
- Apply a chelated iron foliar spray for rapid green-up
- Lower soil pH with elemental sulfur or acidifying amendments
- Incorporate nitrogen-rich compost or blood meal into root zone
- Maintain even irrigation to aid nutrient uptake
- Mulch heavily to stabilize moisture and temperature
When and Why to Correct
Correct chlorosis at the first sign of yellowing between veins to revive photosynthesis and leaf development. Timely intervention prevents chronic nutrient stress, boosts spinach vigor, and secures robust yields for both home gardeners and commercial growers.
6. Downy Mildew Infection - Disease Management Reference
Downy Mildew Infection is a critical diagnostic reference for identifying Peronospora spinaciae on spinach leaves. It highlights the characteristic light green to yellow spotting on upper surfaces with gray-white fungal sporulation on undersides. This fungal disease thrives in cool 50–65°F, wet conditions and poses an economic risk for fall and spring crops.
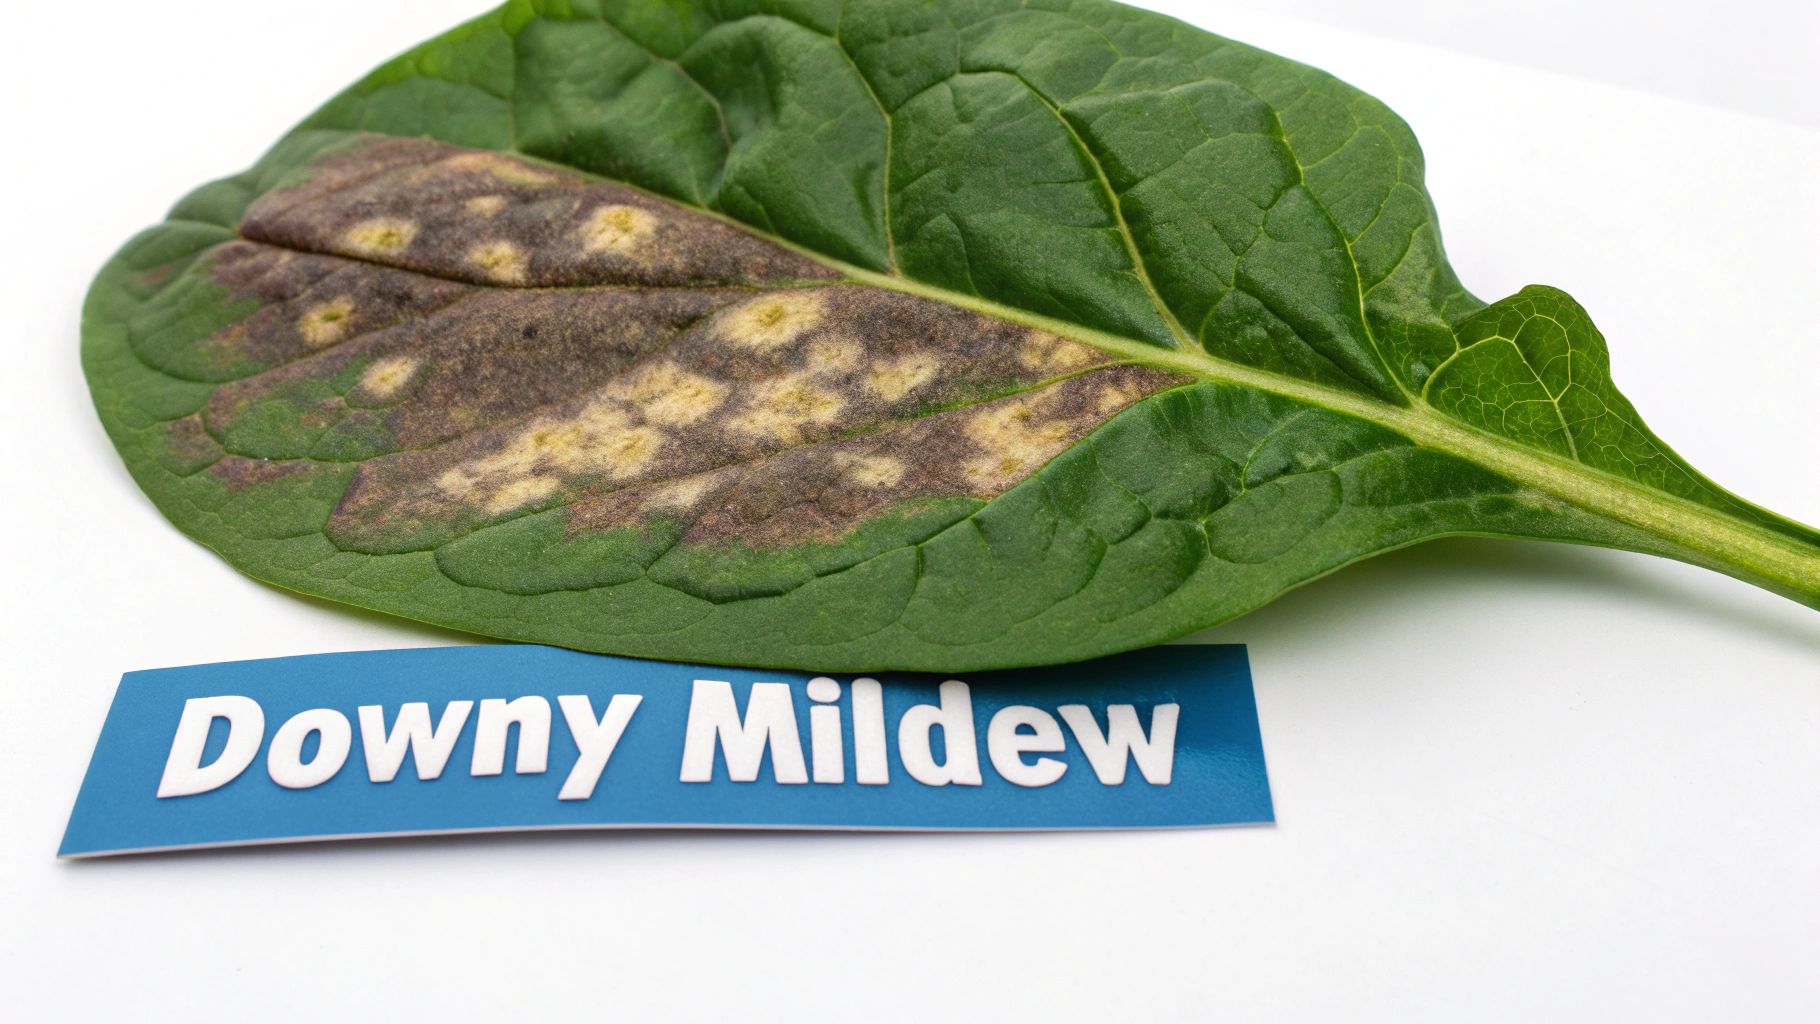
Early detection of downy mildew can prevent losses of up to 80 percent in susceptible spinach stands.
Real-World Examples
- Pacific Northwest fall growers in Oregon and Washington switch to drip lines and schedule overhead irrigation to minimize leaf wetness.
- European organic associations in France and Germany deploy certified biocontrols and resistant cultivars under polytunnels.
- Japanese greenhouse producers integrate humidity control with daily leaf inspections to curb Peronospora outbreaks.
Actionable Tips
- Inspect leaf undersides each morning for early gray-white sporulation spots.
- Maintain 6-8 inch plant spacing to improve airflow and reduce moisture retention.
- Water at soil level only, avoiding overhead irrigation during cool, damp periods.
- Rotate crops and promptly remove infected debris to break the pathogen life cycle.
When and Why to Use
Consult this imagery guide when spinach is grown in cool, wet weather—especially during spring and fall planting windows. Early recognition enables timely cultural and chemical controls, preserving yield quality and preventing disease spread.
Learn more about Downy Mildew Infection - Disease Management Reference on homegrown-garden.com
7. New Zealand Spinach (Tetragonia) - Alternative Variety Heat Tolerance
New Zealand spinach, Tetragonia tetragonioides, is a heat tolerant alternative to true spinach. It thrives in hot summer conditions where Spinacia oleracea bolts. This sprawling vine produces small, triangular succulent leaves massed at branch tips for fresh salads and stir-fries.
In spinach pictures of the plant galleries, New Zealand spinach stands out with its glossy, fleshy foliage and climbing habit. These images highlight how the succulent texture and vine architecture contrast with crinkled spinach leaves, guiding gardeners to identify this variety in warm-climate plots.
Embrace New Zealand spinach for a reliable summer harvest when traditional spinach fails.
Real-World Examples
- Australian vegetable gardens using trellis nets for vertical growth
- Mediterranean rooftop plots intercropped with eggplants for shade
- Southwestern USA home farms direct-sown after last frost date
- Tropical Asian backyard farms leveraging dense foliage for pest control
Actionable Tips
- Soak seeds 24 hours before sowing to boost germination
- Start indoors 6–8 weeks before the warm season
- Direct sow after the final frost for continuous supply
- Install trellis support to maximize yield and airflow
- Pinch growing tips at 8–10 weeks to encourage branching
- Harvest leaves regularly to promote nonstop production
When and Why to Grow
Plant New Zealand spinach when summer temperatures exceed 75°F or in partial shade. Choose this variety for year-round production and as a critical alternative when true spinach bolts, ensuring steady green harvests through the hottest months.
Spinach Plant Photo Comparison — 7 Stages & Conditions
| Item | 🔄 Implementation complexity | ⚡ Resource requirements | 📊 Expected outcomes (⭐ quality) | 💡 Ideal use cases | ⭐ Key advantages |
|---|---|---|---|---|---|
| Mature Savoy Spinach - Harvest Ready | 🔄 Moderate–High: precise timing, consistent irrigation, disease monitoring | ⚡ Medium–High: fertile soil, steady water, skilled harvest labor, storage | 📊 High yield & marketability; ⭐ Excellent flavor, nutrient density, good shelf life | 💡 Commercial retail, farmstands, home growers prioritizing flavor | ⭐ Peak nutrition & visual appeal; longer shelf life |
| Flat-Leaf Spinach (Space Saver) - Early Growth Stage | 🔄 Low: simple maintenance, succession planting recommended | ⚡ Low: minimal space, moderate water, light labor | 📊 Good, fast to harvest; ⭐ Mild flavor suitable for fresh use | 💡 Containers, urban gardens, hydroponics, small-scale producers | ⭐ Space-efficient, quick turnover, bolt-resistant options |
| Bolting Spinach - Advanced Flowering Stage | 🔄 High: indicates environmental stress; requires constant monitoring to prevent | ⚡ Variable: may waste resources; needs shade/variety change or removal | 📊 Poor quality; ⭐ Low edibility/marketability when advanced | 💡 Seed saving, educational/demonstration plots, diagnostic reference | ⭐ Useful for seed collection and as a management indicator |
| Baby Spinach - Microleaf Harvest Stage | 🔄 Moderate: tight harvest windows, specialized handling/packaging | ⚡ High: rapid succession, chilled handling, specialized labor & packaging | 📊 Premium returns; ⭐ Extremely tender but short shelf life | 💡 Salad mixes, RTE producers, high-end restaurants, specialty markets | ⭐ Premium texture & price; fast crop cycle, high yield per ft² |
| Nutrient Deficiency - Iron/Nitrogen Chlorosis | 🔄 Moderate: diagnosis and corrective soil management required | ⚡ Low–Medium: soil tests, chelated iron/ fertilizers, irrigation fixes | 📊 Reduced yield/quality until corrected; ⭐ Recoverable with treatment | 💡 Diagnostic reference; routine soil management and testing | ⭐ Early detection enables targeted, effective correction |
| Downy Mildew Infection - Disease Management Reference | 🔄 High: rapid spread; strict hygiene, monitoring and response needed | ⚡ High: fungicides, resistant varieties, cultural controls, labor | 📊 Can cause severe crop loss; ⭐ Containable if detected early | 💡 Disease ID/training, regions with cool-wet seasons, preventive planning | ⭐ Early ID allows treatment; resistant varieties and cultural controls available |
| New Zealand Spinach (Tetragonia) - Alternative Variety Heat Tolerance | 🔄 Moderate: different cultivation (spacing, trellis, seed prep) | ⚡ Low–Medium: prefers warm soil, less water once established, trellis support | 📊 Good summer production; ⭐ Continuous harvest in heat where true spinach bolts | 💡 Warm climates, summer production, growers needing heat-tolerant greens | ⭐ Heat tolerance, extended season, low disease pressure, continuous yield |
Next Steps for Your Spinach Growing Journey
7 Key Takeaways
- Mature Savoy Spinach – Rich texture and peak harvest cues
- Flat-Leaf Spinach – Space saving and fast germination
- Bolting Spinach – Identify flower stalks before leaf decline
- Baby Spinach – Harvest microleaves at 2–3 weeks
- Nutrient Deficiency – Spot yellowing leaves for iron or nitrogen
- Downy Mildew – Prevent with airflow and organic sprays
- New Zealand Spinach – Thrive in hot seasons when regular spinach stalls
“Healthy spinach starts with strong roots and precise timing for every growth phase.”
Actionable Next Steps
- Test soil pH and amend with compost or lime for balanced nutrients
- Schedule weekly leaf inspections to catch deficiencies early
- Rotate planting spots each season to reduce disease risk
- Install shade cloth when temperatures exceed 80°F for bolting control
- Water at soil level twice weekly to prevent downy mildew
- Share your “spinach pictures of the plant” with online forums for feedback
Why These Steps Matter
Mastering each stage from seed to harvest ensures a consistent, thriving crop. By following targeted care notes you reduce waste and boost yields. These methods build confidence whether you’re a beginner or an experienced grower.
Your best spinach photos capture not just foliage but the story of patient watering, timely feeding, and proactive disease checks. Perfecting these techniques unlocks nutrient-dense harvests for salads, smoothies, and meal prep.
Growing spinach is more than a gardening task – it’s a sustainable practice that enriches soil health and your plate. Embrace these next steps to transform your garden into a reliable source of fresh greens season after season.
Keep photographing each growth milestone and use your best shots to track progress and inspire other gardeners. Your journey doesn’t end at harvest – it evolves with every new leaf.
Ready to turn your spinach pictures of the plant into a thriving harvest? Explore premium heirloom seeds, tailored grow kits, and expert guides at Homegrown Garden. Start growing smarter today with Homegrown Garden.

