


So, you’re ready to start a container garden? It’s easier than you think. The whole process really just boils down to a handful of key decisions. If you can pick a sunny spot, choose the right pots and soil, and start with some easy-to-grow plants, you're already most of the way there.
Get these fundamentals right, and you'll be amazed at how quickly you can turn a bare patio into a green, productive space.
Your 7-Step Quick Start Container Gardening Guide
Container gardening is the perfect way to grow your own fresh herbs, veggies, and flowers, especially when you don't have a traditional yard. You can turn any patio, balcony, or sunny window into your own little farm. This guide is all about getting you started with practical, confidence-building steps—no complex horticultural jargon, just what you need to get your hands dirty and see results.
The idea is to sidestep the common pitfalls that trip up new gardeners. Things like overwatering or using the wrong soil can be really discouraging, so we'll focus on a proven approach that sets you up for success from day one.
The 4 Foundations for a Thriving Garden
Before we jump into the step-by-step, let's look at the 4 absolute must-haves for any container garden. Think of these as the building blocks. Nailing these basics from the start will save you a ton of headaches later.
- A Sunny Spot: Light is everything. Most vegetables and herbs need at least 6 hours of direct sun every day to really flourish.
- The Right Container: Your pot needs to give roots room to grow, but the most important feature is good drainage. Soggy roots are unhappy roots.
- Good Potting Mix: This is non-negotiable. You can't just scoop up dirt from your yard; it's too dense. A quality potting mix is designed for container life.
- Beginner-Friendly Plants: Start with plants known for being resilient. It’s a great way to guarantee a rewarding harvest and build your confidence.
When you plant in a container, you're creating a custom-made world for your plant. It’s up to you to provide everything it needs—the right soil, the right amount of light, and just enough water—to thrive.
To help you get started, here's a quick cheat sheet with our top recommendations for beginners.
Container Gardening At a Glance
| Component | Beginner Recommendation | Why It Matters |
|---|---|---|
| Location | A south-facing patio or balcony | This spot typically gets the most direct sunlight throughout the day, which is crucial for fruiting plants like tomatoes and peppers. |
| Container | A 5-gallon fabric grow bag or plastic pot with drainage holes | Fabric bags offer excellent aeration, preventing root rot. A 5-gallon size is versatile enough for larger plants like tomatoes or a mix of smaller herbs. |
| Soil | High-quality, all-purpose potting mix (not garden soil) | Potting mix is lightweight, drains well, and is sterile, which prevents soil-borne diseases from taking hold in the confined space of a pot. |
| Plants | Leaf lettuce, bush beans, basil, or cherry tomatoes | These plants are known for being productive and relatively low-maintenance, giving you a quick and rewarding harvest. |
This table covers the essentials, but the rest of this guide is designed to walk you through the whole process in more detail.
What to Expect From This Guide
Think of this first section as your roadmap. We’ll cover the seven key steps to get your garden up and running, from choosing that perfect 5-gallon tomato pot to mastering the simple "finger test" for watering. Each section that follows will dive deeper, giving you all the details you need to grow with confidence. Let's get started
Step 1: Choosing the Perfect Pot and Location
When you’re starting a container garden, the two most critical decisions you'll make right out of the gate are your pots and where you put them. Think of it as creating a tiny, self-contained world for your plants. Getting these fundamentals right from day one is the secret to a healthy, thriving garden.
Choosing the right container is about so much more than just aesthetics. The material, size, and especially the drainage directly impact your plant's health, how often you'll need to water, and how much room its roots have to spread out and grow strong.
5 Tips for Picking the Perfect Container
Walking into a garden center can be a bit overwhelming with all the choices. You've got terracotta, plastic, fabric, glazed ceramic—the list goes on. Each one has its own personality. Terracotta, for example, is porous and breathes well, which is great for plants that hate "wet feet," but it also dries out in a flash on a hot day. Fabric pots are fantastic for root aeration but are even thirstier.
For anyone just starting, I almost always recommend plastic pots. They’re light, inexpensive, and fantastic at holding onto moisture, giving you a nice buffer if you occasionally forget to water. It’s no surprise that plastic containers make up around 60% of sales in the household planter market for these very reasons.
But material is only half the story. Size is a huge deal. It’s tempting to grab those smaller, cute pots, but they seriously limit root growth and will stunt your plants.
Giving your plants enough room to grow is one of the easiest ways to ensure a bigger harvest. A cramped plant is a stressed plant, and a stressed plant won't produce much fruit or foliage.
So, what should you actually look for? Here are five key things I always check for when picking out containers:
- Drainage is a Must: This is my number one rule. Your pot absolutely must have holes in the bottom. No exceptions. If you find the perfect pot and it doesn't have any, drill a few yourself. Without proper drainage, water pools at the bottom, and the roots will rot. It's the fastest way to kill a container plant.
- Bigger is Better: A larger pot holds more soil, which means it can hold more water and more nutrients. For most vegetables—think tomatoes, peppers, zucchini—a 5-gallon pot is the bare minimum you should consider. In fact, university trials have shown that plants in 5- to 7-gallon pots can yield 20-30% more than those crammed into smaller containers.
- Match Material to Your Habits: Be honest with yourself. Are you an over-waterer or an under-waterer? If you live in a hot climate or tend to forget, a plastic or glazed ceramic pot that retains moisture is your best friend. If you’re a little too enthusiastic with the watering can, a breathable fabric pot can be a real lifesaver.
- Think About the Weight: A big pot filled with damp soil gets heavy—fast. If you like to move your plants around to chase the sun or bring them indoors, stick with lightweight options like plastic or fabric. If they’re staying put, heavier materials like concrete or thick ceramic are perfectly fine.
- Pair the Pot with the Plant: A tiny 1-gallon pot is perfect for small herbs like thyme or basil. Leafy greens like lettuce and spinach do great in wider, trough-style planters. But that single tomato plant? It really needs a deep, 5-gallon pot to build the massive root system required to produce lots of fruit. For a deeper dive, check out our guide on advanced container gardening tips.
This flowchart can help you think through whether your chosen spot and plant are a good match.
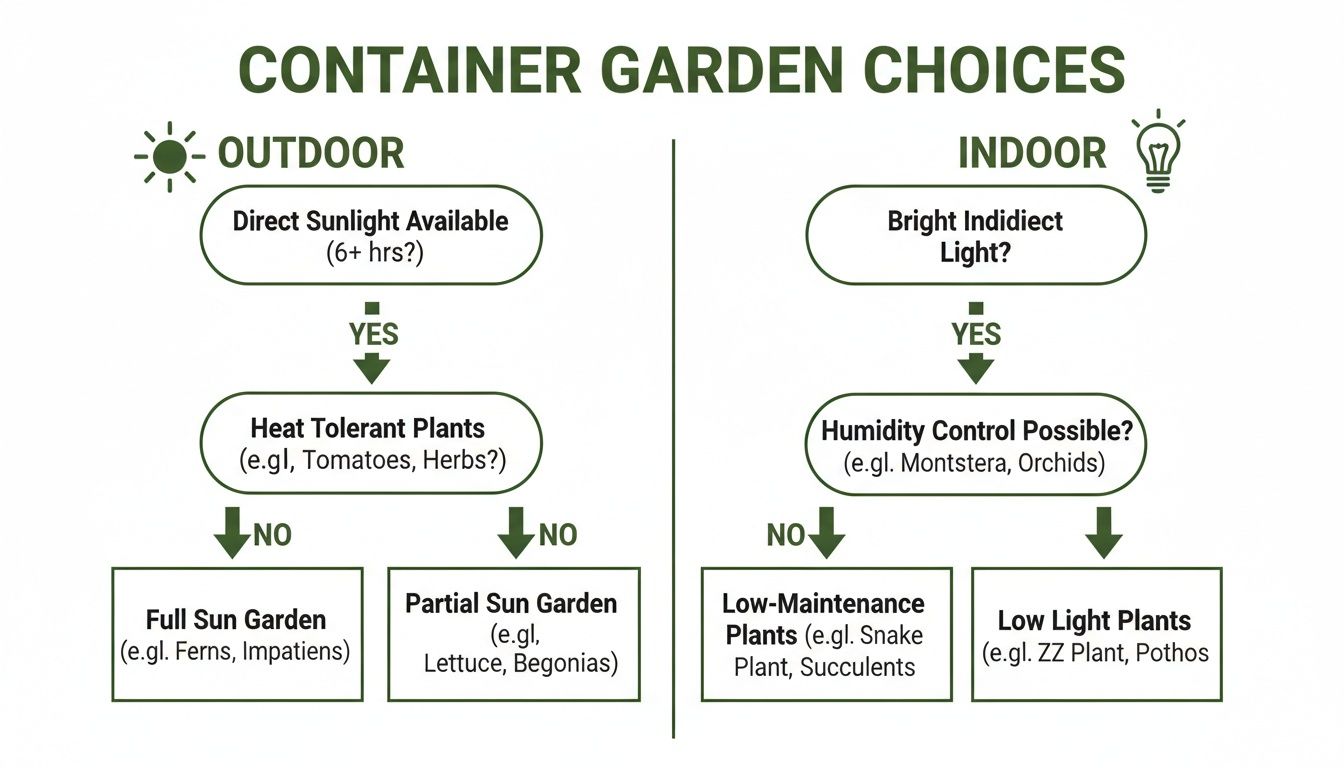
The key takeaway here is that outdoor gardening is a game of managing sunlight and temperature, while success indoors is all about providing the right artificial light and humidity.
How to Find the Best Location
Once you’ve got your pots, it’s time to scout the perfect home for them. The number one factor? Sunlight.
The vast majority of vegetables, fruits, and flowers need at least 6-8 hours of direct sunlight every single day to really flourish. Anything less, and you’ll likely end up with sad, spindly plants and a disappointing harvest.
Before you start planting, I highly recommend spending a day "sun mapping" your space. It sounds technical, but it’s simple. Just pop outside to your balcony, patio, or yard every couple of hours and take note of which spots are getting direct sun and for how long. You might be surprised to find that the spot you assumed was sunny all day only gets a few hours of intense afternoon light. This little exercise is the single best way to make sure you’re putting your plants in a place where they can truly succeed.
Step 2: Selecting The Best Soil And Plants For Success
Alright, you've picked out your containers and found the perfect sunny spot. Now for the most important part: what you fill them with.
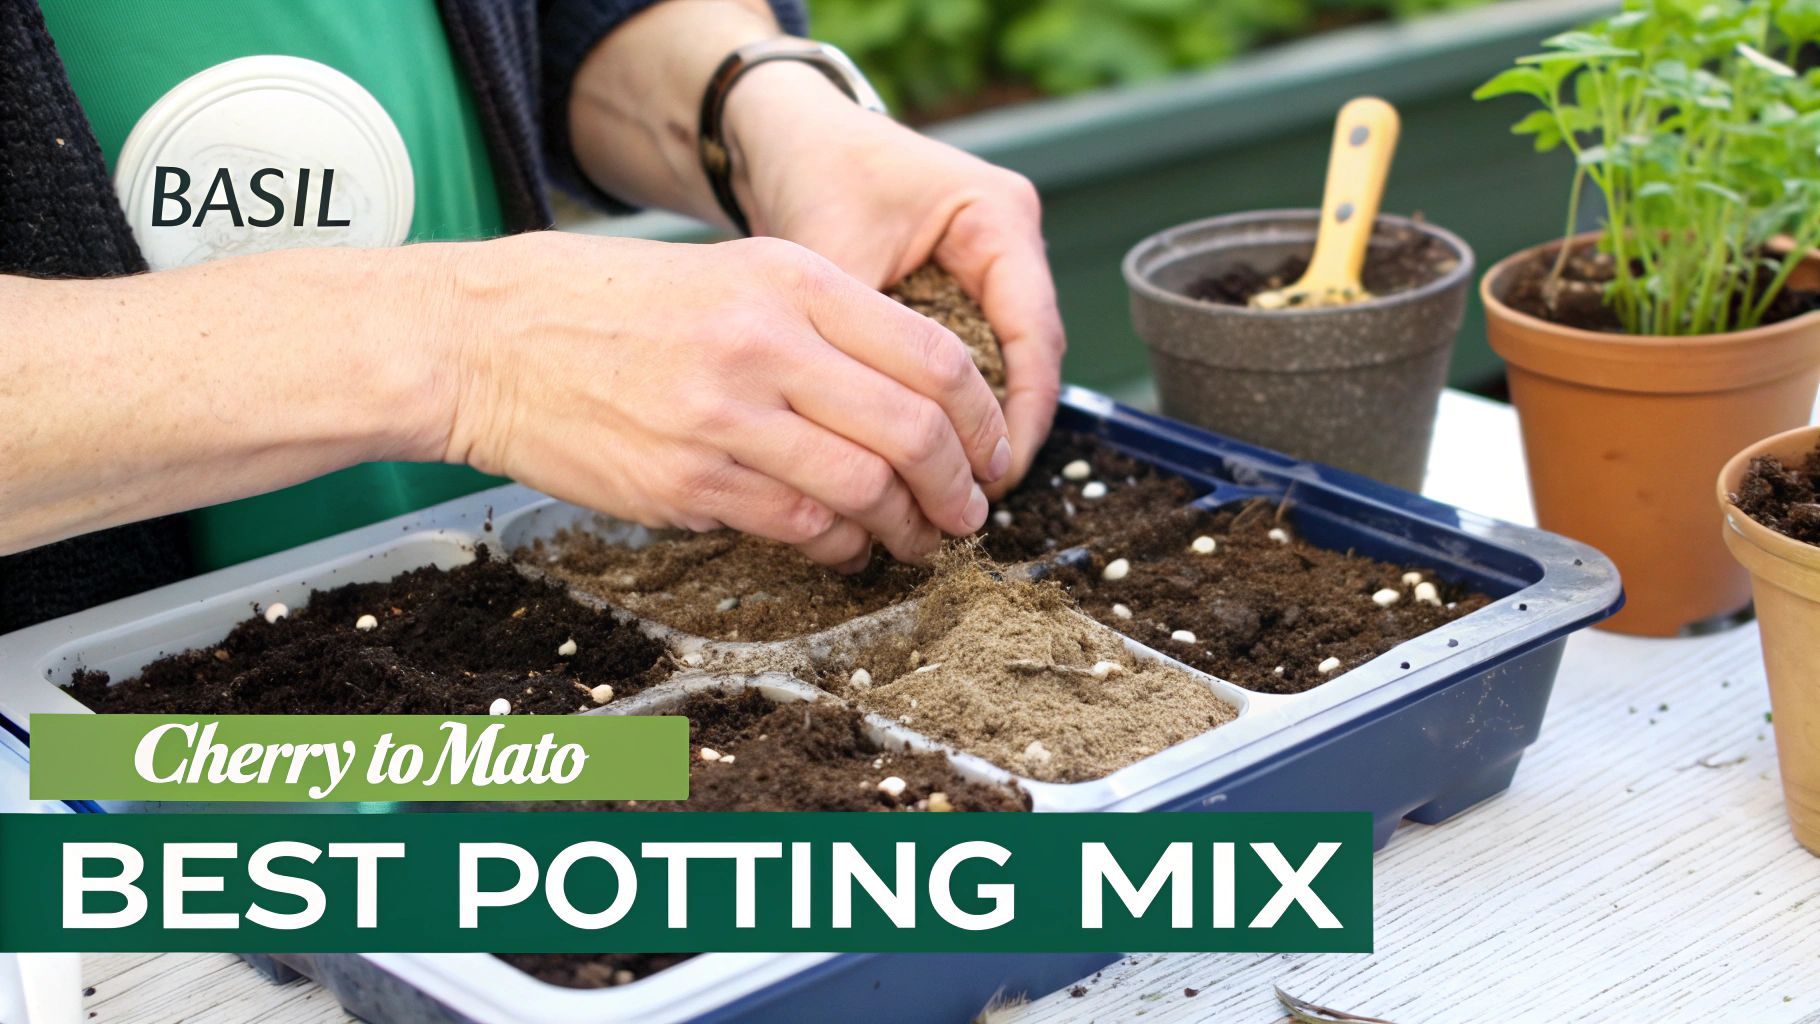
I can't stress this enough—don't just scoop dirt from your garden into a pot. It's a classic rookie mistake. Garden soil is heavy and dense. After a few waterings, it compacts into a brick-like mass, suffocating your plant's roots. It's one of the fastest ways to kill a container plant.
You absolutely need to use a dedicated potting mix. Think of it less as "dirt" and more as a perfectly engineered growing environment, designed specifically for the unique conditions of a pot.
3 Components That Make A Great Potting Mix
A good potting mix is light, fluffy, and strikes a delicate balance between holding moisture and letting the excess drain away. This is the secret to happy, healthy roots, and happy roots are the foundation of a thriving plant.
Most high-quality mixes you'll find are built from a few key ingredients:
- Peat Moss or Coco Coir: This is the spongy base of the mix. It's fantastic at holding onto water and nutrients, releasing them to the plant's roots as needed.
- Perlite or Vermiculite: Those little white specks you see? That's usually perlite. This lightweight volcanic material creates tiny air pockets throughout the mix, which is crucial for preventing compaction and allowing roots to breathe.
- Compost or Worm Castings: This is the good stuff—the life of the party. It provides a slow, steady supply of essential nutrients and introduces beneficial microbes, creating a vibrant little ecosystem right in your pot.
For anyone just starting out, grabbing a bag of all-purpose potting mix from the garden center is a foolproof way to get going.
My Go-To 3-Ingredient DIY Potting Mix
If you're feeling a bit more adventurous or just want to have more control, making your own potting mix is incredibly easy and often works better than store-bought options. It's a simple recipe I've used for years.
In a wheelbarrow or a large tub, just combine equal parts of these three things:
- 1 Part Peat Moss or Coco Coir (for moisture)
- 1 Part Compost (for nutrients)
- 1 Part Perlite (for drainage and aeration)
Give it a good mix with your hands or a small shovel, and that's it. You've created a premium, all-purpose growing medium that’s perfect for almost any vegetable, herb, or flower you want to plant. This simple 1:1:1 ratio is a true game-changer.
To kick off your own setup, grab pots with drainage holes—80% of newbie failures come from root rot. Fill with a 1:1:1 mix of potting soil, compost, and perlite for killer drainage. Pick sun-lovers like basil or cherry tomatoes for quick wins; they yield up to 10 pounds per plant in a 5-gallon pot over summer. Discover more insights on the gardening pots market.
11 Easy-to-Grow Plants for Your First Garden
With your soil ready, it's time for the really fun part—deciding what to grow! My advice is always to start with plants that are known to be resilient and productive. Getting a successful first harvest is a huge confidence booster.
Here are 11 of the easiest plants to get started with, all of which are perfectly happy living in a pot. If you're looking for even more options, check out our guide on the best vegetables for containers.
| Plant Type | Recommended Pot Size | Sunlight Needs | Watering Frequency |
|---|---|---|---|
| Basil | 1-2 Gallon Pot | 6-8 Hours (Full Sun) | When top inch of soil is dry |
| Mint | 2-3 Gallon Pot | 4-6 Hours (Partial Sun) | Keep soil consistently moist |
| Chives | 1 Gallon Pot | 6-8 Hours (Full Sun) | Water when soil is dry |
| Cherry Tomatoes | 5+ Gallon Pot | 8+ Hours (Full Sun) | Water deeply, daily in heat |
| Leaf Lettuce | 3-5 Gallon (Wide) | 4-6 Hours (Partial Sun) | Keep soil consistently moist |
| Radishes | 1 Gallon (6" Deep) | 6+ Hours (Full Sun) | Keep soil consistently moist |
| Bush Beans | 3-5 Gallon Pot | 6-8 Hours (Full Sun) | Water when top inch is dry |
| Peppers | 3-5 Gallon Pot | 8+ Hours (Full Sun) | Water deeply when soil dries |
| Marigolds | 1-2 Gallon Pot | 6-8 Hours (Full Sun) | Allow soil to dry between waterings |
| Petunias | 2-3 Gallon / Basket | 6+ Hours (Full Sun) | Water when top inch is dry |
| Nasturtiums | 2-3 Gallon Pot | 6+ Hours (Full Sun) | Water sparingly; dislikes wet feet |
Choosing any of these varieties will set you up for a rewarding experience, giving you delicious herbs, fresh veggies, or beautiful flowers with minimal fuss.
Step 3: Planting, Watering, and Feeding Your Garden
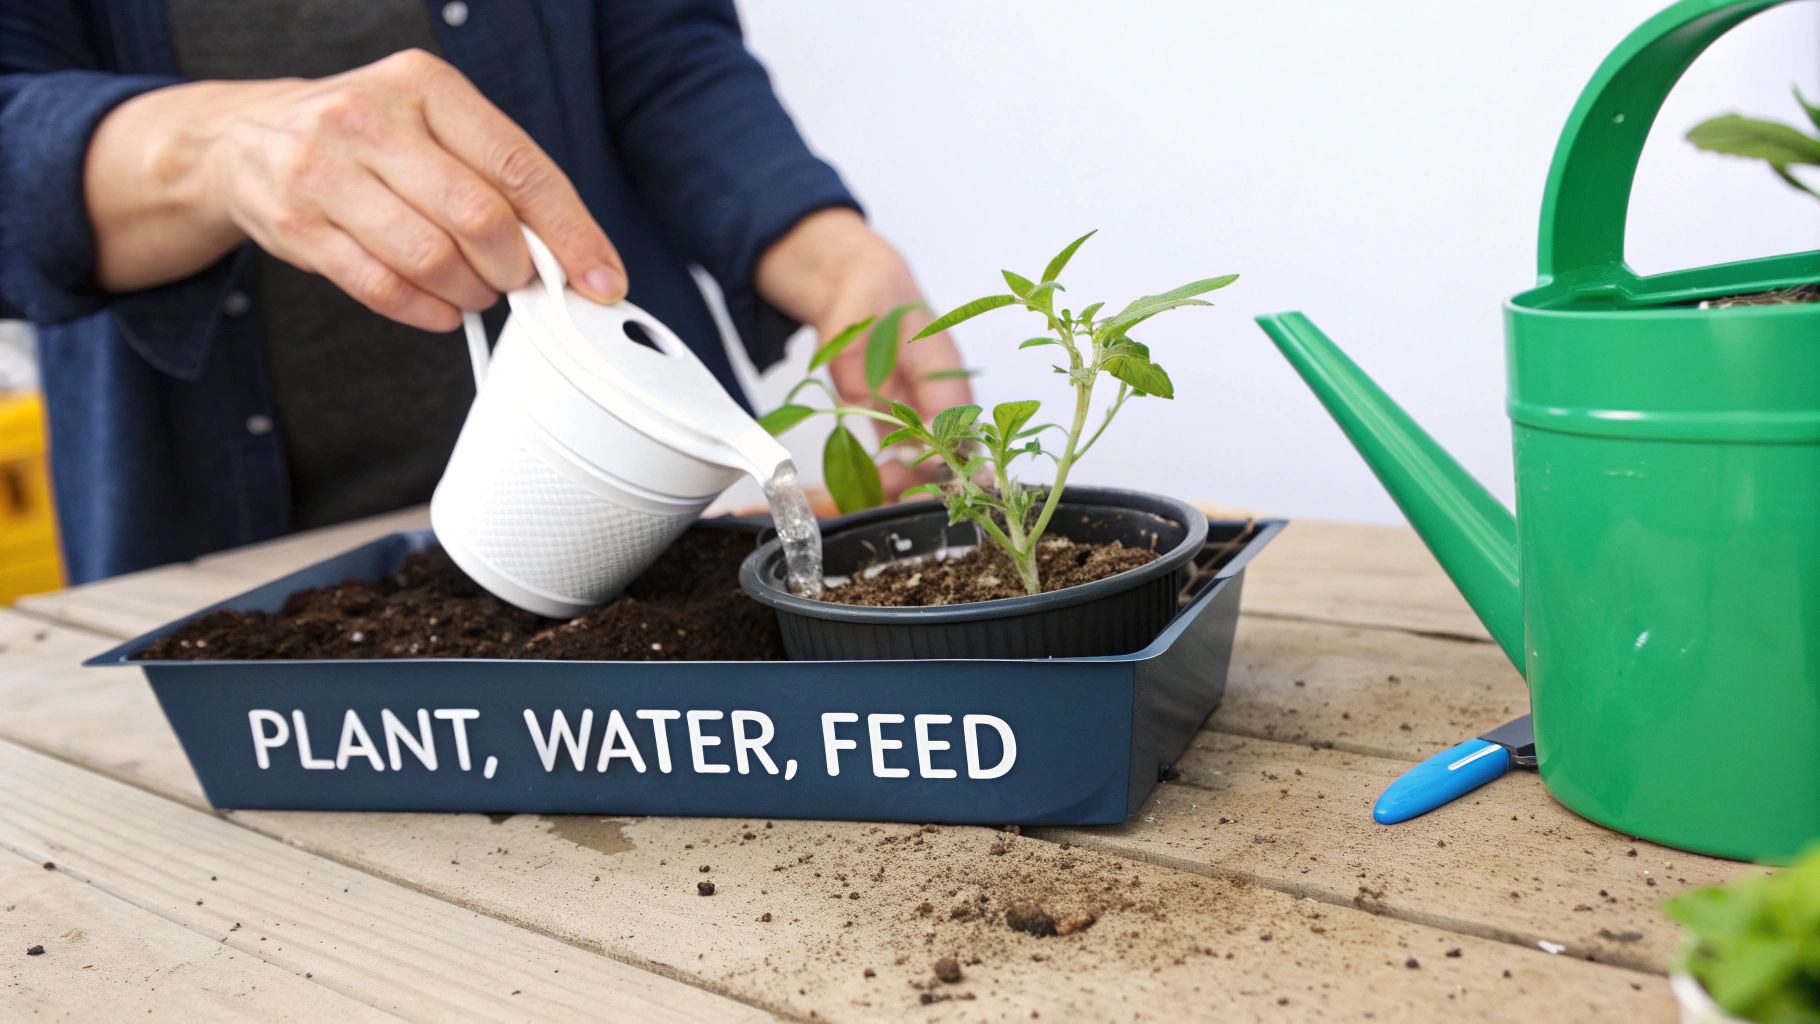
Alright, you've got your containers, soil, and plants picked out. Now for the fun part—getting your hands dirty and bringing your garden to life. This is where all the planning pays off.
Getting these next few steps right is what separates a sad, struggling plant from one that thrives. Nailing your planting technique gives roots the best possible start. Smart watering avoids the number one killer of potted plants: root rot. And a simple feeding routine provides the fuel your plants need for a fantastic harvest.
5 Steps for Potting Your Plants Perfectly
Moving a plant from that flimsy nursery pot into its new home is a big moment for it. Your goal here is to make the transition as stress-free as possible so it can settle in and start growing right away.
- Hydrate Before You Transplant: Give your plant a good soak about an hour before you plan to repot it. This simple trick helps the whole root ball slide out cleanly and seriously reduces transplant shock.
- Prepare the New Container: Fill your pot about two-thirds of the way with pre-moistened potting mix. Then, dig out a little well in the center that's roughly the size of the plant's current pot.
- Gently Remove the Plant: Never pull a plant out by its stem! Instead, tip the pot on its side and give it a few gentle taps or squeezes. Support the base of the plant as you guide the entire root ball out.
- Inspect and Loosen the Roots: Take a look at the roots. If they're a tangled, circular mass (we call this being root-bound), you need to gently break them up with your fingers. This encourages them to grow out into the new soil instead of strangling themselves.
- Plant at the Correct Depth: Set the plant in the hole you made. The top of its root ball should be about an inch below the rim of the pot. Fill in the surrounding space with more soil, patting it down gently to get rid of any air pockets. A crucial tip: Do not bury the stem. Piling soil up against the stem can cause it to rot, a common issue with plants like tomatoes.
Once it's all tucked in, give your newly potted plant a nice, thorough watering. This helps the soil settle in around the roots and gives it a welcome drink after the move.
Mastering the Art of Watering
I can't say this enough: more container plants die from overwatering than from anything else. In a pot, there’s nowhere for that extra water to go, and it quickly suffocates the roots. The real secret isn't a strict schedule, but learning to listen to your plants.
The best way to do this is the good old 'finger test'. Stick your finger about two inches down into the soil. If it feels dry, it's time to water. If you feel moisture, wait another day and check again. It’s that simple.
Your watering needs will change constantly. A small herb in a big plastic pot might only need water once a week. But a huge tomato plant in a terracotta pot during a July heatwave? You'll probably be watering that thing every single day.
When it's time to water, be generous. Water slowly and deeply until you see it running out of the drainage holes. This ensures the entire root system gets a drink, not just the topsoil.
A Simple Guide to Feeding Your Plants
Plants in containers are working with a limited supply of nutrients. They’ll eventually use up everything in that pot, so it's our job to restock the pantry. Think of fertilizer as the meal they need to power through growing, flowering, and making delicious veggies.
The easiest approach is to use a balanced, all-purpose liquid fertilizer. You can find fantastic organic options like fish emulsion or liquid kelp that are gentle on plants and packed with micronutrients.
For most vegetables and flowers, this simple 4-step schedule works wonders:
- Start feeding two to three weeks after planting. This gives the roots time to get established first.
- Feed every two to four weeks during the main growing season.
- Always water the plant before you fertilize. Applying fertilizer to dry soil can burn the roots.
- Follow the directions on the package! When it comes to fertilizer, more is definitely not better.
Step 4: Keeping Your Garden Healthy and Pest-Free
So, you’ve got everything planted. Your containers are looking great. But the work isn’t quite done—now the real fun begins. Keeping your garden thriving is all about consistent, simple care. Think of it less as a chore and more as a series of small, satisfying rituals.
This ongoing attention—a little pruning here, checking for pests there—is what really separates a decent garden from a fantastic one. It’s how you encourage stronger growth, more flowers, and a bigger harvest, making sure all your initial effort pays off week after week.
6 Essential Habits for Garden Maintenance
The best way to stay on top of your garden's needs is to build a simple routine. You don't need to block out hours on your calendar; just a few minutes every couple of days makes a world of difference. When you catch the little issues early, they never get a chance to become big problems.
These habits quickly become second nature and a genuinely rewarding part of connecting with your plants.
-
Deadhead Your Flowers: Once a bloom starts to look tired and faded, just pinch it off right where it meets the stem. This is called deadheading, and it’s a game-changer. It tells the plant to stop wasting energy on making seeds and instead pour that power into producing more beautiful flowers.
-
Prune for Fuller Growth: Have you noticed how herbs like basil and mint can get tall and a bit scraggly? If you regularly pinch off the top sets of leaves, you’ll encourage them to grow outwards, becoming much fuller and bushier. The bonus? You get more to harvest.
-
Harvest Often: Especially with leafy greens and herbs, frequent harvesting is a form of maintenance. The more you pick, the more the plant is stimulated to produce. Don't be shy about snipping off what you need for dinner tonight!
-
Keep Things Tidy: Pull off any yellowing or dead leaves from your plants and clear them off the soil’s surface. This simple cleanup job improves air circulation around the plant and gets rid of perfect hiding spots for pests and diseases.
-
Be a Pest Detective: The best defense is a good offense. Every few days, take a moment to peek under the leaves and check along the stems. Spotting pests early is the absolute key to managing them without a fuss.
-
Rotate Your Pots: If one side of a plant seems to be growing more vigorously than the other, it's probably reaching for the sun. Just give the pot a quarter turn every week or so. This ensures all sides get their fair share of light for balanced, even growth.
A proactive approach to garden care will always beat a reactive one. By making these small tasks a regular habit, you're not just fixing problems—you're preventing them from ever starting.
Tackling Pests the Natural Way
It’s always a little disheartening to find pests on your prized plants, but whatever you do, resist the urge to grab a harsh chemical spray. Your container garden is a mini-ecosystem. You can absolutely manage unwanted visitors with effective, natural methods that are safe for you, your pets, and the good bugs.
One of the smartest strategies right from the start is companion planting. This age-old technique is all about pairing plants that help each other out. For fending off pests, it’s incredibly effective; for example, planting marigolds can deter root-knot nematodes with up to 85% efficiency. For an extra layer of protection and a health boost, organic compost teas can increase your yields by 20-40%. You can dig deeper into the data in this report on the gardening pots market.
3 Common Pests and Simple, Organic Solutions
Here are 3 of the usual suspects you might find in your garden, along with some easy, organic ways to show them the door:
-
Aphids: These tiny, pear-shaped insects love to hang out in clusters on fresh new growth. Often, a strong blast of water from a hose is enough to knock them right off. If they’re being stubborn, a simple solution of insecticidal soap or neem oil will do the trick.
-
Spider Mites: If you see delicate, fine webbing on your plants, you’ve probably got spider mites. These guys thrive in hot, dry conditions, so simply misting your plants to increase the humidity can deter them. Neem oil is also an excellent and safe way to get them under control.
-
Fungus Gnats: These little black flies are more annoying than anything else, especially for indoor plants. They lay their eggs in damp soil. The easiest fix is to let the top inch or two of your soil dry out completely between waterings, which breaks their life cycle.
Learning to spot these common culprits lets you act fast. For a more in-depth guide, check out our complete walkthrough on natural pest control for plants. This approach not only keeps your food safe to eat but also fosters a much healthier garden environment overall.
Step 5: Answering 4 Common Container Gardening Questions
Even the most seasoned gardeners had questions when they started out. It’s a natural part of the learning process. Let's walk through 4 of the most common hurdles you might encounter, so you can feel confident as you get your hands dirty.
1. What’s the Real Cost to Get Started?
Getting a container garden off the ground is one of the most affordable ways to get into gardening. For a solid starter setup, you can realistically expect to spend between $50 and $150.
What does that get you? This budget usually covers the basics for a nice little patio garden: five to seven medium-sized plastic pots (around $5 to $10 each), a big bag of quality potting mix ($15 to $25), and a handful of seed packets or plant starts (which typically cost $3 to $6 apiece).
If you want to keep that initial cost down, think like a resourceful gardener. Old buckets, bins, or even sturdy bags can make great planters—just be absolutely sure to drill plenty of drainage holes. Also, keep an eye out for end-of-season sales at local nurseries; you can often snag pots and leftover plants for a steal. It might seem like an upfront expense, but the taste of your first homegrown tomato makes it all worth it.
2. Can I Just Scoop Some Dirt from My Yard into a Pot?
I hear this question all the time, and the answer is a hard no. In fact, using soil straight from your garden is probably the single biggest mistake a new container gardener can make.
Garden soil is heavy, dense, and full of clay and silt. In the open ground, that’s fine. But once you confine it to a pot, it compacts into a solid brick as soon as you water it. This squeezes out all the air, suffocating the roots and preventing water from draining away.
The result? The number one killer of potted plants: root rot. Instead, you have to use a product specifically labeled "potting mix." These mixes are lightweight blends of things like peat moss, coco coir, and perlite, engineered to hold moisture while still allowing for excellent drainage and airflow—exactly what your plants need to thrive in a container.
A successful container garden is built from the ground up. Using the right potting mix isn't just a suggestion; it's the foundation for healthy roots and happy plants.
For those curious about the future of indoor cultivation, some of the most fascinating developments are in high-tech solutions like AI-regulated indoor gardens and green walls, which take these principles to a whole new level.
3. How Often Do I Need to Change the Soil in My Pots?
For annuals—things like vegetables and flowers that live their whole life in one season—it's a best practice to start with fresh potting mix every spring. Think of it this way: over the growing season, your plants have eaten up most of the nutrients in that soil.
On top of that, the mix itself breaks down, losing its light, airy structure. You can try to amend old soil with fresh compost and fertilizer, but for a beginner, it's often more trouble than it's worth. Starting fresh each year is the simplest way to give your new plants a clean slate and the best shot at success.
If you have perennials in pots (plants that live for several years), you don't need to replace all the soil. Just scrape off the top inch or two each spring and "top dress" it with a fresh layer of compost.
4. What are the 5 Easiest Veggies for a Beginner?
Starting with the right plants can make all the difference. You want something that grows without too much fuss and gives you a rewarding harvest pretty quickly. That's how you build confidence.
Here are 5 foolproof options to get you started:
- Leafy Greens: Loose-leaf lettuce and spinach are incredibly fast. You can start snipping outer leaves in just a few weeks, and they’ll keep producing for ages.
- Radishes: For near-instant gratification, nothing beats radishes. Many varieties are ready to pull in about a month.
- Bush Beans: These are wonderfully productive and stay compact, so you don't need a big trellis. A 3- to 5-gallon pot is perfect for them.
- Herbs: Basil, mint, parsley, and chives are practically bomb-proof in containers and are so useful in the kitchen.
- Cherry Tomatoes: A classic for a reason! Just make sure you grab a "determinate" or "patio" variety. They’re bred to stay smaller and are perfect for pots. You'll be amazed at how much fruit you can get from one plant in a 5-gallon bucket.
Ready to start your own container garden? At Homegrown Garden, we have everything you need, from heirloom seeds to beginner-friendly kits, all backed by comprehensive grow guides. Explore our collections and start growing today at https://www.homegrown-garden.com.

