


Propagating your own strawberry plants is one of the easiest and most satisfying ways to get more fruit for free. Instead of buying new plants every few years, you can simply create new ones from the plants you already have. The most common ways to do this are by rooting runners (those long stems that shoot out from the mother plant), dividing mature plant crowns, or, for the more patient gardener, growing from seed.
Why Bother Propagating Strawberry Plants?
Creating more strawberry plants from your existing patch is a fantastic garden project. It’s not just about saving a few bucks; it’s about keeping your strawberry bed healthy and productive for years to come. After about three or four seasons, you'll notice your original plants start to slow down and produce fewer, smaller berries. Propagation is your ticket to replacing these tired old-timers with fresh, vigorous plants ready to deliver a huge harvest.
When you propagate, you're essentially cloning your best-performing plants. This means you get to keep the exact flavor and size of the berries you love most. It's also a perfect way to fill in any sparse spots in your garden or even start a whole new strawberry pot for the patio. This simple technique is so effective, it's a major reason why global strawberry production skyrocketed by 8.4 million tonnes between the 1960s and 2022. You’re using the same methods that have helped make strawberries a worldwide favorite!
The Best Reasons to Multiply Your Plants
Learning to propagate your strawberries is a skill that keeps on giving. It's a cornerstone of smart, sustainable gardening.
- Expand for Free: Why buy new plants when you can double or triple your patch for nothing? This saves a surprising amount of money over time.
- A Healthier, Happier Patch: Swapping out older, less productive plants with energetic young ones breathes new life into your strawberry bed and boosts your overall yield.
- Keep Your Favorites: If you have a strawberry variety that’s a real winner—extra sweet or huge—propagation makes perfect genetic copies so you can enjoy those traits forever.
- The Perfect Gardener's Gift: A healthy, rooted strawberry runner potted up makes a thoughtful and personal gift for friends and family.
Propagating your own plants puts you in the driver's seat. You control their health from day one, starting them in great, nutrient-rich soil for a much stronger foundation than you might get from a big-box store.
This is also a great gateway into the broader world of making new plants from old ones. If this is new territory for you, we have plenty of resources to help. For a look at the bigger picture, check out our guide on easy plant propagation for other plants you might be growing. You'll find the basic ideas are often quite similar.
Choosing the Right Method for You
So, what's the best way to get started? Here’s a quick rundown of the three main methods for propagating strawberries. Each has its own pros and cons, so you can pick the one that best fits your garden, your timeline, and your experience level.
Strawberry Propagation Methods at a Glance
This table gives a quick comparison of the main strawberry propagation methods to help you choose the best approach for your garden.
| Method | Difficulty Level | Time to Fruit | Success Rate |
|---|---|---|---|
| Runners (Stolons) | Easy | Next Season | Very High |
| Crown Division | Medium | Next Season | High |
| Seeds | Hard | 1-2 Years | Low to Medium |
For most gardeners, rooting runners is the fastest and most foolproof option. Crown division is a great way to revitalize older plants, and growing from seed is a fun experiment for those who love a good challenge.
1. How to Propagate Strawberries From Runners
Hands down, the easiest and most popular way to get more strawberry plants is by using their runners, which are also called stolons. If you've ever grown strawberries, you've seen these long, leafless stems that shoot out from the main plant. They’re nature’s perfect cloning system, designed to create identical baby plants. All you have to do is give them a little help.
The ideal time to get this done is late summer or early fall, right after your plants have finished their main fruiting for the year. This is when the mother plant naturally switches its focus from making berries to making babies. You'll see runners starting to creep across the garden bed, with tiny plantlets forming along them. These are your future fruit producers.
Choosing the Right Runners to Propagate
You'll quickly notice that not all runners are created equal. For the best chance of success, you'll want to be a bit selective. Always pick runners from your healthiest, most productive parent plants—the ones that gave you the best berries. Look for runners that are thick and strong, not the thin, wispy ones.
A single runner might try to produce a whole chain of little plantlets. Here's a pro tip: the first one or two plantlets closest to the mother plant are always the strongest. They get the lion's share of the nutrients and will establish roots much faster. I always snip the runner just after the second plantlet to force all that good energy into developing those first two.
By focusing on the first one or two plantlets per runner, you ensure each new plant gets a powerful start. This simple step dramatically increases your success rate and leads to more fruit the following season.
This basic idea of selecting the best offspring is what drives commercial agriculture. For example, in the United States, where 90% of fresh strawberries are grown in California, growers rely on propagating high-yielding varieties. This kind of smart cultivation has led to a staggering 220% increase in strawberry shipments from California between 2000 and 2019, even while using less land.
This infographic breaks down the three main ways you can propagate strawberries.

As you can see, while division and seeds are definitely options, working with runners is the most direct and reliable path to a bigger harvest.
Two Easy Ways to Root Your Runners
Once you’ve picked your star runners, you’ve got a couple of great options for getting them to root. Both work really well, so it just comes down to what you find easier in your garden.
-
Pegging into the Soil: If you have some empty space in your strawberry patch, this is the simplest method. Gently press the little plantlet down so its base touches the soil. To keep it there, you can use a U-shaped garden pin, a bent piece of wire, or even just a small rock. The key is making sure the node has good contact with the dirt, which tells it to start growing roots.
-
Rooting in a Pot: This is my personal favorite because it creates a self-contained, ready-to-move plant with a perfect root ball. Just grab a small pot, fill it with a good quality potting mix, and set it right next to the mother plant. Pin the plantlet into the pot’s soil, just like you would in the garden. For more info, check out our guide on preparing your garden soil—the principles of good drainage and nutrients are the same.
Give it about four to six weeks, and the plantlet should have a solid root system of its own. You can test it by giving a very gentle tug; if you feel resistance, you're good to go.
Now for the final step: snip the runner that connects the new plant to its mother. You’ve just created a brand-new, independent strawberry plant, ready to be planted in its final home
2. Revitalizing Your Patch with Crown Division
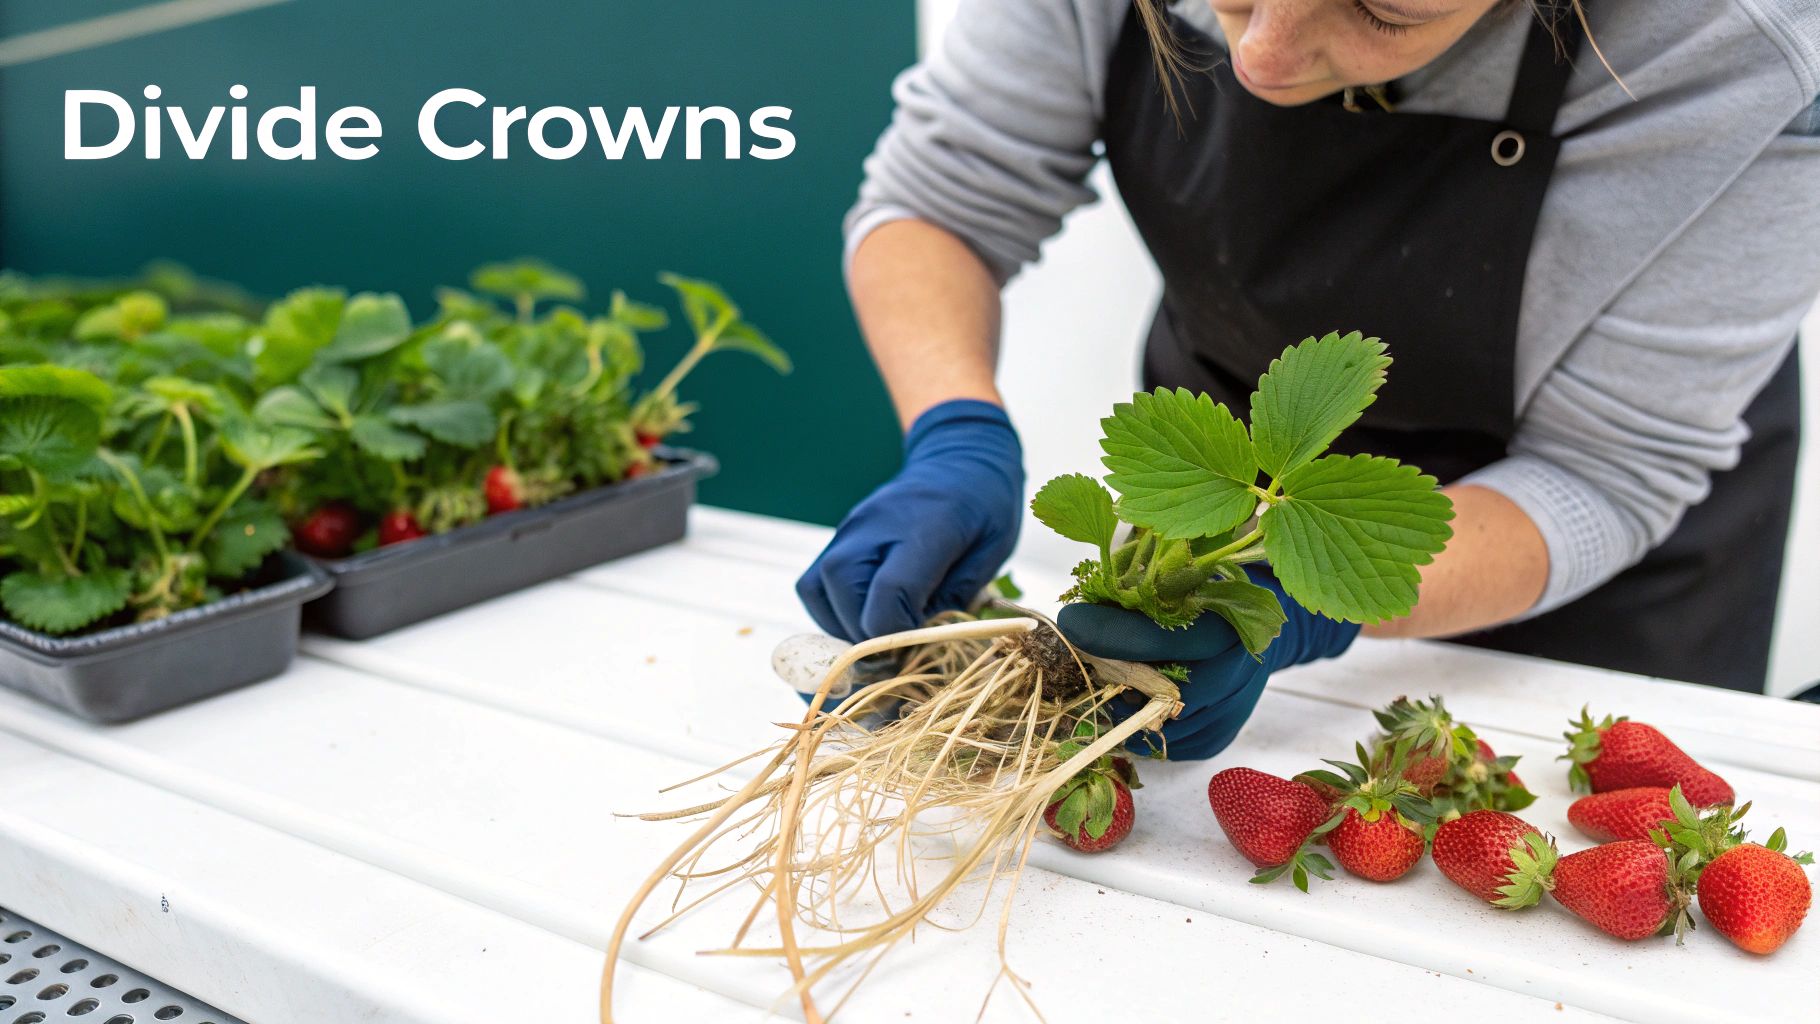
If you've noticed your older strawberry plants are looking a little tired and not producing like they used to, crown division is a fantastic way to bring them back to life. After 3 to 4 years, that original "mother" plant can become a dense, woody clump with multiple crowns, or growth points. This technique is all about carefully separating these individual crowns to create several new, vigorous plants.
The beauty of this method is twofold. First, you get to propagate strawberry plants without spending a dime, effectively multiplying your patch for free. Second, you’re also decongesting the parent plant, which improves airflow and redirects its energy, leading to a much healthier and more fruitful bed overall. It’s like hitting the reset button on your strawberry patch.
Timing is everything here if you want to minimize stress on the plants. The best time to tackle crown division is during the plant's dormant periods—either in early spring right before new growth kicks off, or in the late fall after you've picked your last berry.
Finding and Preparing Your Mother Plant
Your first job is to pick the right plant for the job. You're looking for a large, healthy-looking specimen that’s been a good producer in the past but is now showing its age. Maybe its center looks woody, or perhaps its berry production has noticeably dropped off.
Once you’ve zeroed in on your candidate, grab a garden fork or spade and gently lift the entire plant out of the ground. Make sure to dig wide and deep to get as much of the root ball as you can. After you've lifted it, give it a good shake to knock off the loose soil. This lets you get a clear look at the root system and the cluster of crowns.
How to Divide Strawberry Crowns
Now for the fun part. You'll see that the big clump is actually a collection of smaller, individual plants fused together. Each of these is a potential new plant, as long as it has its own set of roots and leaves.
- Gently Tease Them Apart: Often, you can just pull the crowns apart with your hands. Give them a little wiggle back and forth until they separate. The goal is to make sure each division has a healthy fan of roots attached.
- Use a Sharp Knife: If you're dealing with tougher, woodier crowns, a clean, sharp knife or a hori hori will be your best friend. Make clean, decisive cuts to separate the sections. Again, just be sure each new piece has an adequate root system to support itself.
The real pro-tip when you propagate strawberry plants this way is to discard the old, woody central part of the mother plant. It's past its prime. Focus on replanting the younger, more vigorous crowns from the outer edges—they'll give you the best results.
Once you have your divisions, give them a quick cleanup. Trim off any dead leaves and any roots that are excessively long. Get them back in the ground immediately, planting them at the same depth they were growing before. You want the crown to sit right at the soil line, not below it.
Finally, give them a good, deep watering to help settle them into their new homes and kickstart their next productive cycle.
3. Growing Strawberries from Seed
While most gardeners will opt for runners or division, there's a special kind of satisfaction that comes from starting strawberries from a tiny seed. It’s definitely a test of patience, but for a curious gardener, watching the entire life cycle unfold is an incredible reward.
It’s the ultimate way to propagate strawberry plants from scratch.
One crucial thing to understand right away is that seeds from hybrid strawberries often won't grow "true to type." This just means the new plant and its fruit might be surprisingly different from the parent you took the seed from. If you're working with heirloom or open-pollinated varieties, though, you'll get a perfect clone. For many of us, that genetic lottery is part of the adventure!
Preparing Your Seeds for Germination
Before you even think about planting, strawberry seeds need to be tricked into thinking it's time to grow. Out in nature, they’d sit through a cold winter before sprouting in the spring. We can mimic this natural cycle with a technique called cold stratification.
This step is non-negotiable if you want good germination. Without it, most of your seeds will just stay dormant in the soil, waiting for a winter that never arrives.
- Harvesting Seeds: You can gently scrape the seeds off the skin of a ripe, healthy strawberry. An easier way is often to mash a berry through a fine-mesh sieve, rinsing with water until only the seeds are left. Spread them out on a paper towel and let them dry completely.
- The Cold Treatment: Once dry, place the seeds in a small, sealed plastic bag or a container. Add a little bit of moist sand or a damp paper towel to keep them humid. Don't forget to label it, then stick it in your refrigerator for about 3 to 4 weeks.
Think of cold stratification as creating a "fake winter" for your seeds. This cold, damp period is the essential trigger that tells the seed it's safe to wake up and grow once conditions get warmer.
Sowing and Nurturing Your Seedlings
After their time in the cold, your seeds are ready to be planted. You'll want to start them indoors, usually 10-12 weeks before your area's last expected frost date. This head start is key to getting them strong enough before they have to brave the outdoors.
Always use a sterile, high-quality seed-starting mix. This helps prevent "damping off," a nasty fungal disease that wipes out young seedlings before they even get a chance. Gently press the seeds onto the surface of the moist soil but do not cover them. Strawberry seeds actually need light to germinate.
Mist the surface with water and cover the tray with a plastic dome or even just some plastic wrap to lock in the humidity. Find a warm spot with plenty of indirect light to place the tray. Be prepared to wait—germination can be slow and a bit unpredictable, taking anywhere from one to six weeks. Getting the soil temperature just right can make a huge difference. You can find some great specifics in this seed germination temperature chart.
Once the tiny seedlings pop up and develop a few true leaves, you can take the cover off. When they're big enough to handle without crushing them, it's time to carefully transplant each one into its own small pot. If you're trying a few different varieties, something simple like Sprout Stickers can make it easy to keep track of who's who.
Remember, patience is everything here. It could easily take a full year or even two before you're harvesting your first berries, but trust me, the wait is absolutely worth it.
4. Strawberry Propagation for Small Spaces and Containers
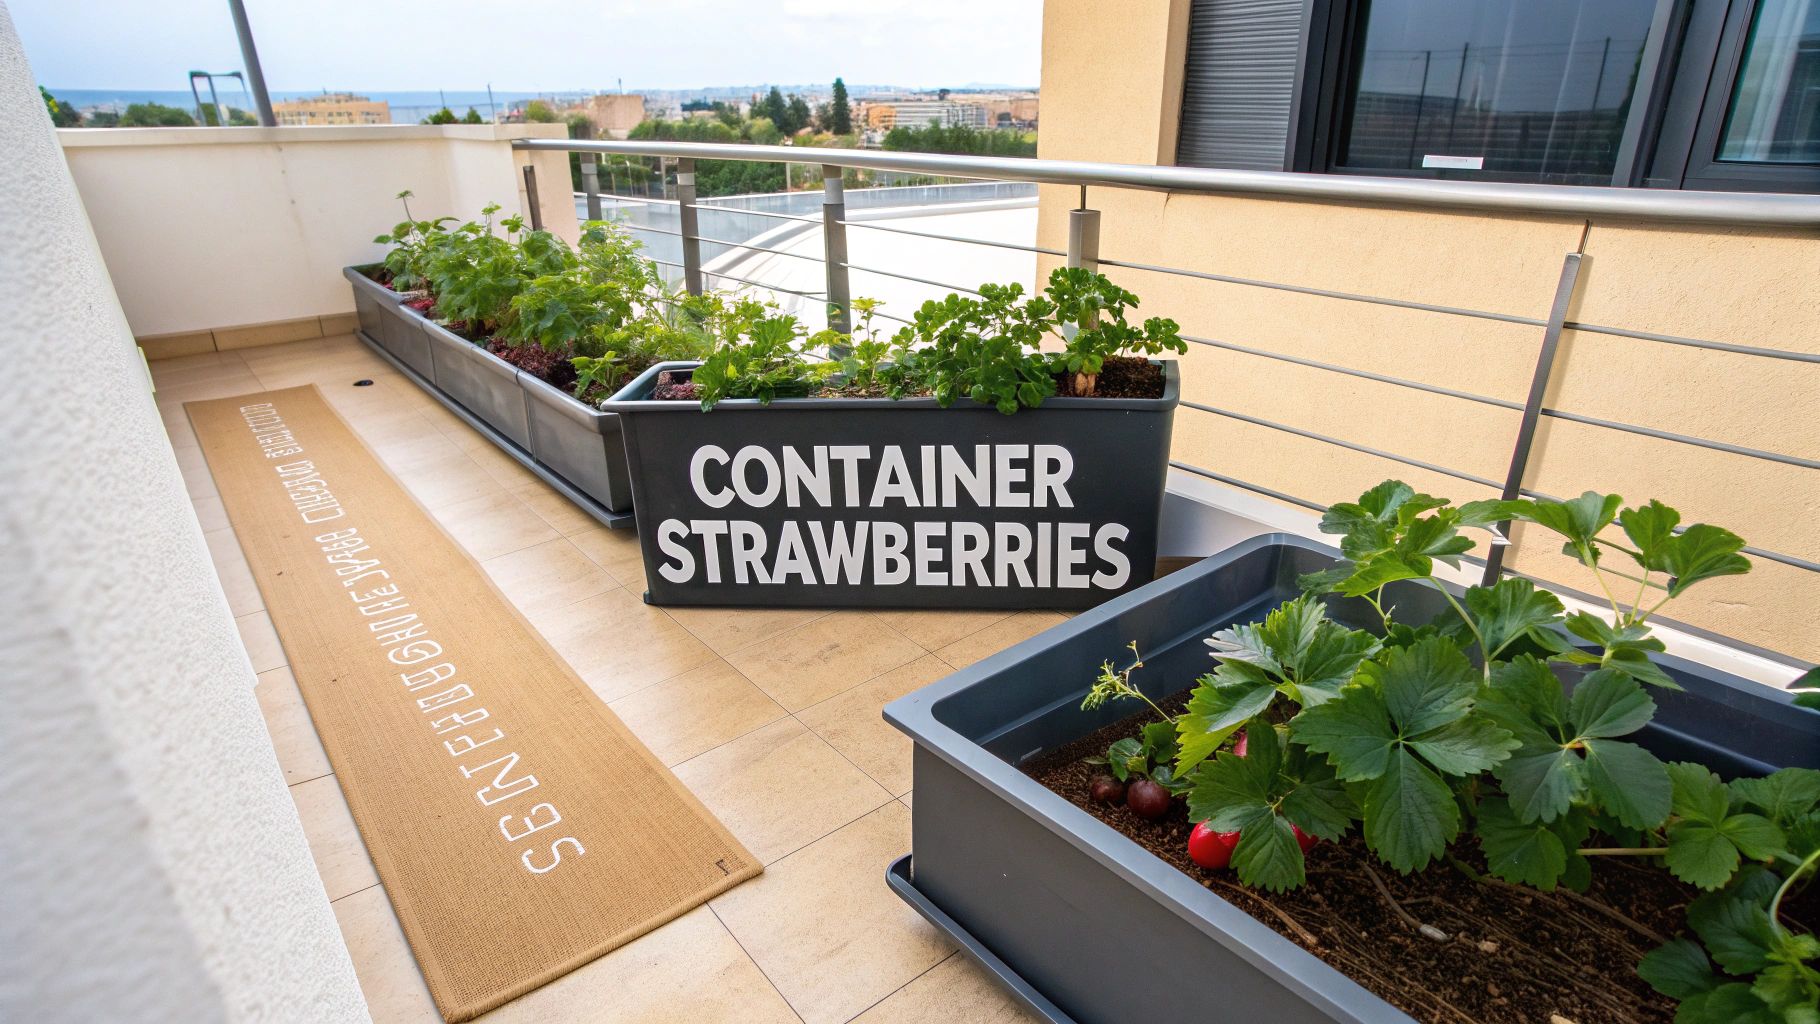
Don't let a lack of yard space stop you from enjoying an endless supply of homegrown strawberries. If you're working with a balcony, patio, or just a sunny windowsill, you can absolutely propagate strawberry plants. It just requires a little creative thinking to make every square inch count.
The runner method, for example, works beautifully with a small tweak. Let's say you have a gorgeous hanging basket overflowing with strawberries. When it sends out a runner, don't just let it hang there. Instead, grab another small pot, fill it with soil, and place it on a stool or crate right underneath. Pin that little plantlet down into the fresh soil, and within a few weeks, you've got a whole new plant ready to go, all without taking up any extra floor space.
Choosing Your Container Champions
Of course, not all strawberry varieties are happy living in the cozy confines of a pot. For the best results in small spaces, you'll want to choose types that are known to thrive in containers.
- Alpine Strawberries: These are my go-to for tidy little pots. They're compact, clump-forming plants that produce small but intensely flavorful berries. Best of all, they don't send out runners, which makes them incredibly low-maintenance for container life.
- Day-Neutral Varieties: Cultivars like 'Seascape' or 'Albion' are fantastic choices. They're workhorses, producing fruit all season long and adapting really well to pots. This means you get a steady harvest, not just one big one.
These compact varieties are also perfect for vertical planters and strawberry towers, which are brilliant space-savers for urban gardeners. You can grow a surprising number of plants in a very small footprint.
Essential Care for Potted Plants
Container gardening comes with its own set of rules, especially when it comes to watering and feeding. The limited soil volume means your plants can burn through nutrients and water much faster.
The secret to thriving container strawberries is a high-quality potting mix. Amending your soil with nutrient-rich compost or earthworm castings provides a slow-release source of food that can sustain a plant even when it becomes root-bound, ensuring it has the energy to fruit.
Consistent watering is also non-negotiable. Pots dry out so much faster than garden beds, so you have to check the soil moisture daily, particularly during a heatwave. The goal is to keep the soil consistently moist but never soggy.
With the right variety and a little extra attention to food and water, you can create an incredibly productive, self-sustaining strawberry patch, even on the smallest balcony.
5. What to Do When Strawberry Propagation Goes Wrong
Even the most seasoned gardeners run into issues when propagating strawberries. Don't get discouraged if things don't go perfectly on your first try. Most of the time, the fix is surprisingly simple once you know what to look for.
Let's break down some of the most common hiccups you might encounter and how to get your new plants back on the right path.
Why Aren't My Runners Rooting?
It’s a classic problem: you've got a healthy-looking runner with a perfect little plantlet, but it just refuses to grow roots. You give it a little nudge, and it pops right out of the soil. This usually boils down to one of three things.
- Not Enough Contact: The base of that new plantlet needs to be pressed firmly against the soil. This physical contact is the signal that tells it to start growing roots. I use a U-shaped garden pin or even just a small rock to hold it in place so it can't get jostled by wind or watering.
- Cutting the Runner Too Early: It’s tempting to snip the runner and free your new plant, but cutting that connection to the mother plant too soon is a fatal mistake. The new plantlet relies on its parent for all its nutrients and water for at least 4-6 weeks while it develops its own root system. Be patient!
- The Soil is Too Dry: Roots won't grow into dry, dusty soil. Simple as that. Consistent moisture is the most crucial ingredient for encouraging root growth. If the pot or patch of soil you're rooting into dries out completely, the plantlet will just sit there, waiting for better conditions.
Help! My Divided Crowns Are Wilting!
You go through all the trouble of carefully dividing a big, mature plant, and the next day, your new transplants are droopy and sad. That’s transplant shock, and it’s completely normal.
The main reason this happens is root damage. No matter how gentle you are, you'll inevitably break some of the tiny, delicate root hairs during the division process. These little hairs do most of the work absorbing water, so their temporary loss makes it hard for the plant to stay hydrated. The biggest mistake people make here is overwatering to "help," which only suffocates the stressed roots. Your goal is to keep the soil moist, like a wrung-out sponge, not a swamp.
My favorite trick for beating transplant shock: Give your newly planted crowns some shade for a few days. You don't need anything fancy; a piece of shade cloth, a piece of cardboard, or even a strategically placed lawn chair will do. Shielding them from the harsh sun reduces water loss from the leaves and gives the roots a chance to recover.
My Strawberry Seeds Aren't Sprouting!
Growing strawberries from seed is a test of patience, and seeing nothing but an empty tray of soil can feel like a failure. If a few weeks have gone by with no green in sight, the culprit is almost always one of these.
First off, did you give them a cold spell? Insufficient cold stratification is the number one reason strawberry seeds fail. They need a "fake winter" in your fridge for about a month to convince them it's time to wake up. Second, you might have buried them. Strawberry seeds need light to germinate, so just press them lightly onto the surface of the soil—don't cover them up. And finally, you have to maintain consistent moisture and temperature; big swings can halt germination for good.
6. Know the Best Time of Year to Propagate
The sweet spot for propagating strawberries is usually in the late summer or early fall.
Once the main fruiting season wraps up, the mother plant naturally shifts its energy from making berries to sending out runners. This is its way of reproducing, and you're just helping the process along.
7. Know How Long Until New Plants Give You Berries
Patience is a virtue, but you won't need much of it with most methods.
If you propagate using runners or by dividing the crowns, you're in luck. Those new plants will almost always produce a crop of berries in their very first growing season the following year.
Starting from seed, however, is a different story. It's a much longer game. You'll need to wait at least a full year, and sometimes even two years, before you see your first homegrown strawberry from a seed-grown plant.
Growing more of your own food from scratch? You can browse our seed collection for heirloom varieties to start alongside your strawberry patch.

