


Ready to add a stunning and spicy kick to your garden? Giant red mustard greens are a fantastic choice—they're fast-growing, visually striking, and deliver a bold, pungent flavor that makes them a real standout in any vegetable patch.
1. Understand Why You Should Plant Giant Red Mustard Greens
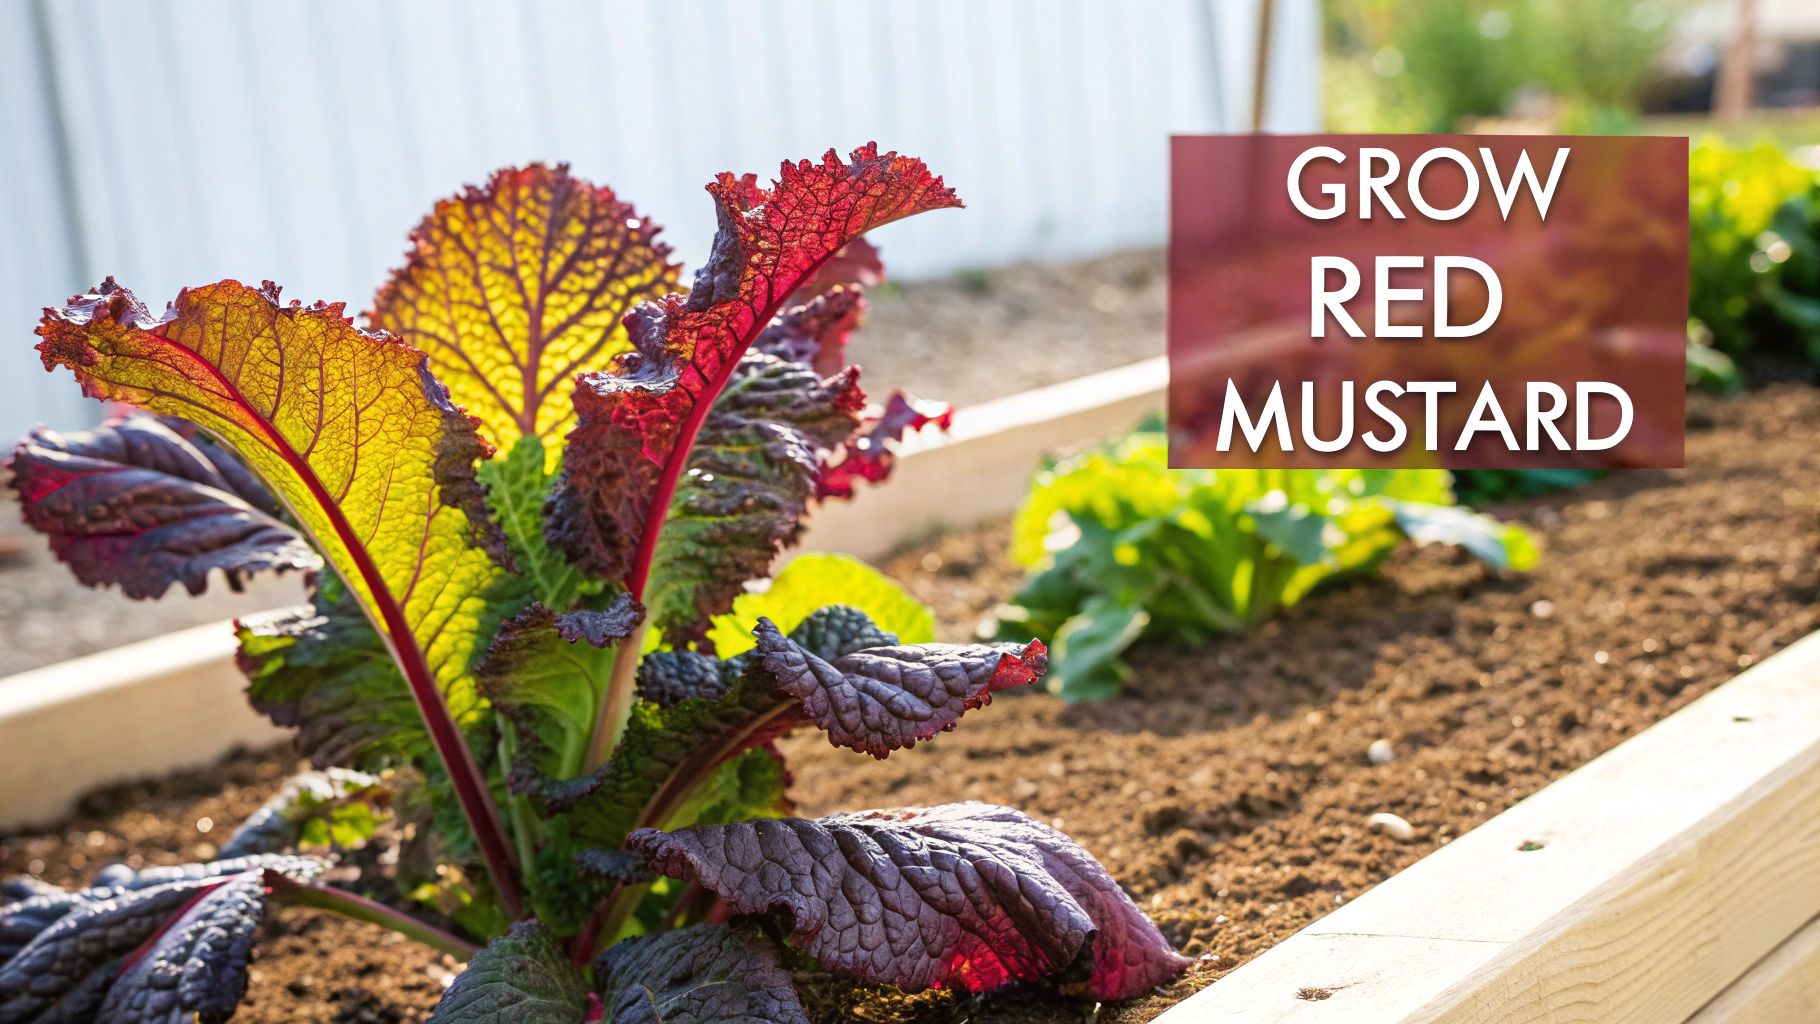
If you're on the hunt for a plant that offers both ornamental beauty and a peppery punch, look no further. Giant red mustard greens are an excellent addition to your garden, combining the ease of growing classic greens with a dramatic flair few other veggies can match.
Unlike the smaller, more common mustard types you might be used to, this variety is known for its sheer scale. Often called Japanese giant red or takana, these plants have a long history in East Asian agriculture and can easily reach heights of 60–90 cm (2–3 ft). You can learn more about the history of these impressive greens on Wikipedia.
This impressive stature doesn't just mean you get a generous harvest; it also creates a beautiful, textured backdrop in your garden beds.
Get a Fast and Flavorful Harvest
One of the most satisfying things about growing these greens is how quickly they mature. Under the right conditions, you can go from seed to a plate-ready harvest in as little as 45 days, which is perfect for gardeners who love seeing quick results.
This rapid growth makes them a great candidate for succession planting in both spring and fall. Because they tolerate cooler temperatures, you can get an early start on the season and enjoy a late harvest long after more sensitive plants have called it quits.
Giant red mustard greens are an ideal crop for beginners and seasoned gardeners alike. Their resilience, speed, and minimal care requirements ensure a successful and satisfying growing experience with very little fuss.
Before you start digging, it helps to have a quick rundown of what these plants need. Here's a quick overview to get you started.
Giant Red Mustard Greens At-a-Glance
This table summarizes the essential growing conditions and plant characteristics you'll need for a thriving crop.
| Attribute | Ideal Condition or Characteristic |
|---|---|
| Sunlight | Full sun (6+ hours) but tolerates partial shade |
| Soil Type | Well-draining, rich in organic matter |
| Soil pH | 6.0 to 7.5 |
| Spacing | 12-18 inches apart for 'giant' size |
| Watering | Consistent moisture; about 1 inch per week |
| Harvest Time | 45-50 days from sowing |
Keep these key points in mind, and you'll be well on your way to harvesting your own spicy, vibrant greens.
2. Prepare the Ideal Garden Bed

A healthy patch of giant red mustard greens gets its start long before you ever plant a seed. If you want those huge, zesty leaves the name promises, you have to create the perfect foundation right in the soil. Getting this part right is probably the single most important thing you can do for a great harvest.
First thing's first: scout your location. These greens are sun-lovers, so you'll want to find a spot in your garden that gets at least 6 hours of direct sunlight a day.
That said, if you live somewhere with blistering hot summers, a little afternoon shade is your friend. Too much intense heat can stress the plants and make the leaves bitter. A spot that gets full morning sun and then some dappled light in the afternoon is pretty much the sweet spot.
5 Tips for Building the Perfect Soil
Once you've picked your spot, it's time to get your hands dirty and focus on the soil. Giant red mustards need loose, fertile, and well-draining soil so their roots can spread out and support those massive leaves. They're happiest in a soil pH between 6.0 and 7.5, which covers a range from slightly acidic to neutral.
Here are five practical ways to turn a basic garden plot into the perfect home for your greens:
- Enrich with Organic Matter: This is non-negotiable. Work a few inches of well-rotted compost or aged manure into the top 6-8 inches of your soil. It improves the texture, adds a slow release of nutrients, and helps the soil hold onto just the right amount of moisture.
- Fix Poor Drainage: If you're dealing with heavy clay soil, compost is your first line of defense. You can also mix in things like coarse sand or perlite to create little air pockets. This prevents the roots from sitting in water, which is a surefire way to get rot.
- Loosen Compacted Earth: Instead of aggressively tilling, try using a garden fork or a broadfork to gently loosen the soil. This breaks up compaction and gets air down into the root zone without wrecking the natural soil structure that worms and microbes have built.
- Check Your pH Level: Don't just guess. A simple soil testing kit will tell you where you stand. If the soil is too acidic (below 6.0), you can amend it with garden lime. If it's too alkaline (above 7.5), adding a little elemental sulfur or peat moss will help bring it down.
- Clear Out the Competition: Before you plant, make sure the bed is totally free of weeds, old roots, and large rocks. Anything left behind will compete with your mustard seedlings for water and nutrients, so give them a clean slate to start from.
A good rule of thumb is the "squeeze test." The goal is to create a soil texture that's light and crumbly. When you grab a handful, it should hold together for a moment before easily falling apart. That tells you've got the perfect balance of moisture and aeration.
For a more comprehensive look at creating a nutrient-rich foundation for your entire garden, our guide on preparing garden soil has a ton of great techniques. Believe me, putting in the effort to build great soil now will pay you back tenfold with a bigger, healthier crop of mustard greens all season long.
3. Get Your Sowing and Spacing Right
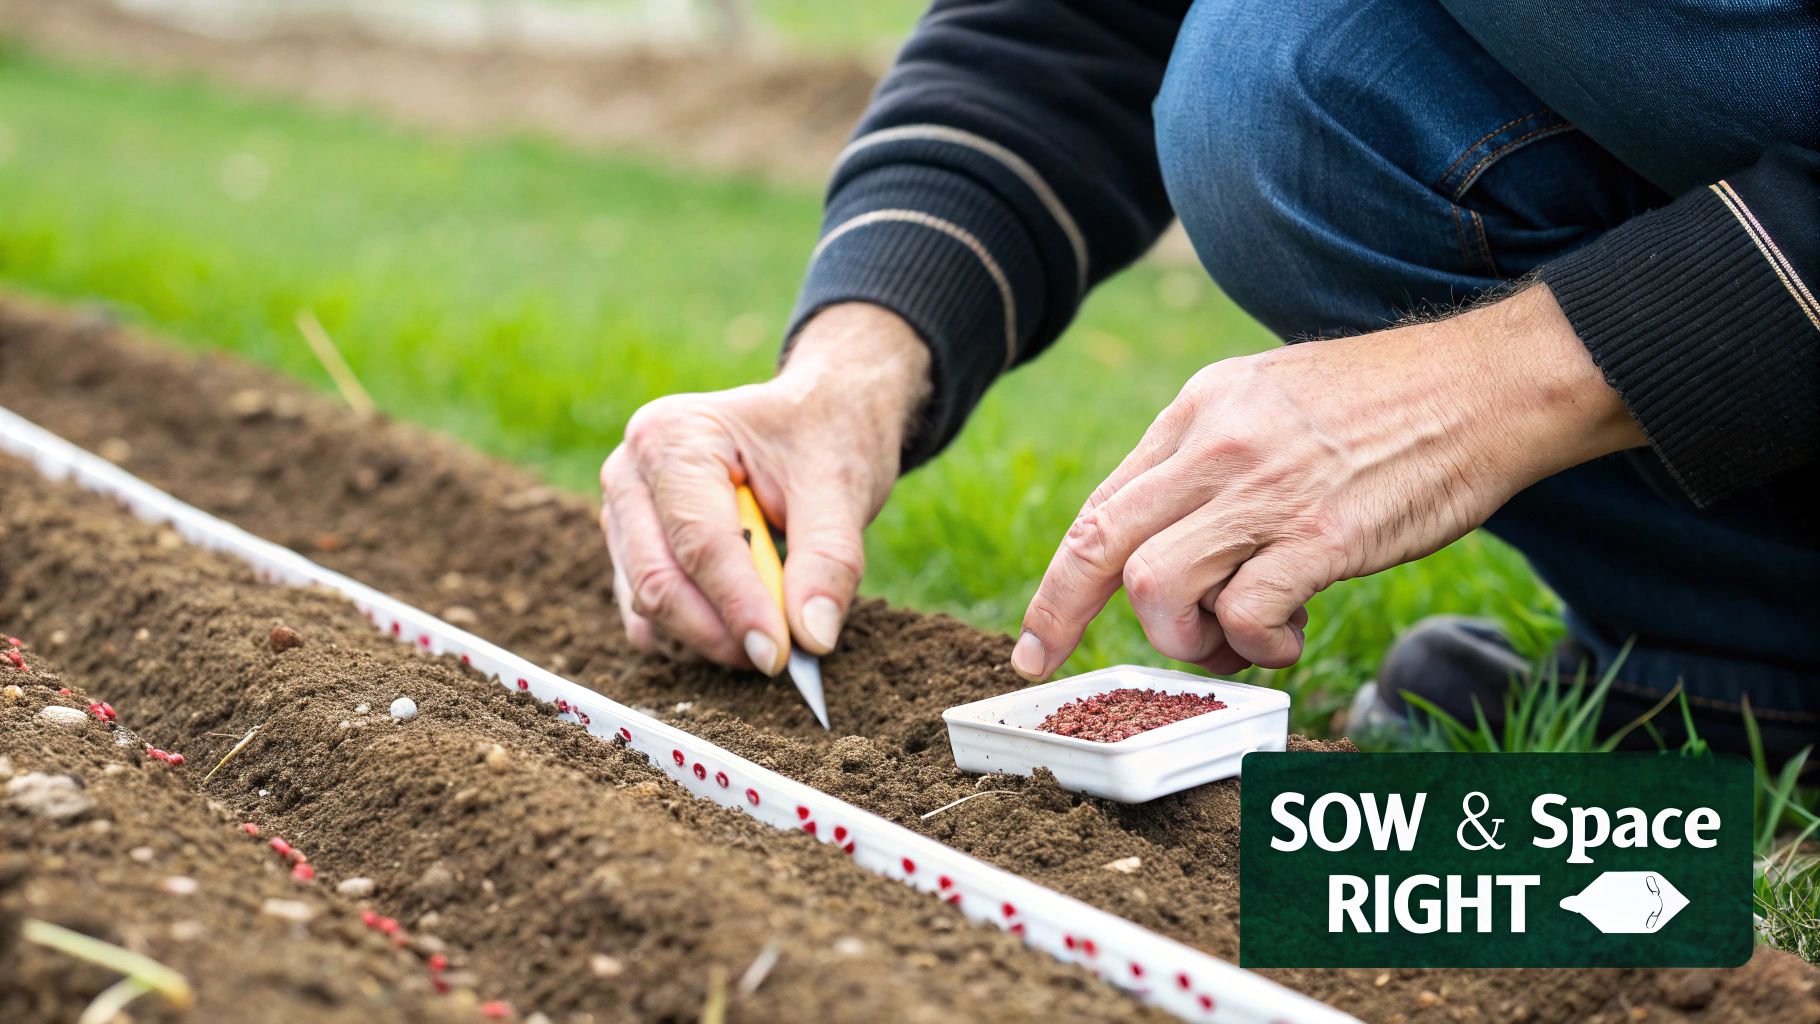
How you get your seeds in the ground sets the stage for everything that follows. From germination to the final size and punch of your mustard greens, it all starts here. Nailing the timing and spacing is the secret to a fantastic harvest.
Timing is everything with cool-weather crops like these. You’ve got two sweet spots for planting: early spring and late summer. For a spring crop, sow your seeds 2-4 weeks before the last expected frost, just as soon as the soil is workable. If you're aiming for a fall harvest, get those seeds in the ground 6-8 weeks before your first fall frost is due.
Planting this way helps you dodge the summer heat, which can make mustard greens "bolt"—that is, flower prematurely. Once a plant bolts, its energy goes into making seeds instead of tasty leaves, leaving you with a bitter, tough disappointment.
Direct Sowing vs. Starting Indoors
You've got two solid options for planting, and the right choice really depends on your local climate and how much of a head start you want.
- Direct Sowing: This is the easiest route. Just plant your seeds about ¼ to ½ inch deep right where you want them to grow. This is my go-to method for fall crops or for those lucky enough to have long, cool springs. It completely avoids the risk of transplant shock.
- Starting Seeds Indoors: If you have a short growing season, starting seeds inside 4-6 weeks before your last frost date is a game-changer. You'll have sturdy little seedlings ready to hit the ground running as soon as the weather cooperates.
The secret to getting those truly 'giant' red mustard leaves? Give them room. I've seen it time and again—overcrowding is the number one reason gardeners end up with small, underwhelming plants.
Why Spacing and Thinning Are Non-Negotiable
After your seeds pop up, you'll probably have a thick carpet of tiny seedlings. It might feel wrong to pull any out, but trust me, thinning is absolutely crucial if you want big, healthy plants.
Wait until the seedlings are 2-3 inches tall and have developed their first true leaves. Then, carefully thin them out, leaving the strongest plants spaced about 12 to 18 inches apart. This elbow room is what allows each plant to soak up the sun, water, and nutrients it needs to reach its impressive full size.
And don't toss those thinned seedlings! They are tender, spicy microgreens that are perfect for livening up a salad. For a deeper dive into planting techniques, these 10 tips for sowing and germination are a great resource for improving your success rate.
One last tip: protect those baby plants. A light layer of straw mulch helps keep the soil moist and can deter some pests. I also recommend a floating row cover to shield them from flea beetles and any surprise late frosts—it gives them a much stronger start.
4. Nail Your Watering and Feeding Strategy
The real secret to getting those tender, spicy leaves—instead of tough, bitter ones—is all in the follow-through. Once your giant red mustard greens are up and growing, a smart watering and feeding plan is what pushes them to develop that signature rapid growth and impressive size.
Consistent moisture is, without a doubt, the most important piece of the puzzle. Mustard greens are over 90% water, so when they get thirsty, they get stressed. That stress is what leads to a harsh, unpleasant flavor. Your goal is to keep the soil feeling like a well-wrung-out sponge—moist, but never soggy. A good rule of thumb is to give them about 1 inch of water a week, counting both rain and your hose.
4 Simple Rules for Watering Mustard Greens
Watering the right way does more than just keep your plants from wilting; it helps head off disease before it can start. The trick is to get water straight to the roots while keeping the leaves as dry as possible, which helps prevent common fungal problems like downy mildew.
Here are four simple habits that make a huge difference:
- Water in the morning. This gives the leaves the whole day to dry out in the sun, drastically cutting down the risk of fungal spores taking hold overnight.
- Use drip lines or soaker hoses if you can. These systems are fantastic because they deliver a slow, steady trickle of water right where it's needed—at the soil level. You lose less to evaporation and the leaves stay bone-dry.
- Do the finger test. Before turning on the hose, just stick your finger about an inch deep into the soil near a plant. If it feels dry, it's time to water. If it’s damp, you can wait.
- Mulch is your best friend. A 2-inch layer of organic mulch like straw, shredded leaves, or grass clippings is a game-changer. It helps the soil hold onto moisture, keeps weeds down, and even helps regulate the soil temperature.
A Straightforward Feeding Plan
Giant red mustard greens are hungry plants. They need a good amount of nitrogen to fuel all that leafy growth. While the compost you worked in at the beginning gives them a great start, a little mid-season boost can really kick things into high gear, especially if you notice the growth slowing or the leaves looking a bit pale.
I find that about three to four weeks after thinning the seedlings is the perfect time for a top-up. A quick dose of an organic, nitrogen-rich liquid fertilizer works wonders. Things like fish emulsion or a well-made compost tea are perfect. Just mix it up according to the label and water it in around the base of the plants.
For a single big harvest, one well-timed feeding is usually all you need. But if you're harvesting leaves continuously with the 'cut-and-come-again' method, a second light feeding about a month after the first will give the plants the energy they need to keep producing.
5. Keep Pests Off Your Mustard Greens Organically
A lush bed of giant red mustard greens is a beautiful thing, but you're not the only one who thinks they're delicious. Those tender, spicy leaves are a magnet for some common garden pests. The good news is, you don't need to resort to harsh chemicals to protect your harvest. In fact, using proactive, organic methods will build a healthier, more resilient garden for years to come.
You'll mostly be dealing with a few usual suspects. Flea beetles chew tiny "shotgun" holes in the leaves, aphids love to cluster on the undersides, and cabbage worms—the larvae of those familiar white butterflies—can munch through a plant surprisingly fast.
Luckily, you have plenty of great organic strategies to keep them at bay.
5 Smart Ways to Manage Pests
The best defense for your giant red mustard is a good offense. By using a mix of physical barriers and natural controls, you can stop pests before they ever become a real problem and ensure you get to enjoy the harvest, not them.
-
Row Covers Are Your Best Friend: This is, hands down, the most effective preventative trick in the book, especially for flea beetles and cabbage worms. As soon as you plant your seeds or set out your transplants, drape a lightweight floating row cover over the bed. It creates a simple physical barrier pests can’t get through, but sunlight and water still can.
-
Invite the Good Bugs: Why do all the work yourself? Turn your garden into an ecosystem that polices itself by attracting beneficial insects. Planting flowers like alyssum, calendula, or dill nearby brings in the ladybugs and lacewings, which are absolute aphid-destroying machines.
-
Use Gentle, Natural Sprays: If you spot the first signs of an infestation, a simple organic spray can knock it down quickly. A solution of neem oil or insecticidal soap is perfect for this. Just be sure to apply it in the evening when pollinators are less active. These sprays disrupt the life cycles of aphids and other soft-bodied pests without leaving behind nasty residues.
-
Try Strategic Companion Planting: Some plants act as natural bodyguards for your mustards. Aromatic herbs like mint, thyme, or rosemary can confuse pests with their strong scents, making your mustard patch harder to find. Nasturtiums are another great choice, acting as a "trap crop" that aphids often prefer over your greens.
-
Keep a Tidy Garden: Don't underestimate the power of good old-fashioned tidiness. If you see yellowing or heavily infested leaves, pluck them and get them out of the garden immediately. At the end of the season, make sure to clear away all the leftover plant debris. This gets rid of potential overwintering spots for pests and their eggs, breaking the cycle for next year.
Remember, the goal with organic pest control isn't to create a sterile, bug-free zone. It's about maintaining a natural balance. A few holes here and there are just a sign that you have a healthy, living ecosystem, not a sign of failure.
If you want to dive deeper into holistic pest solutions, our complete guide on natural pest control for plants is packed with even more strategies.
On a related note, the rise of unique greens like the giant red has opened up interesting markets. These plants are often traded in fresh, regional supply chains and are especially prized in ethnic-vegetable markets across North America and Europe, where their bold color and flavor command premium prices. You can discover more insights about mustard production at foodrepublic.com.
6. Harvest for Peak Flavor and Freshness
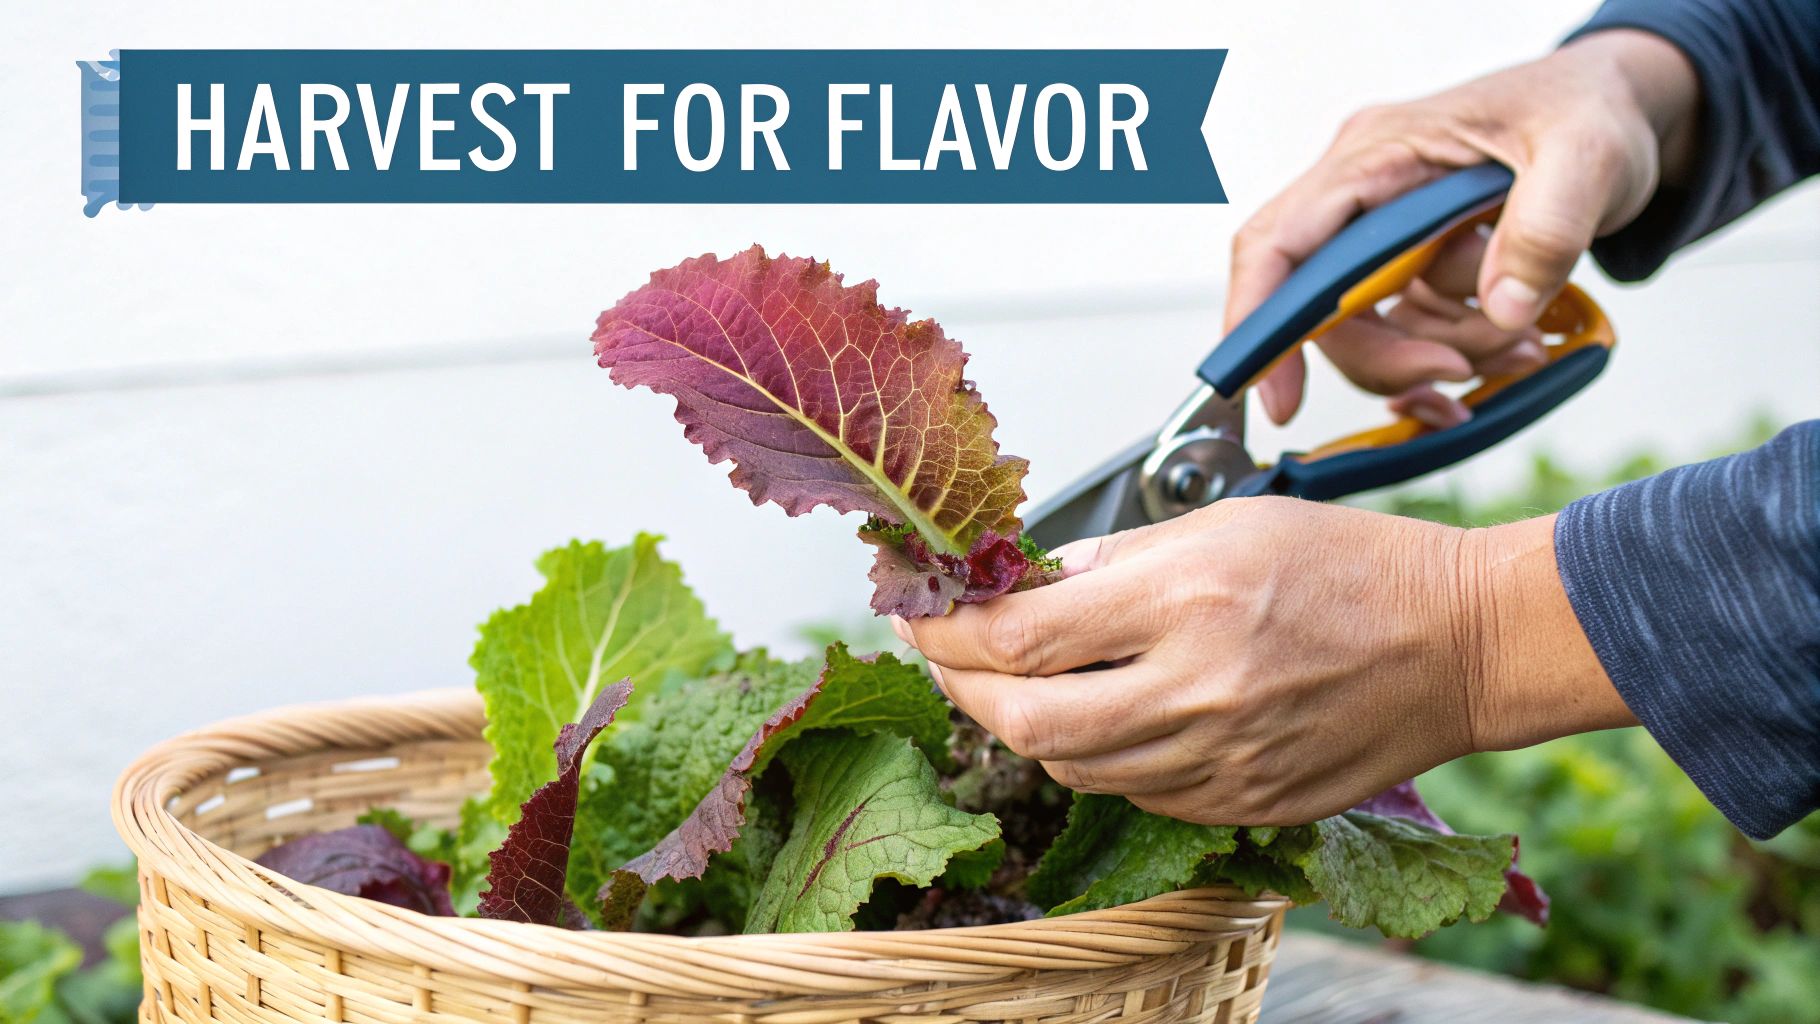
Knowing just when to harvest is how you unlock that signature spicy kick from your giant red mustard greens. If you wait too long, the leaves can turn unpleasantly bitter, but if you time it right, you get that perfect peppery flavor.
You've got two great ways to go about it, and the best one for you just depends on what you need. You can either snip leaves as you go for a continuous supply or harvest the whole plant at once when it's big and beautiful.
The Cut-and-Come-Again Method
This is my go-to technique for keeping fresh greens on the table for weeks. It’s perfect for getting a steady stream of young, tender leaves for salads while the plant keeps pushing out new growth from the center.
- When to Start: I usually start picking when the outer leaves get to be about 4-6 inches long. They're mild, crisp, and just perfect at this stage.
- How to Harvest: Just take a pair of scissors or even your fingers and snip the biggest, outermost leaves right at the base. The trick is to leave the smaller inner leaves and the central growing point untouched.
- Harvest Frequency: You can come back to the same plant every 1-2 weeks for more. This regular trimming actually encourages it to produce more foliage.
Harvesting the Full Mature Plant
Now, if you're after those big, robust leaves for cooking—the kind that are amazing when braised or tossed into a stir-fry—you'll want to let the whole plant mature. This gives you one single, substantial harvest from each plant.
It’s pretty simple. Just wait until the plant forms a big, full rosette of leaves, which usually takes around 45-50 days from when you sowed the seeds. The leaves will look vibrant and fully formed but should still feel tender. To harvest, just take a sharp knife and slice the entire plant off at the soil line.
The real magic here goes beyond just taste. Mustard greens are nutritional powerhouses, packed with vitamins and minerals. They are an incredible source of Vitamin K, often containing well over 100% of the daily value in a single serving. It’s a bonus that makes every harvest even more rewarding.
3 Best Practices for Storing Your Harvest
Once you bring your greens inside, storing them properly is key to keeping them crisp. A few simple steps will keep them fresh in the fridge for up to a week.
- Wash and Dry Thoroughly: Give the leaves a good swish in a basin of cold water to get any dirt off. Then, dry them completely. A salad spinner is your best friend here, but gently patting them with a clean towel also works well.
- Wrap in Paper Towels: Loosely wrap the dry greens in a layer of paper towels. This is a crucial step—it soaks up any extra moisture that would otherwise make them wilt and rot.
- Store in the Crisper Drawer: Tuck the paper-towel-wrapped bundle into a plastic bag or an airtight container and pop it in your refrigerator's crisper drawer.
Once you have a fresh batch of greens ready to go, they are fantastic in all sorts of dishes, including these easy meal prep salads.
7. Troubleshoot Your Mustard Greens Patch
No matter how carefully you plan your garden, sometimes things just don't go as expected. It happens to all of us. Let's walk through a few common issues you might run into with your giant red mustard greens and figure out how to get things back on track.
Why Do My Mustard Greens Taste Bitter?
If you've taken a bite of your harvest and found it unpleasantly bitter, heat is almost always the culprit. Once the temperature starts consistently creeping above 75°F (24°C), the plants get stressed out, and that stress directly impacts their flavor.
Inconsistent watering is another big one. Letting the soil get bone-dry between waterings puts the plant in survival mode, which can also lead to bitterness. Keep the soil evenly moist—a good rule of thumb is about 1 inch of water per week. If you're in a warmer region, planting them where they get some afternoon shade can make a world of difference.
What Is "Bolting" and Why Is It Happening?
"Bolting" is a term you'll hear a lot in gardening. It’s when the plant decides its time is up and sends a flower stalk shooting up from the center, trying to produce seeds as quickly as possible. You'll see the plant's shape change and small yellow flowers appear.
Once a mustard green plant bolts, its energy diverts from making those tasty leaves to producing seeds. The leaves that are left turn tough, fibrous, and even more bitter.
Bolting is a stress response, usually kicked off by a few key things:
- Heat Waves: A sudden spike in temperature is a major trigger.
- Longer Days: The increasing daylight in late spring and early summer signals to the plant that the season is ending.
- Dry Soil: A lack of water can trick the plant into thinking it's the end of its life cycle.
The best defense against bolting is timing. Get your giant red mustard greens in the ground during the cool days of early spring or plant them in late summer for a fantastic fall crop. This lets them mature before the weather gets too hot or the days get too long.
Are the Leaves Edible After the Plant Flowers?
You can technically eat them, but I wouldn't recommend it. Once the plant has flowered, the leaves become incredibly pungent and unpleasantly bitter. Their texture gets tough and stringy, a far cry from the tender leaves you were hoping for.
But don't throw the whole plant on the compost pile just yet! The little yellow flowers are actually edible. They have a delicate, slightly peppery taste and look great sprinkled over a salad. Alternatively, you can let them fully mature and collect the seeds to plant for your next crop.
Ready to start your own spicy, vibrant garden? At Homegrown Garden, we offer a curated selection of heirloom seeds, including unique varieties of leafy greens. Explore our collections and find everything you need for a successful harvest at https://www.homegrown-garden.com.
Love fast, spicy greens? Round out the patch with our Lettuce and Leafy Greens seed variety pack (20 varieties) for more cut-and-come-again salad greens.

