


Starting a garden from scratch can feel like a massive undertaking, but I've found that raised beds are the perfect shortcut to a successful first season. They offer a simple, contained, and incredibly rewarding way to get your hands dirty. This method gives you total control over the most important part of your garden—the soil—making it the ideal launchpad for any aspiring gardener. It proves that a green thumb isn't some innate talent; it's something you build, one harvest at a time.
Why Raised Beds Are a Beginner's Best Friend
If you've ever tried to shove a shovel into a yard full of dense clay or rocky dirt, you know the struggle. It's back-breaking work. Raised beds let you skip that fight entirely. Instead of spending years trying to fix your native soil, you get to build the perfect garden from the ground up.
Think about it: you can go from a patch of weedy, useless lawn to a flourishing vegetable plot in a single weekend. I've seen it happen countless times. A new gardener with soil like concrete can build a simple 4x8 foot bed, fill it with a rich mix of compost and topsoil, and be picking their own tomatoes and peppers in a few months. That’s a victory that would be almost impossible in the ground without a ton of soil amendment.
Ultimate Control Over Your Garden's Foundation
The single biggest win for any beginner is getting control over the soil. You aren't inheriting a yard full of problems; you're creating a perfect environment from day one. This control makes all the difference.
- Perfect Soil Recipes: You can create custom soil blends tailored to exactly what you want to grow. Need a light, fluffy mix for long, straight carrots? Easy. A rich, nutrient-dense blend for hungry tomatoes? No problem.
- Superior Drainage: Raised beds drain far better than most in-ground gardens. This is a huge deal, as it prevents waterlogged roots—one of the most common mistakes beginners make when they get a little too enthusiastic with the watering can.
- Fewer Weeds, Less Work: When you start with fresh, clean soil and lay down a barrier like cardboard at the bottom, you virtually eliminate the weed seeds lurking in your yard. That means less time on your knees pulling thistles and more time enjoying your harvest.
This level of control is exactly why raised bed gardening has exploded in popularity. In the United States, where roughly 55% of households get into gardening, raised beds are the go-to choice for 47% of gardeners. Their ease of setup and reduced physical strain make them a fantastic starting point for everyone. You can dig into the latest gardening trends in this report from global market research.
A green thumb isn't some magical gift. It's just the result of giving plants the right conditions to thrive. Raised beds empower beginners to create those perfect conditions from the start, which is the fastest way I know to build real gardening confidence.
Making Gardening Accessible and Just Plain Fun
Beyond the soil, raised beds simply make the physical act of gardening much more comfortable. The constant bending and kneeling are dramatically reduced, which is a lifesaver for anyone with a sore back or tricky knees.
This accessibility opens up the joy of growing your own food to so many more people. For someone with limited mobility, a waist-high garden bed can transform an impossible hobby into a delightful daily ritual. By bringing the garden up to your level, you remove the physical barriers and make tending your plants a pleasure, not a chore.
If you want to dig deeper into the specific benefits, we've laid out all the pros and cons of raised garden beds compared to in-ground planting in a detailed guide. This straightforward, manageable approach is a key reason so many beginners find success right away and end up falling in love with gardening for life.
11 Steps to Build Your First Garden Bed
Okay, this is where the fun really begins—turning your garden dreams into a real, tangible thing. Building your first raised bed might seem like a huge undertaking, but when you break it down into simple, logical steps, it's not just manageable; it's incredibly satisfying.
Forget about complicated construction projects. This is all about creating a space that's going to feed you and bring you joy for months. Let's walk through it together, from finding the perfect sunny spot to putting the final frame in place.
Find the Perfect Location
Before you even think about buying lumber or soil, your first job is to become a sun detective. Spend a day just watching how the light moves across your yard. Most of the plants you’ll want to grow, especially sun-lovers like tomatoes and peppers, need at least six to eight hours of direct sunlight every day to really produce.
Where does the sun hit first thing in the morning? Is that spot still sunny at midday? What about the late afternoon? Pinpoint the location that gets the most consistent sun exposure throughout the day. That’s your sweet spot.
Check for a Convenient Water Source
Next up: water. Your new garden is going to get thirsty, particularly during those long, hot summer days. Trust me, hauling a heavy watering can back and forth across the yard gets old very, very quickly.
Try to position your bed within easy reach of a spigot or garden hose. This small bit of foresight will save you a world of effort later on and makes it so much easier to give your plants the consistent moisture they need to thrive.
Decide on the Ideal Dimensions
When it comes to raised beds, size definitely matters, but bigger isn't automatically better. The most important factor is accessibility. You have to be able to reach every inch of your garden without ever stepping into it and compacting that beautiful, fluffy soil you’re about to add.
A four-foot width is the magic number for a bed you can access from all sides, allowing most people to comfortably reach the middle. If you're placing it against a wall or fence, don't go any wider than 2.5 feet. For length, an 8-foot bed is often a good starting point, as it's manageable and works well with standard lumber sizes.
Your raised bed should be a joy to work in, not a chore. The golden rule is simple: if you can't easily reach the middle, it's too wide. Planning for comfort and ease from the start makes all the difference in the world.
Select the Right Bed Height
How tall should your bed be? That really comes down to what you plan to grow and what’s most comfortable for you. A depth of 10-12 inches is a great starting point and provides plenty of room for the root systems of most common vegetables, like lettuce, spinach, and herbs.
If you have your heart set on deep-rooted crops like carrots and potatoes, or if you simply want to save your back from a lot of bending over, consider a height of 18 to 24 inches. Taller beds also give you the added benefits of fantastic drainage and even more space for roots to spread out.
Choose Your Building Materials
Now you get to decide on the look and feel of your garden. Every material has its own personality, along with different costs, lifespans, and maintenance needs.
Thinking through the material is a key part of the planning process. You're not just building a box for dirt; you're adding a feature to your landscape.
Comparing 4 Popular Raised Bed Materials
| Material Type | Pros | Cons | Average Lifespan |
|---|---|---|---|
| Wood | Natural look, affordable start, good insulation for soil. | Can rot over time (especially untreated pine). Pressure-treated wood concerns. | 3-10 years (Pine) or 15-20+ years (Cedar) |
| Galvanized Metal | Very durable, modern aesthetic, warms soil early in spring. | Can get hot in direct sun, may be more expensive upfront. | 20+ years |
| Composite/Plastic | Extremely durable, won't rot or warp, often easy to assemble kits. | Higher initial cost, less "natural" appearance. | 30+ years |
| Stone/Brick | Permanent, beautiful, and highly durable. Excellent soil insulation. | Most expensive, labor-intensive to build. | A lifetime |
Ultimately, the right material is a balance between your budget, how long you want it to last, and the style you're going for. For some truly inspiring and long-lasting designs, check out these examples of residential sandstone garden bed projects.
This visual guide breaks down the process, from finding your spot to getting ready for soil.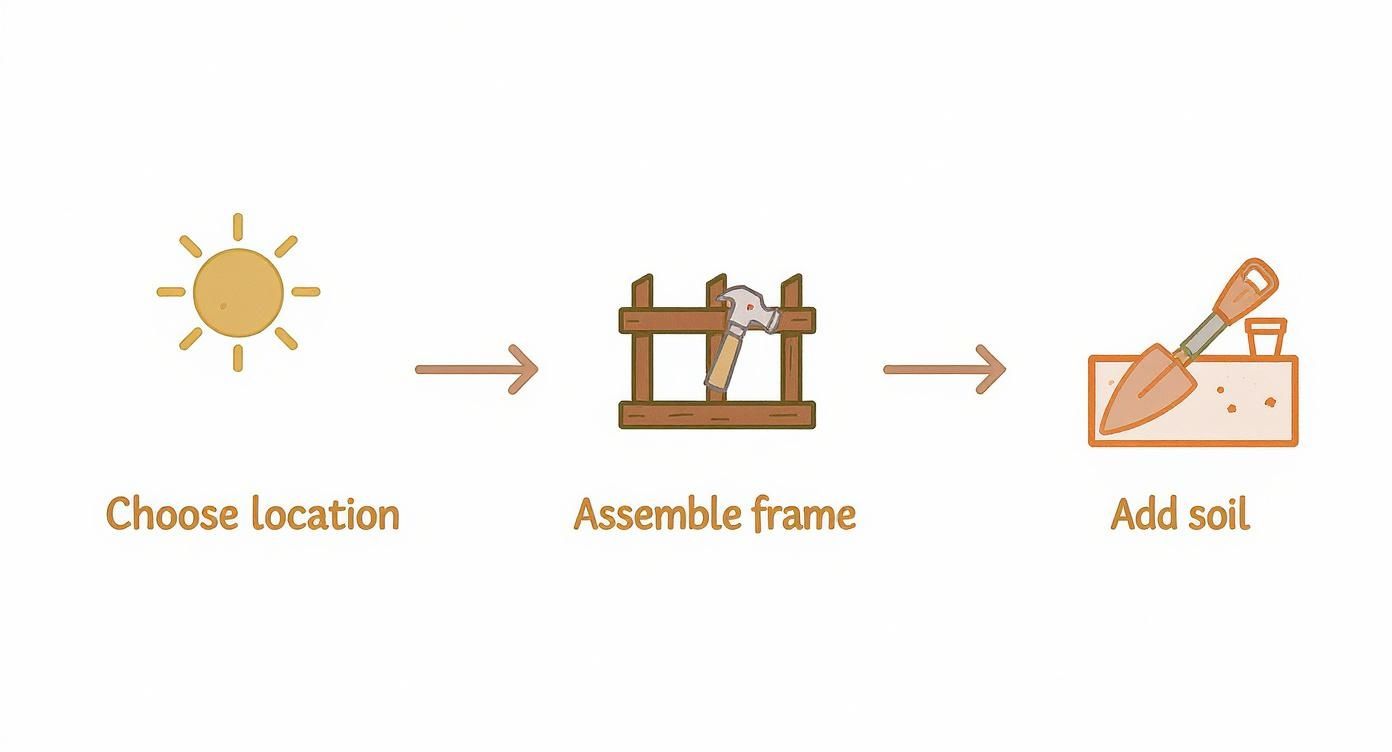
Each step builds on the last, which makes the whole project feel straightforward, even if it's your first time.
Gather Your Tools and Supplies
Before you start building, do yourself a favor and get all your tools and supplies in one place. This little bit of prep will make the assembly process go so much smoother and save you from those frustrating trips back to the garage.
You’ll generally need a drill, screws, a tape measure, and a level. A rubber mallet can also come in handy. If you’ve bought a kit, it should include all the specific hardware you need.
Prepare the Ground
One of the absolute best things about raised bed gardening is that you don't have to spend hours digging up your lawn. The ground prep is minimal.
Just mow the grass in your chosen spot as short as you can get it. Then, lay down a layer of plain cardboard (no glossy inks or plastic tape) right on top of the grass where your bed will be. This acts as a fantastic weed barrier, smothering whatever is underneath while slowly breaking down to enrich your soil.
Assemble the Frame
Time to bring it all together! If you’re working with a kit, just follow the instructions—they’re typically designed for quick and easy assembly, often taking less than an hour.
If you’re building from scratch with lumber, lay out the four sides on a flat surface. Use a carpenter's square to make sure your corners are perfect 90-degree angles before you screw them together. This ensures your bed is sturdy and square.
Position and Level Your Bed
With the frame built, carefully move it into its final spot on top of the cardboard layer. This is a crucial step: pull out your level and check all sides of the frame.
If it's not perfectly level, you can either dig a little soil out from under the high side or shim the low side with a flat stone. A level bed is important because it ensures water soaks in evenly instead of running off to one side.
Add a Vole or Gopher Barrier
If you know you have burrowing critters like gophers or voles in your area, this step is absolutely essential. Don't skip it! Before you add a single scoop of soil, line the bottom of your bed with hardware cloth, which is a type of sturdy wire mesh.
Simply cut the cloth to fit the bottom of your frame and use a staple gun to attach it securely to the inside bottom edges. This simple barrier will physically block pests from tunneling up from below and munching on the roots of your plants.
Plan Your Plant Layout
You're so close! With the bed built and in place, there's one final, fun planning step before you fill it with soil. Think about what you want to grow and where it will go. A little planning now will help you get the most out of your space.
A brilliant and highly efficient method, especially for beginners, is Square Foot Gardening. It’s a system that divides your bed into a grid to help you plant intensively without overcrowding. To learn more about this fantastic technique, check out our detailed guide on https://homegrown-garden.com/blogs/blog/how-to-start-square-foot-gardening. It's a game-changer for maximizing your harvest.
7 Perfect Soil Recipes for a Thriving Raised Bed
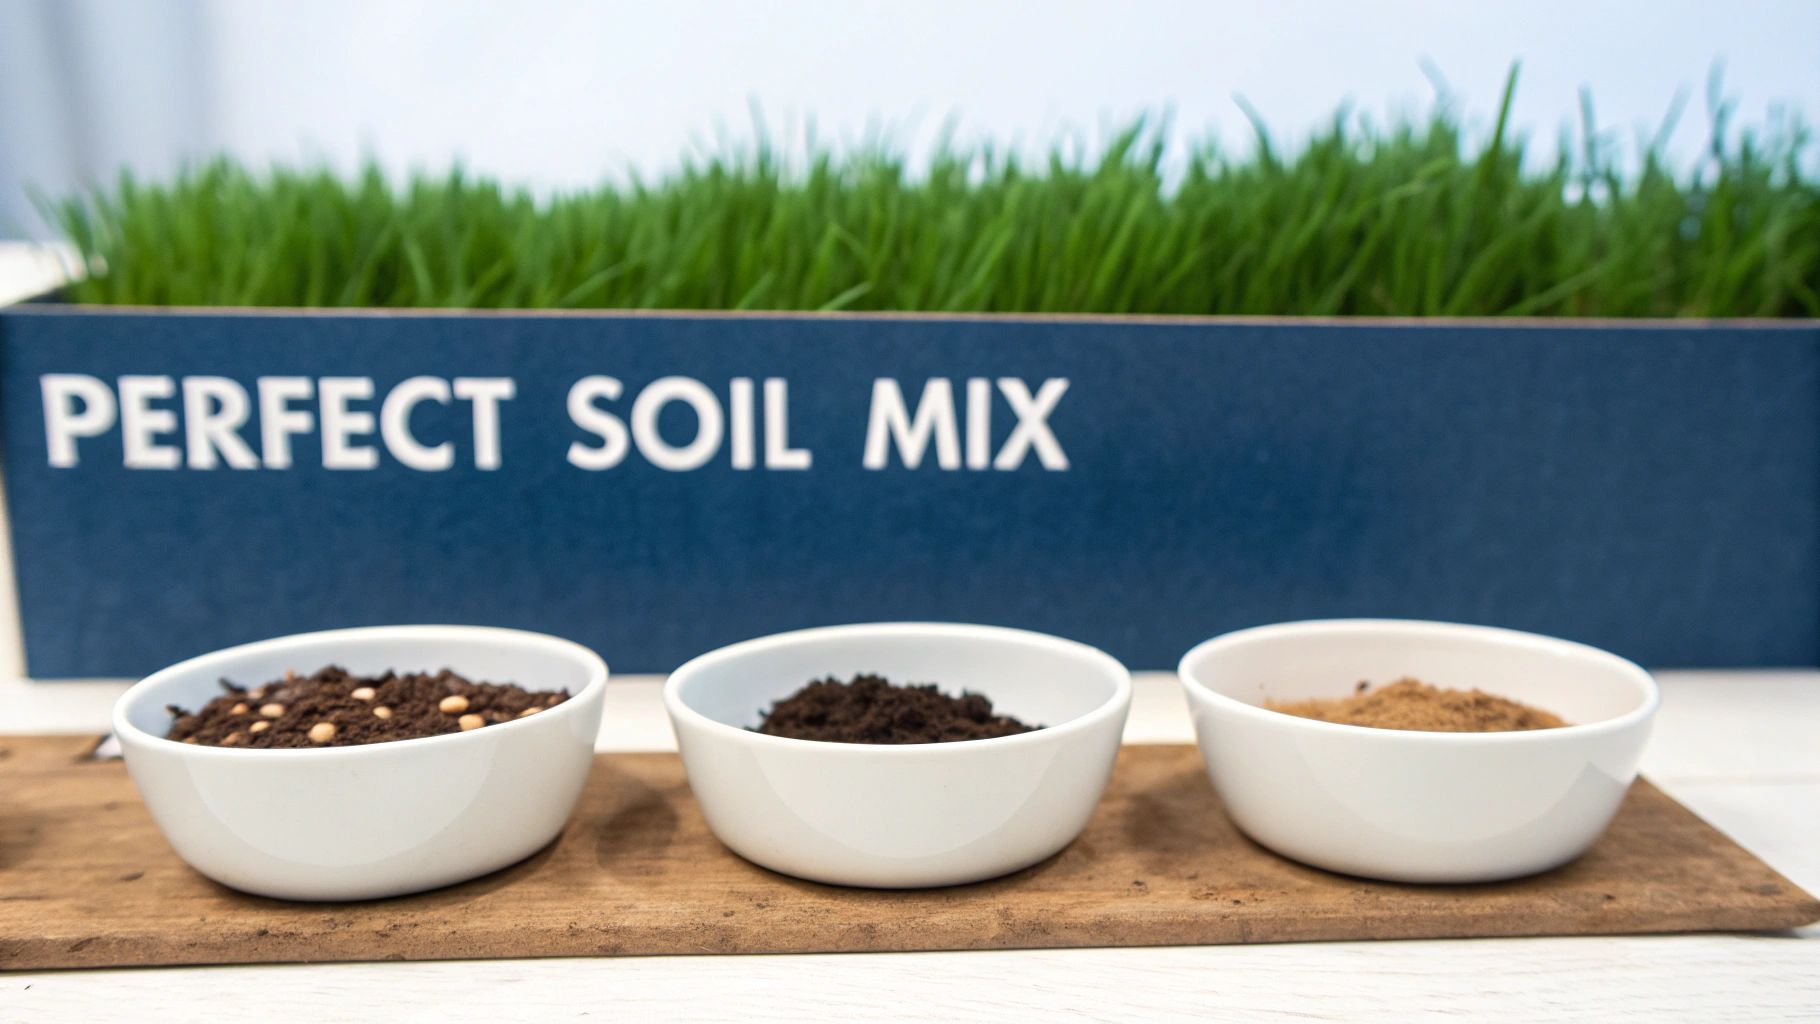
One of the best things about starting with a raised bed is getting to skip the back-breaking work of amending poor native soil. No more fighting with dense clay or nutrient-poor sand. Instead, you get to create the perfect growing environment from the ground up, giving your plants an incredible head start.
But don't just scoop up dirt from your yard—that’s a shortcut to a bed full of weed seeds and compacted soil. The real magic happens when you combine three key things: a solid base for structure, rich compost for nutrients, and something to keep it all light and airy. This trifecta is the secret to soil that plant roots will absolutely love.
1. The Classic All-Purpose Blend
If you're just starting out, this is the recipe for you. It's a tried-and-true mix that works beautifully for a huge range of vegetables, flowers, and herbs. It drains well, holds onto moisture without getting soggy, and provides a steady supply of nutrients.
Simply mix 60% high-quality topsoil with 40% well-rotted compost. If the topsoil you get feels a bit heavy or clay-like, toss in a few shovelfuls of coarse sand to lighten it up. This blend is a home run for things like leafy greens, beans, and peas.
2. The Heavy Feeder Mix for Tomatoes and Peppers
Some plants are just plain hungry. Think tomatoes, peppers, squash, and cucumbers—they have big appetites and will quickly use up all the nutrients in a basic soil mix. To keep them happy and productive all season long, you need to give them something a little richer.
Start with the classic blend and kick it up a notch. A great formula is 50% topsoil, 40% compost, and 10% aged manure or vermicompost (worm castings). That extra kick of organic matter acts like a slow-release fertilizer, feeding your plants exactly what they need to thrive.
Creating your own soil blend is one of the most empowering parts of raised bed gardening. You're not just filling a box; you're building the perfect foundation that will directly translate into healthier plants and a more abundant harvest.
3. The Light and Fluffy Root Vegetable Recipe
For carrots, radishes, and parsnips to grow long and straight, they need soil they can easily push through. If the soil is too dense or has rocks and clumps, you'll end up with sad, forked, and stunted roots.
The key here is aeration. You want a mix that’s incredibly light and loose. Try blending 50% topsoil, 30% compost, and 20% peat moss or coconut coir. This creates a beautiful, friable texture that lets those roots grow deep and true. For a deeper dive into different soil ingredients, check out our guide on the https://homegrown-garden.com/blogs/blog/best-soil-mix-for-vegetable-garden.
4. The Budget-Friendly Filler Method
Let’s be honest: filling a deep raised bed with purchased soil can get pricey. A brilliant, money-saving technique is to fill the bottom portion with organic debris that will break down over time. It's often called the Lasagna Method or Hügelkultur.
- Weed Barrier: Start with a layer of plain cardboard at the very bottom to smother any grass or weeds.
- Woody Layer: Next, add bulky materials like logs, branches, and twigs. These act like a sponge, soaking up water and releasing it slowly.
- Green Layer: On top of the wood, pile on "green" materials like grass clippings, leaves, and kitchen scraps (no meat or dairy!).
- Growing Medium: Finish it all off with a good 10-12 inches of your preferred soil mix on top. Your plants will have plenty of room to grow, and the layers underneath will slowly turn into rich compost.
5. The Ultimate Perennial and Herb Garden Mix
Perennials and Mediterranean herbs like lavender, rosemary, and thyme have one big demand: excellent drainage. They absolutely hate having "wet feet" and are susceptible to root rot if their soil stays waterlogged.
To give them the gritty, fast-draining conditions they crave, use a mix of 40% topsoil, 30% compost, and 30% aeration material. Perlite, coarse sand, or even fine gravel work perfectly. This recipe mimics their native habitat and is the secret to keeping them healthy year after year. Learning how to improve soil drainage in your garden is a skill that will serve you well beyond just raised beds.
6. The Peat-Free Sustainable Blend
If you're looking for a more eco-friendly alternative to peat moss, coconut coir is a fantastic choice. It's a renewable byproduct of the coconut industry and does a wonderful job of aerating soil and retaining moisture.
A simple and effective peat-free recipe is 60% topsoil, 30% compost, and 10% coconut coir. This blend is a great all-rounder and a more sustainable way to fill your garden.
7. The Commercial Bagged Soil Shortcut
Feeling overwhelmed by all the mixing? No problem. You can get fantastic results with high-quality bagged soils from the garden center. It's the fastest and easiest way to get your garden up and running.
Just be sure to grab bags labeled "raised bed soil" or "garden soil." Standard "potting mix" is usually too light and not cost-effective for filling a large bed. For an extra boost, I like to mix two parts raised bed soil with one part bagged compost. This simple step enriches the soil and ensures your plants have plenty of food to start with. For beginners, this method is a game-changer; the superior aeration can increase crop yields by up to 30% compared to struggling with poor in-ground soil.
13 Easiest Plants to Grow for Guaranteed Success
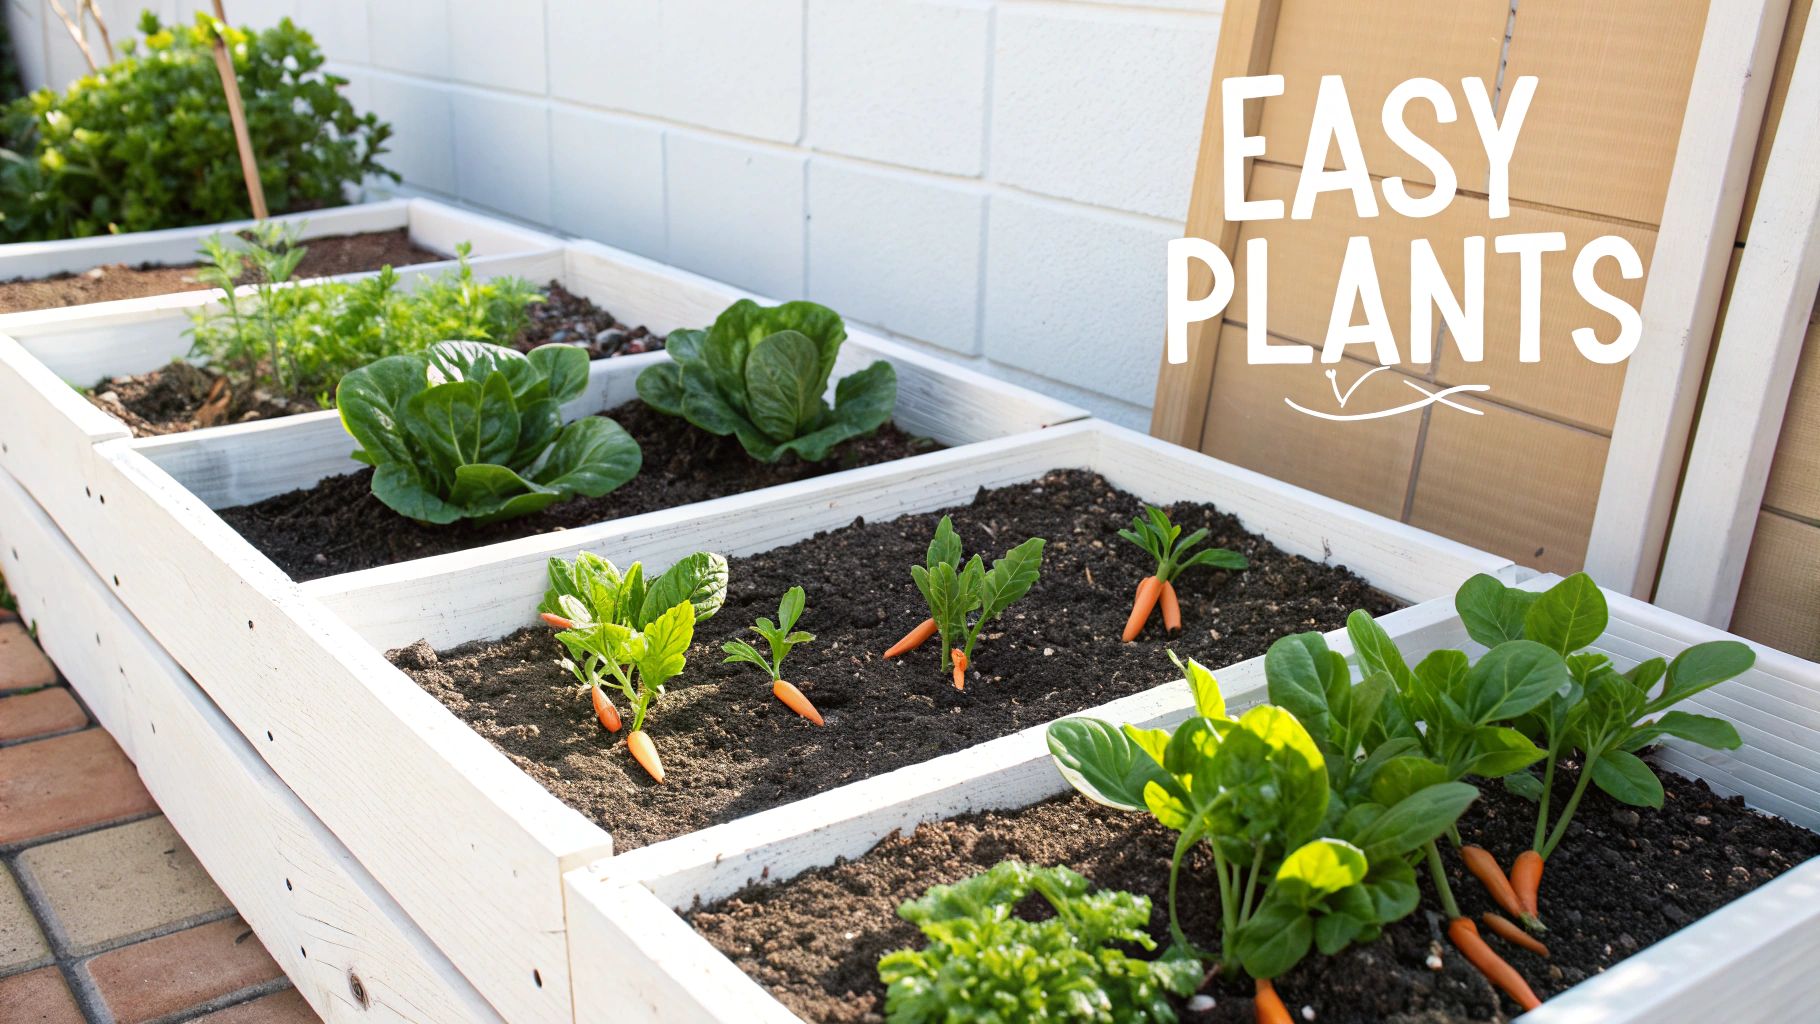
There's nothing quite like the feeling of harvesting something you grew yourself. It’s what builds real gardening confidence. Honestly, choosing the right plants for that first raised bed is probably the biggest decision you'll make.
By starting with easy-going, productive varieties, you’re setting yourself up for those early wins that make the whole process feel incredibly rewarding. Think of this list as your blueprint for a garden that actually gives back.
4 Foolproof Leafy Greens
Leafy greens are the absolute champions of raised bed gardening for beginners. Why? They grow fast, you can harvest from them over and over, and they don't demand a ton of fuss. You'll be tasting your own success in just a few short weeks.
- Loose-Leaf Lettuce: Forget trying to grow a perfect, tight head of lettuce. Loose-leaf types are a game-changer. You just snip the outer leaves as you need them, and the plant keeps producing from the center. This "cut-and-come-again" style means one planting can fuel your salads for months.
- Spinach: This cool-weather favorite is packed with nutrients and grows like a weed (in a good way). Plant it in the spring and fall for the best results. A little pro tip: give it some afternoon shade as the weather heats up to keep it from "bolting"—that’s when it flowers and turns bitter.
- Kale: Kale is the tough guy of the garden. It resists a lot of common pests and can even handle a light frost. In fact, a little cold kiss actually makes the leaves taste sweeter. Just like lettuce, you can harvest the outer leaves for a continuous supply.
- Swiss Chard: Want something that looks as amazing as it tastes? Plant Swiss chard. The vibrant, rainbow-colored stems add a gorgeous pop of color to your bed. It’s also way more tolerant of heat than spinach, so it’ll keep producing for you all summer long.
3 Easiest Fruiting Vegetables
The real magic of gardening happens when you see those first tiny vegetables start to form. It’s an exciting moment! These three plants are famous for being reliable producers in a raised bed.
- Bush Beans: While pole beans are fantastic, bush varieties are just simpler for a first-timer because you don't have to build them a big trellis. They grow into compact little bushes and tend to produce a big harvest all at once, which is perfect if you're thinking about freezing or canning some.
- Zucchini/Summer Squash: Seriously, be prepared for an avalanche of zucchini. These plants are legendary for their productivity. For most families, just one or two plants is more than enough. Just be sure to give them plenty of room to spread out, as their huge leaves can easily smother their neighbors.
- Cherry Tomatoes: Full-sized heirloom tomatoes can be a bit fussy. Cherry tomatoes, on the other hand, are practically foolproof. They’re less prone to diseases and cracking, and a healthy plant will give you hundreds of sweet, bite-sized fruits all season. A simple stake or a small cage is all the support they need.
The secret to a rewarding first garden isn't about growing the most exotic plants. It’s about choosing reliable producers that build your confidence and get you excited to harvest something fresh for your kitchen every week.
3 Essential Aromatic Herbs
Herbs are a no-brainer for any beginner's raised bed. They’re generally easy to care for, they don't take up much space, and many of them actually help protect your other plants by repelling pests.
- Basil: The quintessential summer herb. Basil absolutely loves sun and heat. If you pinch the growing tips regularly, you’ll encourage it to grow into a fuller, bushier plant with tons of leaves for pesto, pasta, and caprese salads.
- Mint: A quick word of warning: mint is an unstoppable force of nature. If you plant it directly in your bed, it will take over everything. The best way to control it is to plant it in a pot and then sink that pot right into your raised bed soil. You get all the fresh mint you want without a hostile garden takeover.
- Chives: This perennial herb is one of the first signs of life in the spring and one of the last to give up in the fall. Its mild onion flavor is great in almost anything, and its pretty purple flowers are edible and a huge draw for bees.
For a quick-glance guide, I've put together a little cheat sheet with some of the easiest vegetables to get you started.
Beginner Planting Cheat Sheet
This table breaks down the basics for five super-reliable veggies that are perfect for your first raised bed.
| Vegetable | Sun Needs | Spacing | Days to Harvest |
|---|---|---|---|
| Loose-Leaf Lettuce | 6+ hours (full sun) | 6-8 inches | 45-55 days |
| Spinach | 6+ hours (full sun) | 4-6 inches | 40-50 days |
| Bush Beans | 8+ hours (full sun) | 3-4 inches | 50-60 days |
| Radishes | 6+ hours (full sun) | 2-3 inches | 25-30 days |
| Cherry Tomatoes | 8+ hours (full sun) | 18-24 inches | 60-70 days |
Don't overthink it—just pick a few from this list, give them the sun and space they need, and you'll be well on your way to a successful first harvest.
3 Companion Flowers for Pest Control
Flowers aren't just for decoration in a vegetable garden. Planting specific flowers among your veggies is a simple, organic strategy called companion planting. It’s an old-school trick that works wonders.
- Marigolds: The distinct smell of marigolds is famous for warding off pests. They can help deter nasty nematodes in the soil and are a classic partner for tomatoes to help keep tomato hornworms away.
- Nasturtiums: These beautiful, edible flowers act as a "trap crop." Aphids, for whatever reason, find them irresistible and will often flock to them, leaving your more valuable plants like beans and kale alone.
- Borage: With its fuzzy leaves and stunning blue, star-shaped flowers, borage is an absolute magnet for pollinators. Planting it near your squash, cucumbers, or zucchini can dramatically increase your harvest by making sure all those blossoms get pollinated.
9 Essential Tips for Your First Growing Season
https://www.youtube.com/embed/uCM0Tvp6Dko
You did it. The bed is built, the soil is in, and your plants are finally in their new home. Now the real fun starts—tending your garden and watching it all come to life. Think of this as finding your garden's rhythm; a little consistent care is all it takes to turn that new bed into a productive patch of heaven.
This is where you'll develop the simple, rewarding habits that lead to an amazing harvest. To get you started on the right foot, here are nine tips I've learned over the years to guide you through your first season.
Mastering the Art of Watering
The number one mistake I see new gardeners make is with the watering can. Raised beds are fantastic for drainage, which keeps roots healthy, but that also means they dry out much faster than a traditional in-ground garden.
The trick isn't to water constantly, but to water deeply and less often. Your goal is to give the soil a thorough soaking two to three times a week, not a light sprinkle every day. A good rule of thumb is to stick your finger about two inches into the soil. If it comes out dry, it's time to water. And always aim for the base of the plants, not the leaves, to keep fungal diseases at bay.
Mulch Is Your Best Friend
Once your seedlings are a few inches tall, it's time to tuck them in. Add a two-inch layer of organic mulch—straw, shredded leaves, or wood chips work great—right on top of the soil. This one simple step has a huge payoff.
- Holds in Moisture: Mulch acts like a blanket, dramatically slowing down how quickly the sun and wind can evaporate water from your soil.
- Keeps Weeds Down: By blocking sunlight, mulch stops most weed seeds from ever getting the chance to sprout.
- Feeds the Soil: As it breaks down over the season, that organic mulch will slowly release nutrients back into your garden, improving its health over time.
Feed Your Plants Wisely
That amazing soil mix you started with gives your plants a fantastic head start, but heavy feeders like tomatoes and zucchini will eventually get hungry. About a month after you plant, it's a good idea to start giving them a little boost every few weeks.
You don’t need anything complicated. A simple all-purpose liquid organic fertilizer, like fish emulsion or a kelp meal blend, is perfect for the job. Just follow the directions on the package—with fertilizer, a little goes a long way.
Keep an Eye Out for Pests
Make a habit of walking through your garden every day or two just to see how things are doing. Peek under leaves and check around stems for common critters like aphids or cabbage worms. More often than not, you can solve a small pest problem before it ever becomes a big one.
For something like aphids, a strong spray of water from the hose is often enough to knock them off. For bigger bugs, hand-picking them in the morning is a surprisingly effective—and totally organic—solution.
The best pest control is a gardener's shadow. A quick daily stroll through your garden to observe your plants is the most powerful tool you have for catching issues early.
Don't Be Afraid to Prune
Pruning can feel a little scary at first, like you're hurting the plant, but it’s one of the best things you can do to get a bigger harvest. For vine-style tomatoes, for example, you’ll want to pinch off the "suckers" that pop up in the 'V' between the main stem and a branch. This tells the plant to put its energy into making delicious fruit instead of growing more leaves.
Provide Support with Trellising
The best way to get more out of a small space is to grow up! Vining plants like cucumbers, pole beans, and even some smaller squash varieties are much happier and healthier when they can climb.
A simple trellis made from bamboo stakes or a rigid wire panel gives them something to grab onto. This not only saves space but also improves air circulation around the plant (which means less disease) and makes harvesting a breeze.
Harvest Often for More Growth
Here's a great little secret: for many plants, harvesting is actually a signal to produce more. When you regularly pick your beans, snip herbs for dinner, or harvest zucchini, you're encouraging the plant to keep on flowering and setting new fruit.
And don't wait for your veggies to get gigantic! They are almost always tastier and more tender when you pick them on the younger side.
Stay on Top of Weeds
Even with a good layer of mulch, a few determined weeds will always find a way to poke through. The key is to get them while they're small, before their roots dig in deep and they start competing with your plants for water and nutrients. It really only takes a few minutes of your time each week.
Prepare for the Next Season
As your first season comes to a close, don't just walk away from the bed. Once the plants are spent, pull them out, get rid of any last weeds, and top the bed off with a fresh two-inch layer of compost.
This effectively "puts the bed to sleep" for the winter, protecting the soil and ensuring it will be rich, recharged, and ready for you next spring. It’s this kind of ongoing innovation that makes raised beds so popular. In fact, about 28% of new raised beds now include features like self-watering systems to simplify care. You can discover more garden marketing statistics to see how the industry is making gardening more accessible than ever.
Got Questions? We've Got Answers.
As you start your raised bed adventure, you're bound to have a few questions pop up. It happens to every gardener! Think of this as your go-to cheat sheet for those common head-scratchers. Knowing the "why" behind the "how" is what turns a beginner into a confident gardener.
How Deep Should a Raised Garden Bed Be?
For most of the things people love to grow—juicy tomatoes, crisp peppers, all sorts of leafy greens—a depth of 10 to 12 inches is the sweet spot. That gives their roots plenty of room to stretch out in all that lovely, loose soil you've provided, without ever hitting the hard, compacted ground below.
Now, if you've got your heart set on pulling up long, perfect carrots, parsnips, or even a nice crop of potatoes, you'll want to give them a bit more legroom. For these deep-diving root veggies, shoot for a bed that's 12 to 18 inches deep. It makes all the difference.
What Do You Put in the Bottom of a Raised Garden Bed?
This is probably the most-asked question I hear, and the best answer is also the simplest: cardboard. Yep, plain old corrugated cardboard (just be sure to pull off any plastic packing tape).
Lay it down directly on the grass or soil before you add your dirt. This simple layer is a powerhouse. First, it smothers any grass or weeds, stopping them from invading your pristine garden bed. Second, as it breaks down, it enriches the soil and becomes a feast for earthworms, inviting them to come and work their magic. Skip the landscape fabric; it can prevent those beneficial worms from getting in and can mess with drainage down the road.
Putting down a layer of cardboard is one of the best tricks in the book for a new raised bed. It's free, it works, and it gives you a massive head start against weeds.
How Often Should You Water Raised Beds?
Because raised beds have such fantastic drainage (a huge plus for healthy roots!), they also tend to dry out more quickly than a traditional garden plot. There's no single magic number for how often to water; it really depends on your local weather, the season, and what you’re growing.
The best way to know for sure is the old-fashioned finger test. Every morning, just poke your finger a couple of inches into the soil. If it feels dry, it's time to water. And when you do, give your plants a good, deep soak right at the base. A long, thorough drink encourages roots to grow deep and strong, which is far better than a quick, shallow sprinkle every day.
Is Pressure-Treated Wood Safe for Vegetable Gardens?
I get it, this one sounds a little scary. But the good news is that the days of arsenic-treated wood are long gone—the industry stopped using it for residential lumber way back in 2003.
Modern pressure-treated wood uses copper-based compounds that don't readily transfer into the soil or get absorbed by plants in any significant way. Most horticultural experts agree it’s safe for growing edibles. If you're still feeling a bit uneasy, you have easy options. You can build your bed with a naturally rot-resistant wood like cedar, or just line the inside walls of your treated-wood bed with a food-safe plastic liner.
Ready to turn that patch of lawn into a thriving garden? At Homegrown Garden, we've got everything you need to get growing, from our favorite heirloom seeds to easy-to-build kits and guides written by gardeners, for gardeners. Come see what's new and start your journey at https://www.homegrown-garden.com.

