


Picture this: you're making pasta and need some fresh basil. Instead of running to the store, you just snip a few leaves from a plant on your kitchen windowsill. Or maybe you're craving a fresh salad and can harvest crisp lettuce right from a pot in your living room.
Growing your own food indoors isn't some far-off dream reserved for master gardeners. It's actually a super rewarding and totally achievable project for anyone, even if you just have a little bit of light and space to work with. Let's dive into 11 foolproof edible indoor plants that are perfect for getting started.
Starting Your Indoor Edible Garden
Turning a small corner of your home into a mini-garden brings more than just fresh ingredients to your table. There's a simple, profound joy in watching a tiny seed sprout and grow into something you can actually eat. Plus, you get instant access to produce you know is completely free of pesticides.
This guide is all about getting straight to the point. I'll show you how a little bit of light, the right amount of water, and some basic care can bring your indoor garden to life. You absolutely don't need a sprawling backyard to get in on the action; a sunny window, a small shelf, or even a bit of countertop space is all it takes.
This isn't just a niche hobby, either. The global indoor plants market is absolutely booming and is expected to hit USD 30.25 billion by 2032. It's all part of a bigger shift toward urban gardening and people wanting to feel more connected to their food.
3 Reasons to Grow Edible Plants Indoors
For anyone living in an apartment or a home without much outdoor space, an indoor garden is a total game-changer. It’s the perfect way to connect with what you eat.
Here are just a few of the perks:
- Year-Round Freshness: Forget about seasons. You can have fresh herbs, greens, and even some small veggies ready to pick whenever you want them.
- Complete Control: You are in charge of what goes onto your plants. No weird pesticides or herbicides—just clean, healthy food for your family.
- Educational and Fun: It’s an incredible hands-on learning experience, especially for kids. You get to see the entire life cycle of a plant unfold right before your eyes.
I've been growing herbs indoors for years, and honestly, it's the ultimate convenience. There’s nothing better than needing a sprig of mint for a mojito or a handful of chives for scrambled eggs and just walking a few feet to grab it.
The first step on this journey is picking the right plants. I've put together a list of 11 reliable options that I know do really well inside.
Before we get into the specific plants, it helps to have a quick overview of the basics. To get you started on the right foot, I've created a simple table below that summarizes what some of the easiest plants need.
Quick Start Guide for Your Indoor Edible Garden
This table is your cheat sheet for choosing your first few plants. It breaks down the most popular categories and their essential care requirements, so you can pick what works best for your home and lifestyle.
| Plant Type | Light Needs | Watering Frequency | Best For |
|---|---|---|---|
| Herbs | 6-8 hours of bright, indirect light | Water when top inch of soil is dry | Beginners, small spaces, frequent use in cooking |
| Leafy Greens | 4-6 hours of direct light (or grow light) | Keep soil consistently moist but not soggy | Quick harvests, salads and sandwiches |
| Microgreens | 4+ hours of bright, indirect light | Mist daily to keep soil surface damp | Super fast-growing, nutrient-dense garnishes |
| Small Fruits | 8-10 hours of direct, intense light | Varies by plant; often needs consistent moisture | Gardeners with a sunny spot looking for a fun challenge |
Think of this as your jumping-off point. Each plant has its own personality, but these general guidelines will set you up for success.
For a deeper dive into the fundamentals, from choosing the right containers to understanding soil mixes, check out our comprehensive post on how to start an indoor garden. It covers all the core knowledge you’ll need for a thriving, delicious harvest.
3 Steps to Find the Perfect Spot for Your Plants
Where you decide to put your indoor garden is easily the most critical choice you'll make. It’s not just about finding an empty corner; it's about finding the right environment. Think of it like real estate for your plants—location is everything.
I always tell people to forget vague advice like "put it in a bright spot." We can do better than that. Spend a day just watching the light move through your home. You'll quickly discover which spots are prime real estate for your future harvest.
A south-facing window is the jackpot for sun-worshippers like cherry tomatoes or a pot of basil. It gets blasted with strong, direct light for most of the day. On the flip side, an east-facing window offers a much gentler morning sun, which is perfect for delicate greens like lettuce and spinach that can't handle the intense heat of an afternoon blast. West-facing windows get that strong afternoon light, great for many herbs, while a north-facing window is the shadiest spot, and frankly, not ideal for most edibles without a little help.
1. Decode Your Home’s Light
To really get a feel for your space, map out the sun's path. Where do the direct beams hit? And for how long? This simple bit of observation is your best tool for figuring out which plants will be happy where.
Here are a few tricks I've learned over the years to squeeze out every last drop of sunlight:
- Clean your windows! You'd be shocked how much light a layer of dust and grime can block. A quick wipe-down can make a world of difference.
- Use reflective surfaces. A strategically placed mirror or even just a plain white wall can bounce light back onto your plants, giving them a much-needed boost.
- Trim any outdoor blockers. If that tree branch outside is casting a huge shadow over your best window, a little pruning can open things up dramatically.
If you're looking for more ways to brighten things up, you can find some expert tips on increasing natural light that apply to almost any home.
2. Know When to Use Grow Lights
Let’s be realistic. What if your apartment faces a brick wall or you live somewhere with long, gray winters? Don't give up! This is exactly what grow lights were made for. They are your personal, on-demand sunshine.
Modern LED grow lights are a game-changer. They’re super energy-efficient and provide the specific light spectrum that plants crave for photosynthesis. You don't need a huge, professional setup, either. A simple clip-on lamp or a light strip tucked under a kitchen cabinet can work wonders. If you want to dive deeper into the options, we've put together a full guide on the best grow lights for indoor plants.
The secret to using grow lights is all about consistency. Your plants need a routine. I always recommend putting them on a timer for 12-16 hours a day to mimic a natural day-night cycle. This gives them a steady flow of energy without burning them out.
3. Choose the Right Container
Finally, let's talk about pots. The container you choose is your plant's home, and it’s about so much more than just looks. The material and size directly impact the health of your plant's roots.
- Terracotta Pots: These classic clay pots are porous, meaning they breathe. This is perfect for herbs like rosemary or thyme that despise having "wet feet" and need their soil to dry out a bit between waterings.
- Glazed Ceramic or Plastic Pots: These are non-porous, so they hold onto moisture much longer. They’re a fantastic choice for thirstier plants like mint or most leafy greens that prefer to stay consistently damp.
- Fabric Pots: I'm a huge fan of these. They provide amazing aeration, which prevents the roots from circling the bottom of the pot (a common problem called being "root-bound"). Instead, it encourages a dense, fibrous root system, which ultimately means a healthier, more robust plant.
No matter which material you choose, there's one rule that is absolutely non-negotiable: drainage. Your pot must have at least one hole in the bottom. Without it, water pools up, the roots drown, and you get root rot—the fastest way to kill an indoor plant. Get this part right, and you've built the perfect foundation for a fantastic harvest.
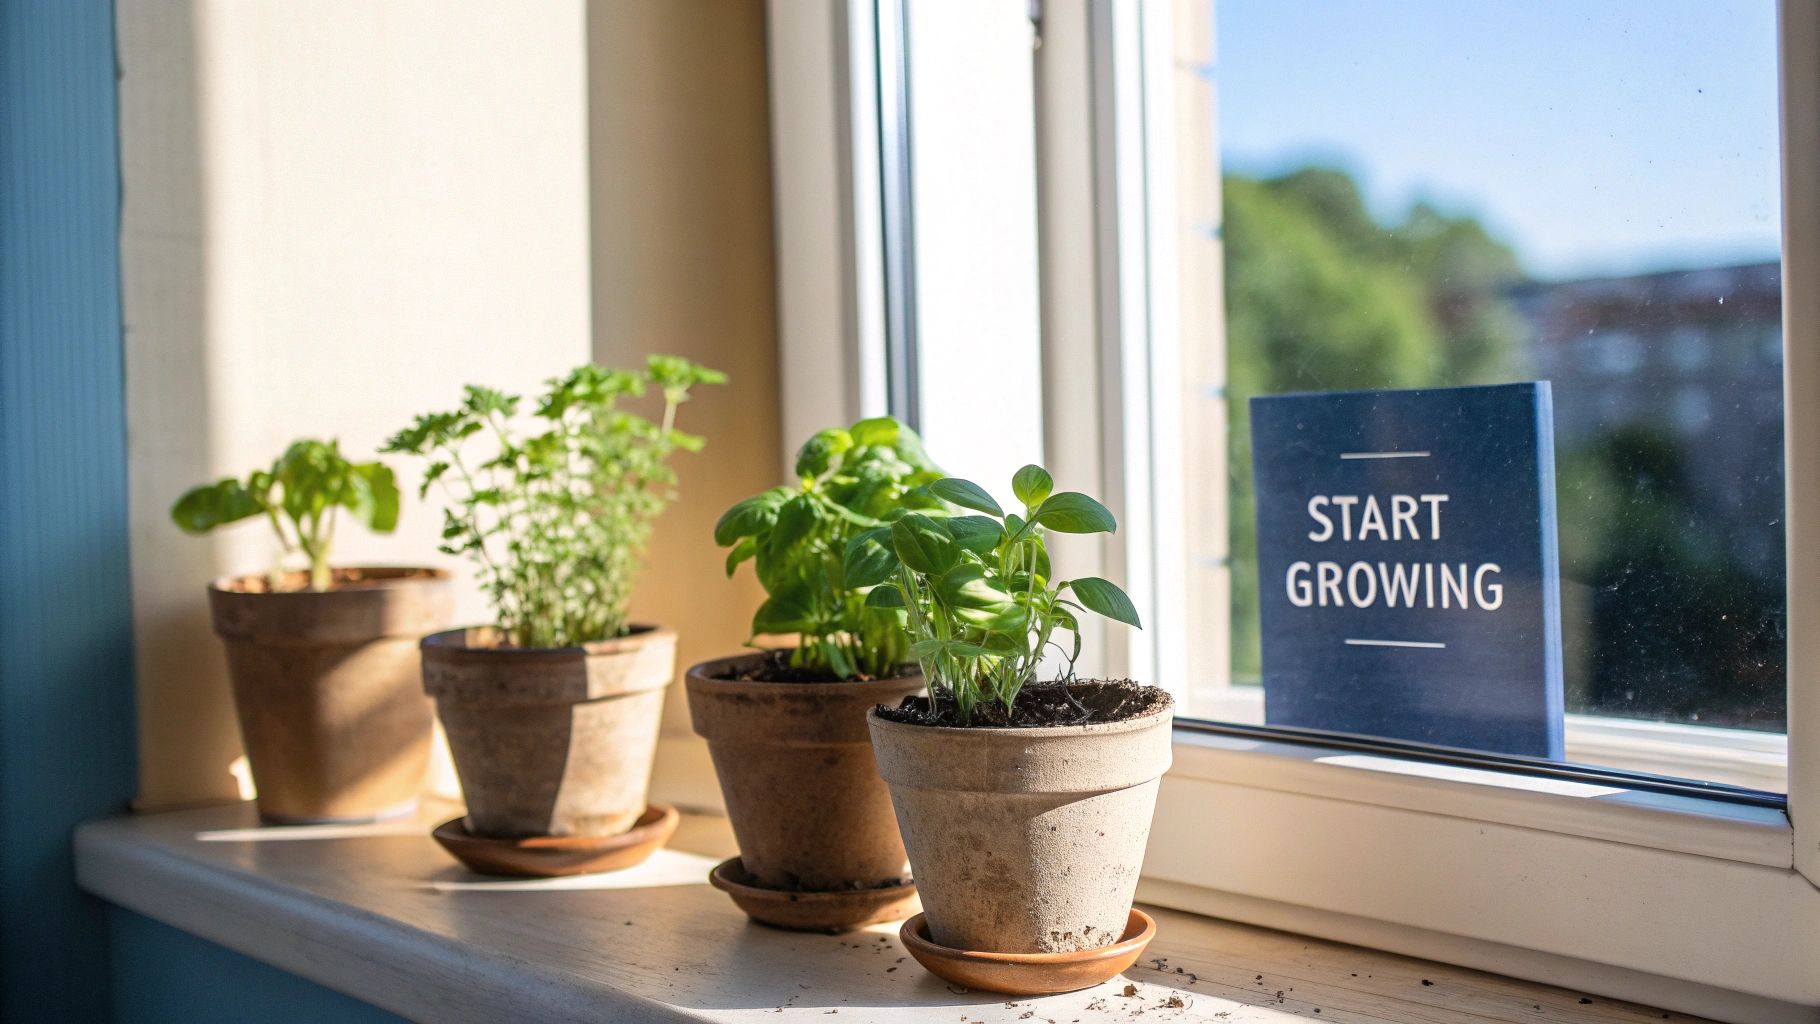
11 Edible Indoor Plants That Actually Thrive
Alright, let's get to the fun part—picking your plants. You can forget about those finicky, high-maintenance varieties you see in glossy gardening magazines. I’ve rounded up 11 tried-and-true winners that are practically made for growing indoors. For each plant, we'll cover the essentials: how much light they need, their watering schedule, and the right soil, plus a few tips I've picked up along the way to guarantee a great harvest.
From kitchen staples like basil to some you might not expect, like radishes, this list is your ticket to a productive indoor garden. We're going to turn your windowsill into a source of fresh, tasty ingredients.
This infographic breaks down the three most important things to consider when setting up your indoor garden.
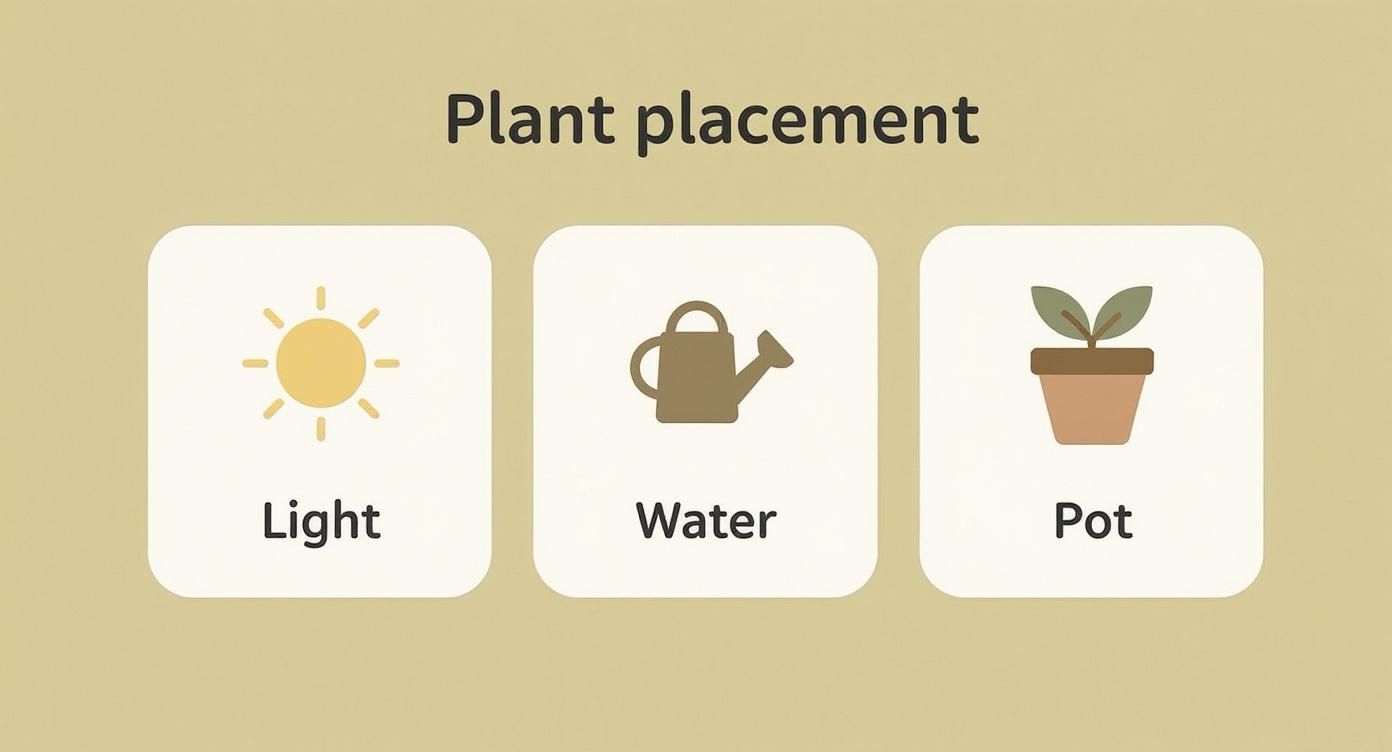
Getting the balance right between light, water, and your choice of container is really the foundational secret to success.
1. Basil
Basil is, without a doubt, the king of indoor herbs. The aroma alone makes it worth growing, and it does incredibly well in a simple pot on a sunny windowsill.
- Light: This plant is a total sun-worshipper. Give it at least 6-8 hours of direct sun every day. A south-facing window is its happy place. If you see the stems getting long and spindly with just a few leaves—what gardeners call "leggy"—it's crying out for more light.
- Water: The goal is consistently moist soil, but never soggy. A good rule of thumb is to water thoroughly whenever the top inch of soil feels dry. Basil also hates having wet leaves overnight, so try to water at the base of the plant in the morning.
- Pro Tip: The real secret to a big, bushy basil plant is to harvest it often. As soon as the plant has a few sets of leaves, pinch off the very top set. This simple trick encourages it to branch out from the sides, giving you a much fuller plant and a bigger harvest.
2. Mint
Mint is famously easy to grow. In fact, it's so vigorous it can quickly take over an outdoor garden bed. That's what makes it the perfect, well-behaved candidate for an indoor container, where its aggressive roots are safely contained.
- Light: Mint is much more forgiving than basil. It loves bright, indirect light but will do just fine in lower-light spots, like an east-facing window.
- Water: This one's a thirsty plant! Mint prefers its soil to stay consistently damp, so don't let it dry out completely.
- Harvesting: Just snip off stems and leaves as you need them. Trimming it regularly actually keeps the plant compact and encourages it to produce that tender new growth that's perfect for teas, salads, or mojitos.
3. Chives
For anyone just starting out, chives are a fantastic choice. They have a delicate onion flavor, and their bright green, grass-like shoots add a nice pop of color to your kitchen. Best of all, they're incredibly resilient.
- Light: They'll be happiest in a spot that gets at least 4-6 hours of bright, direct sunlight.
- Water: Let the top layer of soil dry out, then give it a good watering. Chives can handle a little neglect but do best with consistent moisture.
- Pro Tip: When you're ready to harvest, grab some scissors and snip the leaves about an inch from the soil. Just be sure to never cut off more than a third of the plant at once so it has plenty of energy to regrow quickly.
4. Parsley
Whether you like the flat-leaf Italian kind or the curly variety, parsley is a workhorse in the kitchen and a surprisingly pretty houseplant. It also happens to be packed with nutrients and grows happily in a pot.
- Light: Parsley really enjoys bright light but can get a little scorched by intense, direct afternoon sun. An east-facing window usually provides the perfect balance.
- Water: Aim to keep the soil evenly moist. You'll know when it's thirsty because it will droop dramatically, but don't worry—it almost always perks right back up after a good drink.
- Harvesting: The best way to harvest is by snipping the outer stems first. This allows the younger, inner stems to keep maturing, giving you a continuous supply all season long.
5. Microgreens
If you're looking for near-instant gratification, microgreens are the answer. They are just the tiny, young seedlings of vegetables and herbs (think broccoli, kale, radish, or basil) that you harvest right after their first set of true leaves appear. They are incredibly flavorful and nutrient-dense.
- Light: A bright windowsill is all they need, about 4 hours of direct light per day is plenty.
- Water: The key here is to keep the soil surface consistently damp but not flooded. A simple spray bottle is your best friend for this, as a heavy stream of water can easily wash away the tiny seedlings.
- Pro Tip: You don’t need a deep container for these. A shallow tray or even a recycled takeout container with a few drainage holes poked in the bottom works perfectly. Since you harvest them so young, their root systems never get very big.
6. Lettuce Greens
Imagine snipping off fresh leaves for a salad right from your countertop. Loose-leaf lettuce varieties like 'Black Seed Simpson' or 'Oakleaf' are ideal for growing indoors because you can harvest individual leaves as they mature without pulling up the whole plant.
- Light: Lettuce needs a solid 4-6 hours of light. If you don't have a window that gets that much sun, it does exceptionally well under a simple grow light.
- Water: Keeping the moisture level consistent is important. If the soil dries out, the leaves can turn bitter.
- Harvesting: Use the same "cut-and-come-again" method as with parsley. Just snip the larger, outer leaves and leave the central bud intact to keep producing more. You can easily get several harvests from one plant this way.
The love for these easy-to-grow plants is more than just a feeling. A quick look at social media shows a huge interest in basil, mint, and microgreens, with related posts easily topping 50,000 daily across the globe. This online buzz, combined with a growing desire for sustainable living, has helped drive a 25% growth in sales for eco-friendly houseplant products in just the last three years. You can see more data behind this movement in these houseplant statistics.
7. Spinach
Much like lettuce, spinach is another cool-season green that adapts beautifully to life indoors. It’s a fast grower, and you can start picking tender baby leaves in just a matter of weeks.
- Light: Spinach does well with at least 4 hours of direct sun, but it will wilt if it gets too hot. A cooler, east-facing window is often the perfect spot for it.
- Water: To encourage tender, delicious leaves, keep the soil consistently moist.
- Pro Tip: Make sure you choose a container that's at least 6-8 inches deep. Spinach has a main taproot that needs some room to grow downward, and a deeper pot will result in a healthier, more productive plant.
8. Garlic Greens
You don't need a sprawling garden to grow your own garlic—at least, not the greens. You can easily sprout a single clove of garlic in a small pot and harvest the mild, flavorful green shoots that emerge.
- Light: They aren't fussy at all and will grow just fine in a moderately bright spot, even without hours of direct sun.
- Water: Just water whenever the soil feels dry. It's one of the most low-maintenance options out there.
- How-To: Simply take a garlic clove from your kitchen and plant it pointy-side-up about an inch deep in a pot of soil. Within a week or two, you'll see the green shoots. Snip them just like chives to add a fresh kick to salads, eggs, or soups.
I love growing garlic greens because it feels like a total gardening hack. You're taking a single clove from your pantry and turning it into a perpetual source of fresh flavor. It's one of the most rewarding and low-effort edible indoor plants out there.
9. Radishes
This one might come as a surprise, but yes, you can absolutely grow radishes indoors! The trick is to choose a small, round variety like 'Cherry Belle'. While you won't get a massive crop, it's a really fun and fast-growing project.
- Light: To form proper roots, they need a good 6 hours of bright light. A sunny windowsill is good, but a grow light is even better.
- Water: Keep that soil consistently moist. If it dries out, the radishes can get woody or even crack.
- Container: Your pot needs to be at least 6 inches deep to give the root enough space to swell. It's also important to thin your seedlings so they're about 2 inches apart—overcrowding is the number one enemy of a good radish.
10. Thyme
This hardy, woody herb brings a wonderful earthy fragrance and flavor right into your home. It’s a Mediterranean native, which tells you everything you need to know about its preferences.
- Light: Thyme demands bright, direct sunlight—think 6+ hours a day.
- Water: This is critical: thyme absolutely hates having "wet feet" and is very prone to root rot. You must let the soil dry out completely between waterings. When in doubt, it’s always better to underwater than to overwater this plant.
- Soil: Use a potting mix that drains really well. You can improve drainage by adding some sand or perlite to a standard potting soil, which will help keep your thyme happy.
11. Scallions (Green Onions)
Finally, we have the ultimate kitchen scrap recycling project. You can easily regrow scallions from the white, stringy-rooted ends that you would normally toss in the compost.
- Light: All they need is a bright windowsill.
- Water: This couldn't be easier. Just place the root ends in a shallow glass of water, making sure only the roots are submerged. Swap out the water every couple of days to keep it fresh.
- Harvesting: In about a week, the green tops will have started to regrow. You can snip off what you need with scissors, and they'll keep growing for several cycles. If you want a more permanent plant, just plant the rooted ends in a small pot of soil.
3 Keys to Mastering Your Indoor Garden Care Routine
https://www.youtube.com/embed/uHLChW4R5vw
Growing great edible plants indoors doesn't come down to some complicated secret or fancy gadget. It's all about simple, consistent habits that give your plants exactly what they need, right when they need it. Think of this routine as the final, crucial piece of the puzzle—it's what turns your initial setup into a garden that truly thrives.
The biggest hurdle for most new gardeners? Watering. We've all been there, poking at the soil, wondering if it's too wet or too dry. Luckily, there’s a foolproof method that costs nothing and takes just a few seconds.
1. The Art of Watering Your Edible Plants
First things first: forget rigid schedules like "water every Tuesday." A plant's thirst changes all the time, depending on the season, the humidity in your home, and how much light it's getting. The best way to know for sure is the good old 'finger dip' test.
Just stick your index finger about an inch deep into the soil. If it feels dry at the tip, it’s time for a drink. If you feel any moisture at all, hold off for another day or two. This simple test is the single best way to prevent both overwatering (the #1 killer of indoor plants) and underwatering.
When it is time to water, you have a couple of solid options.
- Top-Watering: This is the classic approach. You pour water over the soil surface until you see it draining out of the bottom. This method is great for flushing out any salt buildup from fertilizers that can accumulate over time.
- Bottom-Watering: For this, you place the pot in a shallow tray of water and let the soil soak it up like a sponge from the bottom. It's a fantastic way to encourage deep, strong root growth and is perfect for plants that dislike wet leaves, like basil, which can be prone to mildew. I like to alternate between the two to give my plants the best of both worlds.
2. A Simple Guide to Feeding and Fertilizing
Think of fertilizer as a vitamin supplement for your plants. Potting soil comes with some nutrients, but your plants will eventually use them all up, especially if they're working hard producing leaves and fruit for you to eat. For anything you plan to consume, sticking with organic options is non-negotiable.
A balanced, all-purpose liquid organic fertilizer is a fantastic choice for most herbs and leafy greens. Look for ingredients you recognize, like worm castings, kelp, or compost tea. These feed not just the plant, but the soil itself, creating a healthier little ecosystem right there in the pot.
When it comes to feeding, less is often more. I always recommend feeding plants at half the strength listed on the bottle every 2-4 weeks during the peak growing season (spring and summer). Then, I stop completely in the fall and winter when the plant’s growth naturally slows down.
For a deeper dive into year-round plant maintenance, our complete indoor plant care guide covers everything from seasonal adjustments to knowing when it's time to repot.
3. How to Keep Your Indoor Garden Pest-Free
One of the huge perks of growing indoors is having far fewer pest problems to deal with. But, a few annoyances can still sneak in, with fungus gnats being the most common offender. These are those tiny, black flies you might see buzzing around your pots, and they absolutely love damp soil.
The good news? You don't need harsh chemicals. The most effective, non-toxic solutions are often the simplest.
3 Organic Ways to Handle Common Pests:
- Let the Soil Dry Out: The absolute best way to fight fungus gnats is to let the top inch or two of soil dry out completely between waterings. Their larvae simply can't survive in dry conditions.
- Use Sticky Traps: Bright yellow sticky traps placed near the soil are incredibly effective at catching the adult gnats, which quickly breaks their life cycle.
- Try a Soil Topper: A thin layer of coarse sand or decorative pebbles on top of your soil creates a physical barrier, preventing adult gnats from laying their eggs in the first place.
It’s no surprise that the market for indoor foliage is booming. Valued at around USD 1.5 billion, it's projected to grow by 7% annually through 2033. This trend is driven by our collective desire to bring a bit of nature and health indoors. You can read more about these market trends on Archive Market Research.
6 Common Indoor Plant Problems and Their Organic Solutions
Even with the best care, you might run into a few bumps along the road. Don't panic! Most issues are easy to fix once you know what to look for. This table covers some of the most common problems and how to solve them organically.
| Symptom (e.g., Yellowing Leaves) | Potential Cause | Organic Solution |
|---|---|---|
| Yellowing Leaves | Overwatering, nutrient deficiency, or natural aging of lower leaves. | Check soil moisture with the 'finger dip' test. If soil is soggy, let it dry out. If dry, consider feeding with a balanced organic fertilizer. |
| Brown, Crispy Leaf Tips | Low humidity or inconsistent watering. | Group plants together to increase local humidity, use a pebble tray with water, or mist occasionally. Ensure consistent watering. |
| Leggy or Stretched Growth | Not enough light. | Move the plant to a brighter location, closer to a south-facing window, or supplement with a grow light. Rotate the plant weekly. |
| White Powdery Substance on Leaves | Powdery mildew (a fungal disease). | Improve air circulation. Wipe leaves with a solution of 1 part milk to 9 parts water, or a neem oil spray. |
| Wilting Plant (Even with Moist Soil) | Root rot from overwatering. | Immediately stop watering. Gently remove the plant, trim any black, mushy roots, and repot in fresh, well-draining soil. |
| Tiny Flying Insects Around Soil | Fungus gnats. | Allow the top 1-2 inches of soil to dry out between waterings. Use yellow sticky traps to catch adults. |
Remember, observing your plants is the best skill you can develop. A little attention goes a long way in catching and correcting these issues before they become big problems. Happy growing
3 Tips for Harvesting and Enjoying Your Homegrown Food
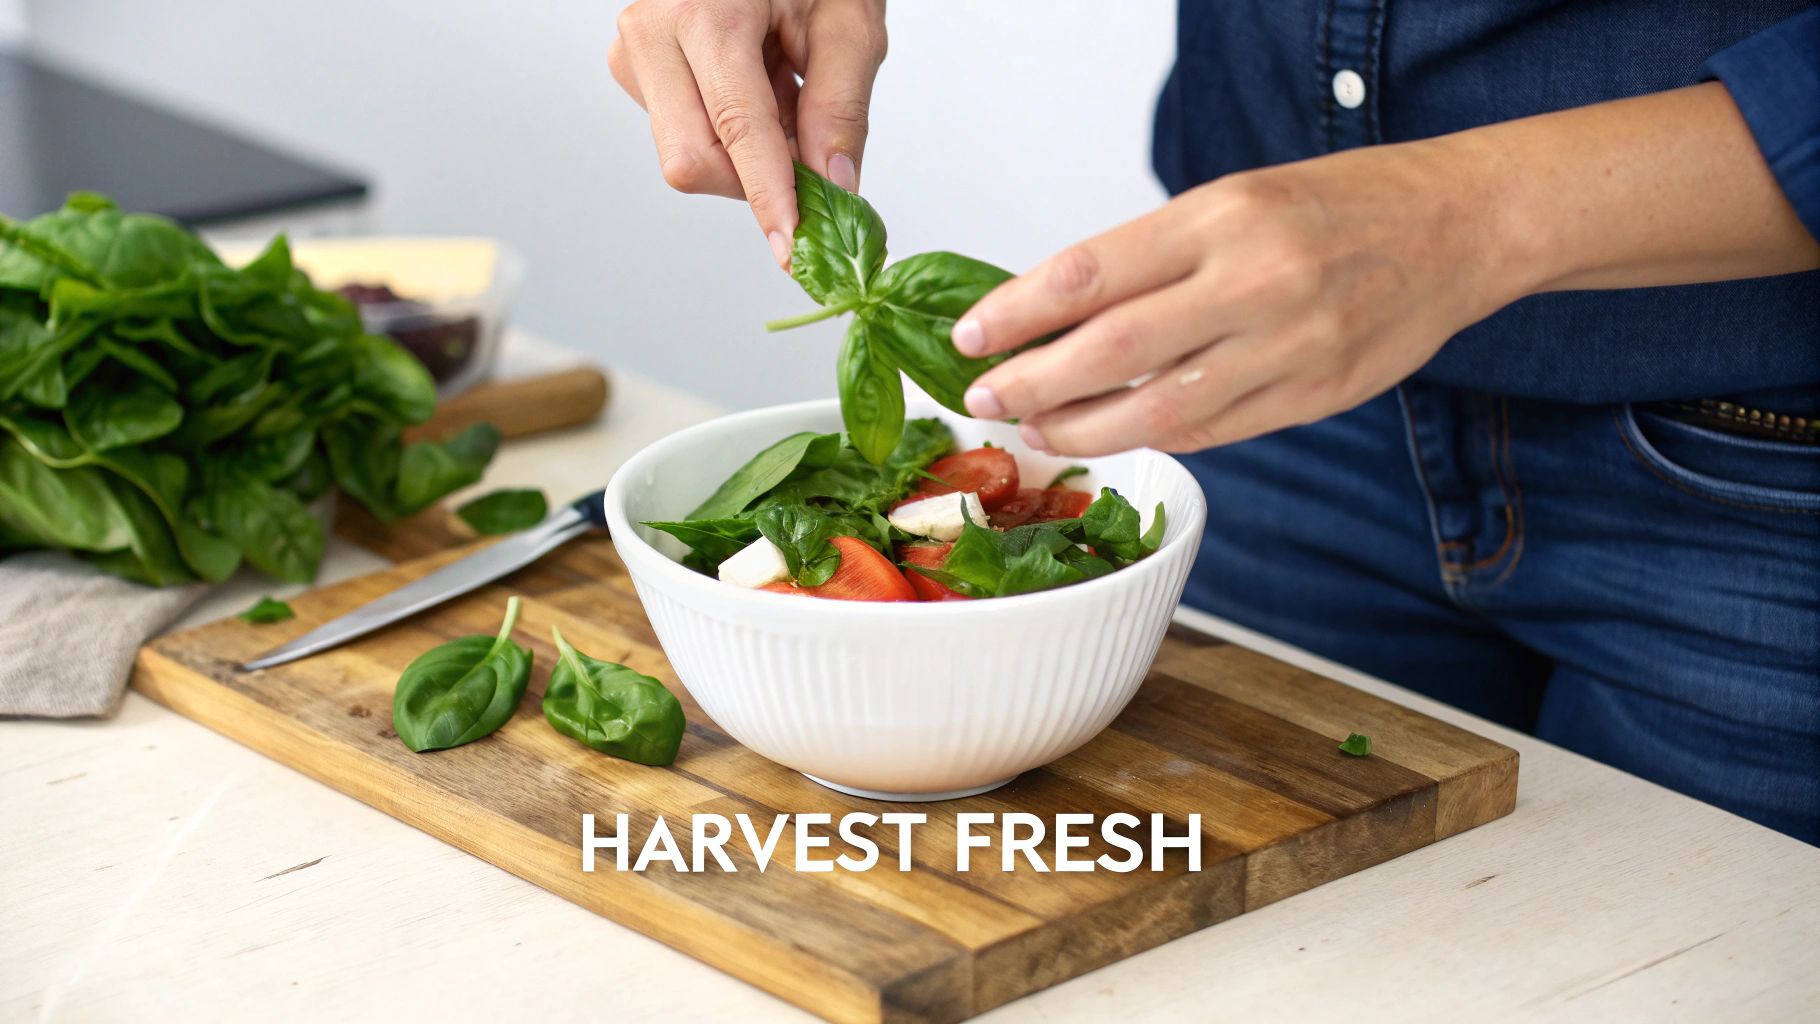
This is it—the moment all your patience and care pays off. You’re about to turn those thriving plants into something delicious. Knowing exactly when and how to harvest is what unlocks the best flavor, and for many plants, it’s also the secret to encouraging even more growth. It’s the final, rewarding step that brings everything full circle.
Harvesting isn't a one-size-fits-all deal. Each plant gives its own little signals that it’s ready, and learning to read these cues means you’ll be picking everything at its absolute peak. Think of it as a conversation with your plants; regular harvesting keeps them healthy and productive.
1. Know When to Harvest Your Plants
Timing is everything. For leafy greens and herbs, I always try to harvest in the morning. The plant’s cells are plump with water, making the leaves crisp and the flavors pop. If you wait until the end of a hot day, you might find they’re a bit wilted and less potent.
Here are the specific signs I look for with a few indoor favorites:
- Leafy Greens (Lettuce, Spinach): Start picking the outer leaves as soon as they’re a usable size—around 3-4 inches long. Forget waiting for a perfect, grocery-store head to form; you can enjoy them much sooner this way.
- Herbs (Basil, Mint, Parsley): Once the plant looks established with several sets of leaves, it’s ready. For basil, I always pinch off the top sets of leaves right above a node. This little trick forces it to grow bushy and full rather than tall and spindly.
- Cherry Tomatoes: The signs are pretty clear on these. You’re looking for a deep, uniform color (usually a vibrant red) and a slight give when you gently squeeze the fruit. A perfectly ripe tomato will practically fall off the vine with a gentle tug.
2. Master the Cut-and-Come-Again Method
One of the best techniques for a steady supply of greens and herbs is what we call the cut-and-come-again method. It’s a simple strategy that lets you take multiple harvests from one plant, often for weeks or even months. Instead of yanking the whole plant out, you just take what you need.
This method is a total game-changer for indoor gardeners. By harvesting just the outer leaves of lettuce or the top sprigs of parsley, you leave the central growth point (the crown) untouched. This signals the plant to keep pushing out new, tender growth, giving you a nearly endless supply.
With this simple trick, a small pot with just 3-4 lettuce plants can easily provide enough fresh greens for one person's daily salad. It really transforms your indoor garden from a one-off project into a sustainable source of fresh food.
3. Discover 5 Creative Ways to Use Your Harvest
Okay, you’ve got your harvest. Now the real fun begins. The flavor of homegrown food is just so much more vibrant than anything from a store. After picking your fresh indoor plants, you'll want to preserve those delicate nutrients and flavors in the kitchen. Using the best healthy cooking pans can make a real difference.
Here are five of my go-to ideas to get you started:
- Craft the Perfect Mint Tea: Steep a handful of freshly picked mint leaves in hot water. It’s incredibly soothing and aromatic.
- Make Homemade Basil Pesto: Nothing beats homemade. Blend your fresh basil with pine nuts, parmesan, garlic, and good olive oil for a pesto that’s bursting with real flavor.
- Whip Up Garlic Green Butter: Finely chop your garlic greens and mix them into softened butter with a pinch of salt. It’s incredible on toast or melted over steamed veggies.
- Create a Microgreen Garnish: Sprinkle a handful of radish or broccoli microgreens over soups, salads, or avocado toast. They add a spicy, nutrient-packed crunch.
- Infuse Your Own Oils: Gently bruise some herbs like thyme or rosemary and drop them into a bottle of quality olive oil. In a week or two, you’ll have your own custom-flavored cooking oil.
3 Common Questions About Edible Indoor Gardening
Even with the best guide, a few questions are bound to pop up when you're trying something new. Getting into edible indoor gardening is a blast, but it’s totally normal to feel a bit uncertain at first. This section is all about tackling the most common things people ask, so you can get quick answers and get back to growing.
Think of this as your personal FAQ for those little "uh-oh" or "what if" moments. We'll cover everything from how much this hobby will actually cost to making sure your green additions are safe for your four-legged family members. Getting these worries sorted out early builds confidence and lets you enjoy the process.
1. What’s the Real Cost to Start an Indoor Edible Garden?
Starting an indoor garden can be incredibly cheap, and you really have a ton of control over the budget. On the low end, you can get everything you need for next to nothing.
A few seed packets usually run $2-$4 each, a decent bag of potting soil is about $5-$10, and you can find basic pots for $1-$5 a pop. Honestly, if you get creative and upcycle things like yogurt cups or plastic containers from your kitchen (just be sure to add drainage holes!), you could easily keep your startup costs under $20. The biggest wildcard is always lighting. If your windows don't cut it, a simple grow light bulb can be had for around $20, while a more serious setup could push past $100.
2. Can I Grow Edible Plants Indoors With Pets Around?
Yes, absolutely! You just need to be smart about it. The great news is that a lot of the most popular edibles—like basil, mint, and parsley—are perfectly safe for both cats and dogs.
That said, you have to do your homework. Some plants are definitely toxic if your pet decides to snack on them. For instance, the leaves and stems of tomato plants are a no-go (even though the ripe fruit is okay), and anything in the onion family, like garlic and chives, can cause big problems.
Here's my golden rule: always, always look up the specific plant you want to grow. A quick check on the ASPCA's toxic and non-toxic plant list will tell you everything you need to know. To keep curious critters at bay, try using hanging planters or putting your pots on high shelves they can't reach.
3. How Do I Keep Bugs Off My Indoor Plants?
One of the biggest perks of gardening inside is that you deal with way fewer pests. But "fewer" doesn't mean "zero." The best defense is a good offense, which means creating a space where bugs just don't want to be.
- Don't Overwater: I can't stress this enough. Soggy, constantly wet soil is basically an open invitation for fungus gnats, which are by far the most annoying indoor pest.
- Keep the Air Moving: Good airflow helps prevent fungal problems like powdery mildew and makes your plants less hospitable to bugs. A small, oscillating fan can work wonders.
- Inspect Regularly: Get in the habit of checking your plants over every few days. Pay close attention to the undersides of leaves, as that's where pests like spider mites and aphids love to hide.
If you do find some unwanted visitors, don't panic. Start simple. You can often just wipe them off with a damp cloth or spray the plant down with a little bit of water and a single drop of dish soap. If you have a more stubborn infestation, organic solutions like neem oil or insecticidal soap are safe for edibles and get the job done.
Ready to turn your space into a green, productive oasis? At Homegrown Garden, we've got everything you need to get growing, from unique heirloom seeds to complete kits for beginners. Check out our collection and start your journey at https://www.homegrown-garden.com.

