


Building a cold frame is a lot simpler than you might think. At its core, it's just a bottomless box with a clear, sloped lid designed to catch the sun's warmth. This straightforward setup creates a mini-greenhouse, letting you shield your plants from rough weather and stretch your gardening season by months.
Why a Cold Frame Is Your Garden's Best Kept Secret
Before you start pulling out your tools, let's talk about why a cold frame is such a game-changer for any gardener. It's so much more than a simple box—it’s a microclimate you can control, a secret weapon for a longer and more bountiful growing season.
Picture this: you're in zone 5 and itching to start your tomatoes six weeks early. Or maybe you're in zone 8 and dreaming of fresh salad greens all winter long. A cold frame turns these goals into reality. It creates a pocket of protection where the soil stays several degrees warmer than the surrounding ground, guarding your plants against frost, harsh winds, and downpours.
A Nursery for Young Plants
One of the best uses for a cold frame is for "hardening off" seedlings. This is the crucial step of slowly getting your indoor-started plants used to the great outdoors. Instead of the daily shuffle of moving trays in and out of the house, you can just pop them into the cold frame.
Inside, they get real sunlight and learn to handle temperature swings, all from within a safe space. This process strengthens them immensely, making them tougher and reducing the shock they experience when you finally transplant them into the garden.
Beat the Seasons and Boost Your Harvest
A cold frame gives you the power to bend the rules of the traditional planting calendar. You can get a jump on cool-weather crops like spinach, lettuce, and radishes weeks earlier in the spring. It also helps prevent them from bolting (flowering too early) by keeping the soil from getting too hot as the season warms up.
Come fall, it becomes a haven for extending your harvest.
- Winter Greens: You can sow kale, chard, and mâche for a steady supply of fresh greens right through the coldest part of the year.
- Root Vegetables: Carrots and beets can stay in the ground under the frame's protection, ready for you to pull whenever you need them.
- Perennial Head Start: It’s the perfect nursery for young perennials, giving them a sheltered spot to get established before they have to face their first winter.
This simple structure isn't just a fleeting trend. The recent boom in sustainable urban gardening has put a spotlight on its value. In fact, some surveys show that approximately 25% of urban gardeners in North America and Europe rely on cold frames to push their growing seasons. You can read more about the data behind this trend over at Data Insights Market.
Ultimately, learning to build a cold frame is a direct investment in your garden’s potential. It pairs perfectly with other season-extending strategies. For example, once you’re done harvesting from your cold frame, you can apply similar protective principles to your main garden. Our guide on how to winterize garden beds is a great next read for protecting your soil all year.
Step 1: Gather Your 5 Key Building Materials
Before you make a single cut, let's talk about what you’ll need. I’ve learned over the years that a successful DIY project is 90% preparation. Getting all your materials lined up first not only saves you a headache and multiple trips to the hardware store, but it also ensures the cold frame you build will actually last.
Your build really comes down to five key parts: the frame itself, the clear lid (or glazing), the hardware that holds it all together, any extra insulation, and a solid spot to put it. Let’s break down the best choices for each.
Choose Your Frame Material
The box is the heart of your cold frame, and while you could build it out of a few different things, wood is the go-to for most gardeners. It’s easy to work with and looks great in the garden.
- Cedar: This is the top-shelf choice, and for good reason. Cedar naturally fights off rot and bugs, so it’ll stand up to damp soil and bad weather for years without needing any chemical treatments. It costs a bit more upfront, but I find its durability makes it a smart investment.
- Pressure-Treated Pine: If you're watching your budget, pressure-treated pine is a fantastic workhorse. It’s been treated to resist decay and is incredibly tough. Just a pro tip: make sure you grab lumber rated for "ground contact" if any part of your frame will be sitting directly on or in the soil.
Traditionally, cold frames are simple wooden boxes with a sloped top, usually angled between 15-30 degrees to catch the most sun. While old-timers used whatever wood was on hand, modern options have expanded. You can find more on current construction material trends on Fortune Business Insights, but for a home garden, wood is tough to beat.
Select the Perfect Glazing
"Glazing" is just the fancy term for the clear top of your cold frame. This is the part that traps the sun's warmth and creates that cozy little microclimate for your plants.
An old window you've salvaged is a brilliant, eco-friendly option. It's often free or cheap and gives your cold frame a wonderfully rustic feel. The big catch, though, is that glass is fragile. If you have kids, pets, or live where hail is a thing, it can be a real hazard.
A much safer and often more effective material is twin-wall polycarbonate. These panels are surprisingly lightweight, nearly impossible to shatter, and provide fantastic insulation—often better than a single pane of glass. They also diffuse the sunlight, which is much gentler on tender seedlings.
Compare 3 Glazing and 2 Frame Material Options
Choosing the right materials can feel overwhelming, so I've put together this quick comparison to help you weigh the pros and cons based on durability, performance, and what you can expect to spend.
| Component | Material Option | Pros | Cons | Average Cost |
|---|---|---|---|---|
| Frame | Cedar | Naturally rot & pest resistant, long-lasting, no chemicals. | Higher initial cost, can be heavy. | $$$ |
| Frame | Pressure-Treated Pine | Very durable, rot-resistant, budget-friendly. | Contains chemicals, can be heavy. | $$ |
| Glazing (Lid) | Reclaimed Glass Window | Low cost (or free), great clarity, charming look. | Heavy, fragile, can be a safety hazard. | $ |
| Glazing (Lid) | Twin-Wall Polycarbonate | Excellent insulation, lightweight, shatter-proof, UV resistant. | Higher cost, can scratch over time. | $$$ |
| Glazing (Lid) | Plexiglass/Acrylic | Lighter than glass, good clarity, easy to cut. | Scratches easily, can yellow with sun exposure. | $$ |
Ultimately, the "best" choice is the one that fits your garden's needs and your wallet. Don't be afraid to mix and match—a pressure-treated frame with a polycarbonate lid is a fantastic and durable combination.
Select Your Hardware and Fasteners
The little bits of metal are what hold this whole thing together, so don't skimp here! Using the right fasteners will make the difference between a wobbly box and a sturdy structure that lasts for seasons.
- Screws: Always grab exterior-grade deck screws. They have a special coating to prevent rust and will far outlast regular indoor screws.
- Hinges: A pair of heavy-duty strap hinges is perfect for the lid. They're strong enough to handle repeated opening and closing.
- Handle: A simple gate or cabinet handle makes lifting the lid much, much easier on your back.
- Prop Stick: You absolutely need a way to prop the lid open for ventilation. A simple scrap of wood with a notch cut in it or a short length of chain works perfectly.
This list of essential hardware building materials is a great resource to make sure you don’t forget any of these small but critical pieces on your shopping trip.
Consider Insulation and Foundation Needs
For those of us in colder climates, a little extra insulation can make a world of difference. Once your frame is built, you can bank straw bales, bags of fall leaves, or even just pile up soil around the outside walls. This helps the cold frame hold onto its heat through the night.
Finally, give some thought to the foundation. You can set the frame right on the ground, but I like to create a simple base of gravel. It helps with drainage and keeps the wood from sitting in soggy soil, which will help it last longer. It’s the same principle as getting your indoor setup ready—preparation is everything. You can see how that same mindset pays off in our guide to the 7 steps to your perfect indoor seed starting setup.
Taking an hour to plan and gather everything you need will make the actual build a smooth, fun, and truly rewarding experience.
The 4 Main Stages of Your DIY Cold Frame Build
Alright, this is where the fun begins—where plans on paper turn into a real garden project. We're moving from lists and layouts to actually making some sawdust. I'm going to walk you through building a classic 4'x2' wooden cold frame, which is a fantastic size for most backyard gardens, especially when you use a cool old window for the lid.
Don't look at this as one giant, complicated job. It's really just a series of small, satisfying steps. We'll start with measuring and cutting the wood, then move on to assembling the box, attaching the lid, and finally adding that all-important prop stick for ventilation.
The whole project really breaks down into three main parts: building the frame, adding the window (the glazing), and putting on the hardware.

Thinking about it this way simplifies everything. You can see how each piece logically connects to the next, creating a sturdy and functional garden tool from just a few basic materials.
Step 2: Get Your Materials and Tools Together
Precision is everything here. Before you touch a saw, double-check your measurements against the actual window you're using. These plans are designed around a standard 4-foot by 2-foot window, so if yours is a different size, you'll absolutely need to adjust your lumber cuts to match.
Here’s what you’ll need to have on hand:
Tools You'll Need:
- Miter Saw (a circular saw with a speed square also works great for accurate angles)
- Power Drill with various bits
- Tape Measure
- Pencil
- Safety Glasses (seriously, sawdust gets everywhere)
Materials for a 4'x2' Frame:
- One 4'x2' recycled window
- One 12-foot long 2x12 cedar or pressure-treated board
- One 8-foot long 2x2 board (for corner supports and the prop stick)
- 3-inch exterior-grade deck screws
- Two heavy-duty 4-inch strap hinges
- One sturdy handle (a simple gate handle is perfect)
Trust me, having everything laid out and ready to go makes the whole process so much smoother. It’s the difference between a frustrating afternoon of hunting for things and a really rewarding weekend project.
Step 3: Make the 4 Key Cuts
Now for the action. The sloped top is the secret sauce for a great cold frame—it maximizes sun exposure and lets rain and snow slide right off. To get that slope, your side pieces will be cut at an angle.
-
The Back Wall: First up, cut a 48-inch piece from your 2x12 board. This is the tall back of your cold frame. Simple.
-
The Front Wall: Next, cut another 48-inch piece from the 2x12. This one will be your shorter front wall. You'll need to rip this board lengthwise down to a height of about 6 inches. If you don't own a table saw, most big-box hardware stores can make this cut for you for a small fee.
-
The Angled Sides: From the rest of your 2x12, you'll cut two side pieces to connect the front and back. These should be 24 inches long at the bottom edge. On one end of each piece, mark the height of your backboard (which is about 11.25 inches for a 2x12), and on the other end, mark the height of your front board (6 inches). Just draw a line between those two points and cut along it. Voila—angled side walls.
Pro Tip: A miter saw is your best friend for getting those angled cuts just right. If you’re using a circular saw, clamp a straight edge or a speed square to the board to act as a guide. It makes all the difference for a clean, professional-looking cut.
- The Corner Supports: Finally, from your 2x2 board, cut four support pieces. Two should match the height of your back wall, and two should match the front. We'll tuck these into the inside corners for some serious structural strength.
Once all your pieces are cut, do a quick "dry fit" by laying them out on a flat surface. This is a great way to make sure everything lines up perfectly before you start driving screws.
Step 4: Assemble the Frame
This is the moment your flat pieces of wood become a real, three-dimensional structure. The absolute key to a strong frame that won't split over time is to pre-drill your screw holes. Always pick a drill bit that’s just a little bit smaller than the diameter of your screws.
- Start by standing the back wall and one side piece up to form a corner.
- Tuck one of your 2x2 support pieces into that inside corner. It should fit snugly.
- Drill three pilot holes through the back piece, going into the end of the side piece and the support.
- Drive your 3-inch deck screws in to pull the corner tight. That internal support piece gives the screws plenty of wood to grab onto, making the joint incredibly strong.
- Just repeat that process for the other three corners until you have a sturdy, bottomless box.
Give the assembled frame a little shake. It should feel solid. If you notice any wobble, now’s the time to add another screw to firm things up.
Step 5: Attach the Lid and Final Touches
Your box is built! Now let's turn it into a proper cold frame by adding the lid and hardware.
-
Attach the Hinges: Carefully lay your window on top of the frame. Place your two strap hinges evenly along the tall back edge, marking where the screw holes land on both the window and the wooden box. Pre-drill every hole, being extra gentle on the old window frame to avoid splitting the wood. Then, screw the hinges on securely.
-
Install the Handle: Mount a simple handle to the front edge of the window. This tiny addition will make the daily task of opening and closing it so much easier on your back.
-
Create a Prop Stick: For your last step, grab a 15-inch piece of your leftover 2x2. Drill a hole clean through about an inch from one end. Attach this to the side of the cold frame with a single screw so it can pivot freely. To finish it off, cut a few different notches along the stick—this lets you prop the lid open at various heights for perfect ventilation.
Building a cold frame is a fantastic gateway to bigger garden construction projects. If you get the bug and want to tackle something larger, it's helpful to see how bigger structures come together. This greenhouse assembly guide has some great insights that can apply to all sorts of garden builds.
And that's it! Your new cold frame is ready to be moved to a sunny, south-facing spot in the garden, all set to protect your plants and stretch your growing season.
5 Smart Cold Frame Alternatives
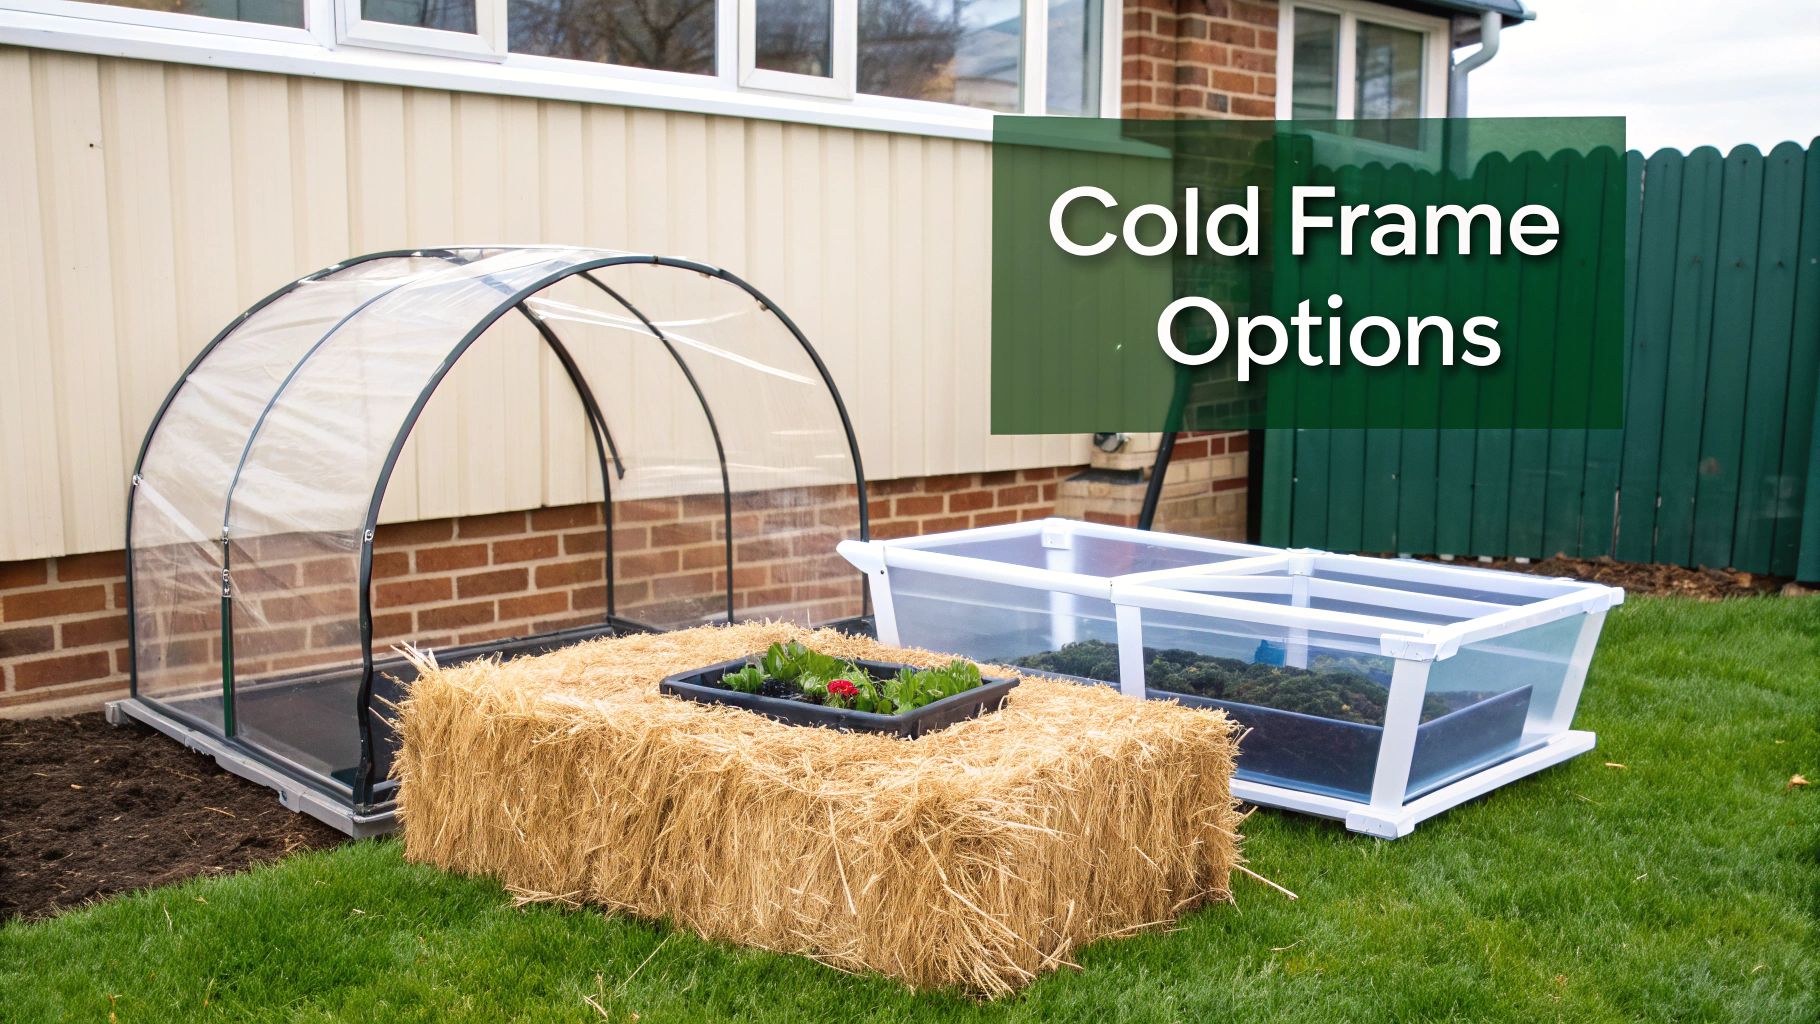
While the classic wooden box is a garden workhorse for a reason, it's certainly not the only game in town. Your garden is unique, and your strategy for extending the season should be too. Let's dig into five clever alternatives to the traditional build, each perfect for different needs, spaces, and budgets.
Sometimes the best solution is the simplest one. Not everyone needs a permanent structure, and these creative options offer real flexibility without demanding a trip to the lumber yard.
1. The Straw Bale Cold Frame
For a temporary, no-build solution that’s shockingly effective, look no further than a few straw bales. This is probably one of the oldest tricks in the book, relying on the incredible natural insulation of straw to create a protected microclimate.
The idea is brilliantly simple. Just arrange four or more straw bales in a rectangle right on your garden soil to form thick, insulated walls. Then, lay an old window or a sheet of polycarbonate across the top, and you're done. It's a perfect, low-effort way to shield a patch of fall-planted spinach or overwinter hardy herbs. When spring rolls around and you don't need it anymore, the bales can be broken up and used as mulch.
2. The PVC Hoop House Tunnel
If you need to cover a whole row of plants or want something you can easily move around, a PVC hoop house is a fantastic option. This design is less of a box and more of a low tunnel that you can pop right over an existing garden bed.
Putting one together is surprisingly quick:
- First, pound short lengths of rebar into the ground every few feet along both sides of your bed.
- Next, bend flexible PVC pipes into arches, slipping the ends over the rebar stakes to form your "hoops."
- Finally, drape a sheet of heavy-duty greenhouse plastic over the hoops and anchor the edges with bricks, soil, or sandbags.
This setup is ideal for hardening off dozens of seedlings at once or for giving taller crops like kale and chard extra protection through the winter. And because it's so lightweight, you can easily shift it to different parts of the garden as your crops rotate.
I’ve found that a well-built hoop house can create a surprisingly warm environment. Even on a frosty morning, the temperature inside can be 10-15°F warmer than the outside air, which is often all that's needed to keep hardy greens alive and well.
3. The Mini Balcony Cold Frame
For city gardeners, space is the ultimate luxury. If you're working with a small balcony or patio, you can whip up an effective mini cold frame using a large, clear plastic storage bin. This upcycled solution is one of the easiest ways to get started without any actual building.
Just fill the bottom of the bin with a couple of inches of gravel for drainage, then add your potting mix. Plant your cold-hardy lettuces or herbs directly inside. The clear lid acts just like the glass on a traditional frame, trapping solar heat and shielding plants from wind. On sunny days, just prop the lid open for ventilation. It's a self-contained, portable garden that brings season extension to the smallest of spaces.
4. The Raised Bed Topper
Already have raised garden beds? Well, you've done most of the work already. A raised bed topper is basically a custom-fit lid that instantly converts your existing bed into a large-scale cold frame.
You can build a simple rectangular frame from 2x2 lumber that matches the exact dimensions of your raised bed. Attach a sheet of polycarbonate or stretch greenhouse plastic over it to create the glazing, then hinge one side to your bed for easy access. This approach leverages the infrastructure you already have, making it one of the most efficient ways to protect a large planting area.
5. The A-Frame Cold Frame
Last but not least, for a design that’s both functional and easy on the eyes, consider an A-frame cold frame. As the name suggests, this structure looks like a little tent with sloping, transparent sides that sit over your plants.
The frame is usually built from wood, forming a sturdy triangular shape. The big advantage here is that the angled sides are brilliant at catching the low winter sun and are fantastic at shedding snow. Many designs feature hinged panels on both sides, which gives you incredibly convenient access to your crops. It might require a bit more precision with your angle cuts, but the result is a beautiful and highly effective garden feature.
Step 6: Master Your Cold Frame Management
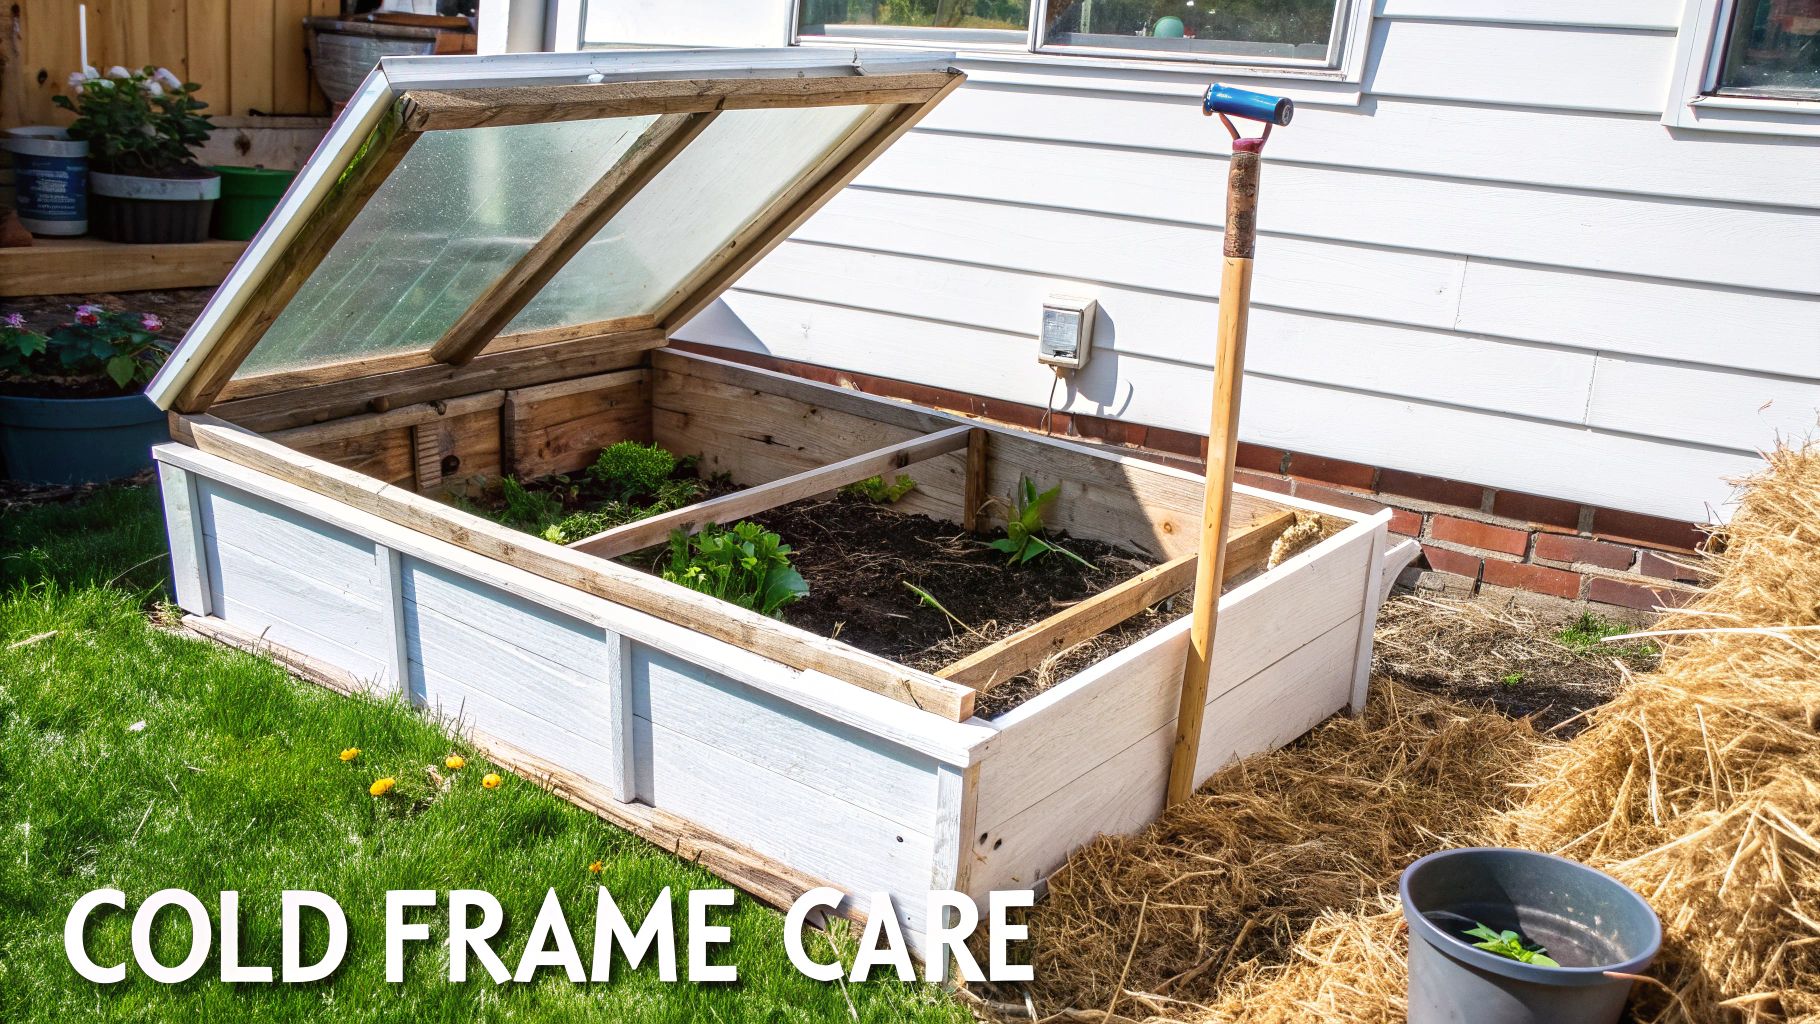
Alright, the sawdust has settled and your cold frame is built. Congratulations! But as any seasoned gardener will tell you, the construction is just the first step. The real magic begins now, in how you manage this simple but powerful tool.
Think of your cold frame as your secret weapon for bending the rules of the seasons. Getting it right comes down to a few key things: smart placement to soak up every ray of precious winter sun, proper ventilation so you don't accidentally cook your plants, and a little extra insulation when a deep freeze rolls in. Nail these, and you’ll transform that box into a year-round fresh-food factory.
Find the Perfect Spot
Location, location, location. It’s as true in the garden as it is in real estate. The entire purpose of a cold frame is to act like a solar collector for your plants, so where you put it is the most important decision you'll make.
You’ll want to position your frame so the sloped lid is facing south. This is non-negotiable for maximizing sun exposure, especially when the sun hangs low in the sky during fall and winter. An east-facing spot gets some morning light but misses out on the stronger afternoon warmth. A west-facing orientation can actually get too hot. South is the gold standard for serious winter gardening.
4 Keys to Daily Cold Frame Care
Once your frame is basking in its sunny home, a little daily attention is all it takes. It’s amazing how hot a cold frame can get—even on a brisk but sunny day, the internal temperature can easily climb 20-30°F higher than the air outside.
Here’s what you need to do:
- Ventilate, Ventilate, Ventilate. If the outside temperature climbs above 40°F (4°C) and the sun is out, you have to vent the frame. Just prop the lid open with a stick. Forgetting this simple step is the fastest way to fry your cool-weather crops.
- Tuck It In at Night. As the afternoon wears on, be sure to close the lid before dusk. This traps all the warmth absorbed by the soil during the day, giving your plants a much cozier environment to ride out the cold night.
- Water with a Light Hand. Plants in a cold frame need far less water than you might think, since the enclosed space traps humidity. Check the soil every week or so. When you do water, do it on a mild, sunny morning so the leaves have plenty of time to dry before temperatures drop at night.
- Insulate Against the Bitter Cold. When the forecast calls for a real arctic blast, give your frame an extra blanket. You can pile straw bales, bags of fallen leaves, or even snow up against the outside walls for a serious insulation boost.
A common mistake is thinking the goal is to keep the cold frame warm all winter. The real objective is to keep the temperature stable. Protecting plants from the damaging freeze-thaw cycle is more important than trying to create a tropical paradise.
What to Plant and When
A cold frame truly shines when you use it to get a jump on spring planting or to keep harvesting delicious greens deep into winter. Timing is everything, and knowing the basics of when to start seeds indoors is a great starting point for mapping out your cold frame calendar.
Here's a simple planting guide for gardeners in the Zone 5-7 range. The timing might shift a bit where you live, but the core ideas are the same.
3-Season Cold Frame Planting Guide (Zone 5-7)
| Season | Crops to Sow/Start | Primary Goal |
|---|---|---|
| Autumn (Aug-Sept) | Kale, Spinach, Mâche, Carrots, Green Onions | Overwintering. Establish hardy crops before the days get too short. The goal is to have them mature enough to harvest throughout the winter. |
| Late Winter (Feb-Mar) | Lettuce, Radishes, Broccoli starts, Cabbage starts | Spring Head Start. Sow fast-growing spring crops directly in the frame or use it to harden off seedlings you started inside for an extra-early spring garden. |
| Spring (Apr-May) | Basil, Pepper, and Tomato seedlings | Hardening Off. Use the frame as a safe transition zone for tender summer vegetables, protecting them from late frosts and harsh winds before transplanting. |
By following these simple management tips, you'll ensure your DIY project keeps your kitchen stocked with fresh, homegrown food nearly all year long.
Step 7: Get Answers to 3 Top Cold Frame Questions
Once the last screw is in and your cold frame is built, you're bound to have a few questions. I see them pop up all the time. Getting these practical details right is what separates a decent cold frame from one that truly becomes a garden workhorse, season after season.
Let's dig into the most common things gardeners wonder about after finishing the build. These are the small tweaks that unlock the full potential of your new season-extender.
1. What’s the Best Angle for a Cold Frame Lid?
You’ve probably noticed that cold frame tops are always sloped, and there’s a very good reason for that. The angle of the lid is a surprisingly critical detail for capturing as much sunlight as possible, especially when the sun hangs low in the sky during fall and winter.
From my experience, the ideal angle is somewhere between 15 and 30 degrees. This range really is the sweet spot. Here’s why:
- Solar Gain: A sloped lid intercepts the sun's rays more directly than a flat one, which is a huge advantage during the low-light months.
- Water Runoff: The angle makes sure rain and melting snow slide right off. This stops water from pooling on top or, even worse, leaking inside.
- Shedding Snow: A heavy blanket of snow can block precious light and add a lot of weight. A good slope helps it slide off naturally.
Honestly, any slope is better than a flat top, but if you aim for that 15-30 degree range during your build, you’ll see the best results.
2. How Do I Keep My Cold Frame from Getting Too Hot?
This always sounds strange to people, but one of your biggest jobs is preventing your cold frame from overheating. It’s a classic rookie mistake. Even on a cool but sunny day, the temperature inside can skyrocket to a point that will cook your tender greens.
Think of your cold frame as a mini-greenhouse. On a sunny 40°F (4°C) day, the air inside can easily hit 75°F (24°C) or more if you don't vent it. Good ventilation isn't just a suggestion—it's absolutely essential for healthy plants.
Managing the heat is all about daily attention. Any time the sun is out and the outdoor temperature is above freezing, you need to prop that lid open. I use a simple stick with a few notches cut into it; this lets me create a small gap on chilly, windy days or a much wider opening when it's sunny and mild. Just remember to close it up before the sun goes down to trap that warmth for the night.
3. Can I Just Put My Cold Frame Directly on the Soil?
Yep, you sure can. In fact, placing a cold frame directly on your garden soil is the most common and simplest way to do it. This lets your plants send their roots down deep into the native ground.
But there are some trade-offs to consider. While setting it on the soil is fast and connects your plants to the natural soil ecosystem, it also means the wooden frame is in constant contact with moisture. Over time, this will cause the wood to rot, even if it's been treated.
If you want the frame to last longer, try this trick: create a shallow foundation of pea gravel for it to sit on. This small step elevates the wood just enough to keep it out of the damp soil, which helps with drainage and can add years to its life. Your choice really comes down to your local climate and how permanent you want the structure to be.
Ready to put that cold frame to work? Homegrown Garden has a fantastic selection of heirloom seeds that thrive in a protected environment, from hardy winter greens to early spring vegetables. Check out our seed collections to find everything you need at https://www.homegrown-garden.com.
Once your cold frame is built, fill it with cool-weather vegetable seeds like spinach, lettuce and kale to extend your growing season.

