

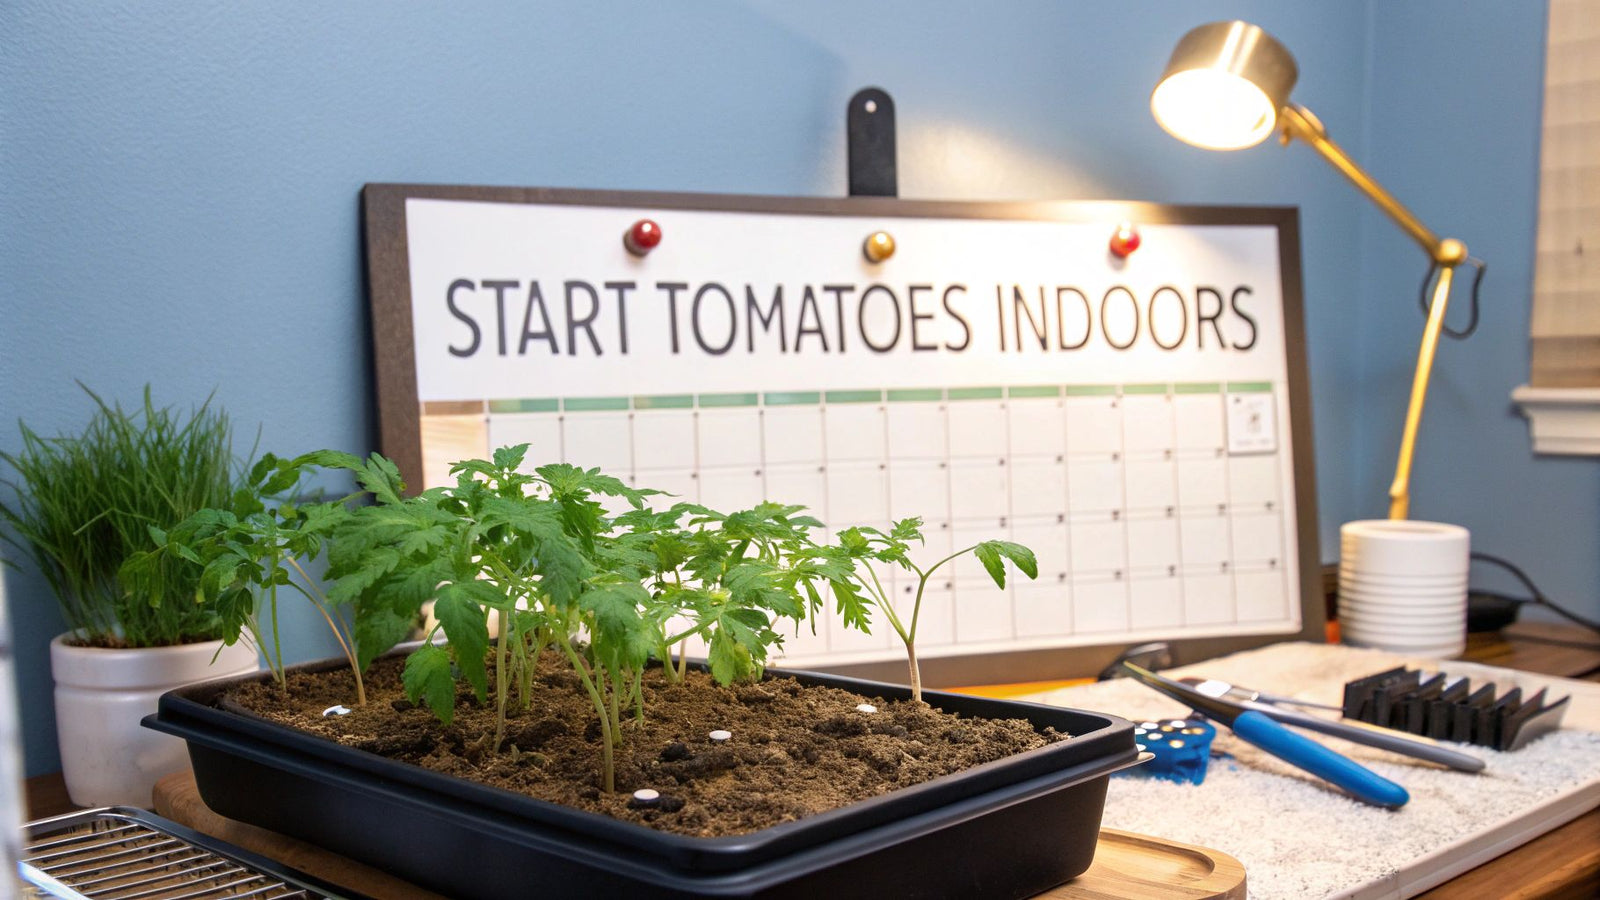

When it comes to figuring out when to start tomatoes indoors, the most crucial first step is to sow your seeds 6 to 8 weeks before your area's last average frost date. This is the sweet spot. It gives your seedlings that crucial head start to grow strong and sturdy, but keeps them from getting overgrown and stressed before it's safe to plant them outside. Follow these 7 key steps for a perfect start to your tomato season.
1. Find the Perfect 6 to 8 Week Sweet Spot
The secret to a fantastic tomato harvest really does begin long before you ever break ground in the garden. That 6 to 8-week window is the standard for a reason, and it's a lesson most of us gardeners learn the hard way.
If you start them any earlier, you'll likely end up with "leggy" seedlings—tall, weak plants that have stretched desperately for light. Start too late, and you're just delaying your harvest, which is the last thing anyone wants.
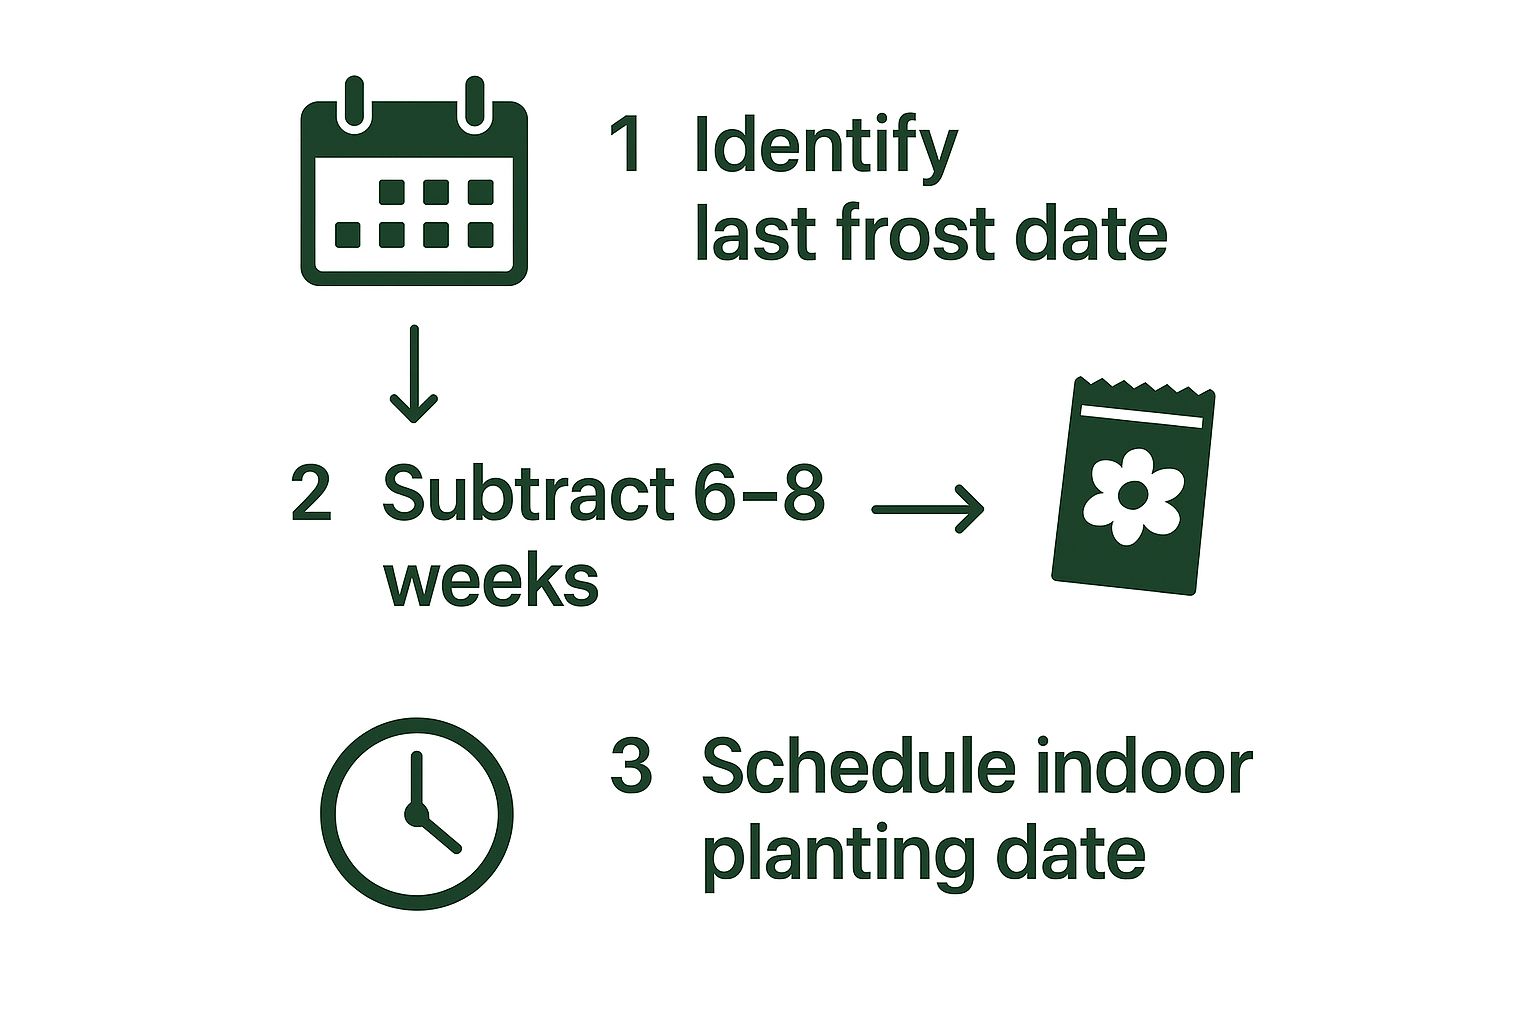
Think of it as working backward from one single, critical date. For example, I’ve seen many gardeners in USDA hardiness zone 8b, where the last frost might be around April 15, have great success starting their seeds indoors between early February and mid-March. You can find some great insights into how planting zones affect this timing in these detailed gardening guides from The Reid Homestead.
To make this even easier, I've put together a quick reference table. Just find your last frost date to see your ideal timeline.
Quick Reference Tomato Starting Calendar
| If Your Last Frost Date Is... | Start Seeds Indoors Between... | Ideal Transplant Window |
|---|---|---|
| April 15 | February 18 - March 4 | April 29 - May 13 |
| May 1 | March 6 - March 20 | May 15 - May 29 |
| May 15 | March 20 - April 3 | May 29 - June 12 |
| June 1 | April 6 - April 20 | June 15 - June 29 |
This table helps visualize how that 6-to-8-week countdown plays out, giving you a clear picture of when to get those seeds into soil and when to get your garden beds ready for their new arrivals.
Why This Timing Is So Critical
Getting this window right helps you sidestep the common mistakes that can really set back your entire season's efforts.
By giving your plants just enough time inside, you ensure they develop a robust root system and strong stems, making them far more resilient to the shock of being moved into the garden.
Here’s exactly what you gain by nailing the timing:
- Optimal Plant Health: Your seedlings will be at their peak size and strength for transplanting—not too small, not too big.
- Reduced Transplant Shock: Well-developed plants that aren't overgrown or root-bound adapt much more easily to the great outdoors.
- A Bigger, Better Harvest: Your plants are primed and ready to start producing fruit as soon as the weather warms up, giving you the longest possible harvest window.
2. Pinpoint Your Area's Last Frost Date
Every single decision you make about your tomato plants—from when you sow that first seed to when you finally tuck them into the garden—revolves around one key date: your area's average last frost. Get this right, and you're well on your way. Get it wrong, and you risk losing your precious seedlings to a late-season cold snap.
Fortunately, figuring this out is easier than ever. Forget guessing or relying on old wives' tales. We have solid data at our fingertips.
3 Reliable Tools for Finding Your Frost Date
I always recommend checking a couple of different sources just to be sure. Here are the go-to resources I personally use and recommend to every gardener wanting to know when to start their tomatoes indoors:
- USDA Plant Hardiness Zone Map: This is your starting point. It gives you a great big-picture view of your climate based on average winter low temperatures.
- Online Calculators: Websites like the Old Farmer's Almanac have fantastic calculators. Just pop in your zip code, and it will give you a last frost date based on decades of historical data for your specific spot.
- Local Agricultural Extension Offices: This is the gold standard for accuracy. Your local extension office knows your specific microclimate better than anyone and can provide data that’s much more precise than a national average.
A classic rookie mistake is to rush seedlings outside the day after the supposed last frost. Remember, it's an average, not a hard-and-fast rule. I’ve learned the hard way to always wait at least one to two weeks after that date. This gives the soil a chance to truly warm up.
Your location will drastically change your entire timeline. For instance, a gardener in Chicago (Zone 5b) is looking at a last frost around May 15th. Meanwhile, someone down in Houston (Zone 9a) might be in the clear by late February. That’s a difference of months!
If you want to dive deeper into building a custom timeline, our complete guide on when to start tomato seeds is the perfect next step. Nailing down your frost date is the bedrock of a successful and bountiful tomato season.
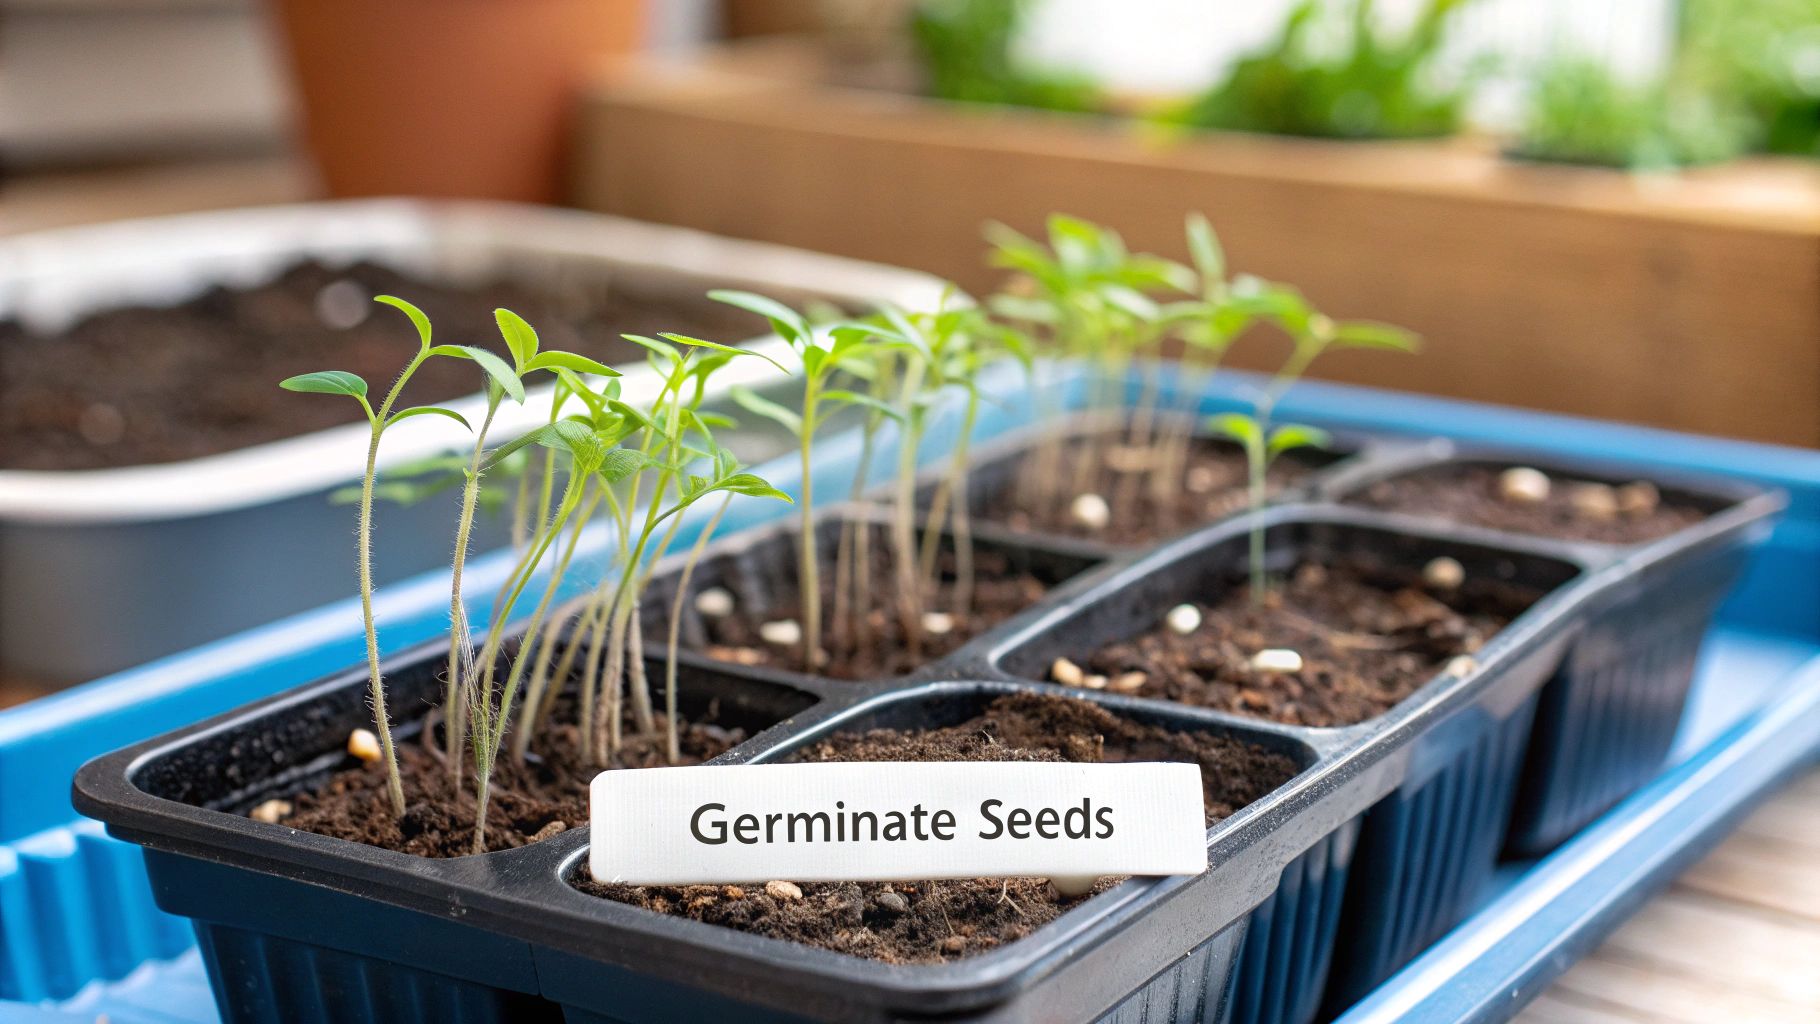
3. Set Up Your Indoor Seed Starting Station
Now that you know your key dates, it's time for the fun part: setting up a cozy nursery for your future tomato plants. Getting this right is about creating the perfect, controlled environment to give your seeds a huge head start before they ever see the garden.
You don't need to spend a fortune on containers. Professional cell trays are fantastic, but I've had great success with recycled yogurt cups and even those plastic clamshell egg cartons. The key is drainage—whatever you use, make sure you poke a few holes in the bottom.
Gathering the Right Gear
While you can get creative with containers, the soil you use is not the place to cut corners. You absolutely must use a sterile, light, and fluffy seed-starting mix. Grabbing soil from your garden is a recipe for disaster; it’s often packed with fungal spores that can cause damping-off, a disease that will wipe out your seedlings overnight. A quality mix is your best insurance policy.
Think of your setup as a mini-greenhouse. Your job is to control the soil, heat, and moisture to give that seed everything it needs to sprout.
A couple of tools can dramatically improve your results and are worth every penny for serious tomato growers:
- Humidity Domes: These are just clear plastic lids that pop onto your seed trays. They’re brilliant at trapping moisture and warmth, creating the humid, balmy conditions that coax tomato seeds to life.
- Seedling Heat Mats: Tomatoes really need warm soil to germinate reliably, ideally somewhere between 65-70°F (18-21°C). A simple heat mat under your trays provides gentle, consistent warmth from the bottom up. This one piece of equipment can shave days off your germination time and give you much more even sprouting across the whole tray.
Putting It All Together
With your supplies in hand, the setup is simple. Fill your containers with the seed-starting mix, pre-moisten it so it's damp but not waterlogged, and plant your seeds according to the depth on the seed packet.
Once planted, get your trays onto the heat mat and pop the humidity dome on top. This is the trifecta for germination success: sterile soil, consistent warmth, and high humidity.
For a deeper dive into the process, our guide on general tips for starting seeds indoors has even more great info. By taking the time to build a proper station, you're not just planting seeds—you're laying the foundation for an incredible summer harvest.
4. Give Your Seedlings the Right Light and Warmth
Once those first little green sprouts pop up, your focus needs to shift immediately to light and temperature. This is where many new gardeners stumble. Providing inadequate light is the single biggest mistake I see, and it's what leads to those famously weak, "leggy" seedlings that just can't handle the transition outdoors.
Sorry to say, but a sunny windowsill is almost never enough. The light is too indirect and too brief, especially during late winter and early spring. To grow strong, healthy plants, you need to give them a dedicated light source.
4 Keys to Getting the Light Just Right
You don’t need a fancy, high-tech setup to get this right. The key is consistency and thinking like the sun.
- Pick Your Lights: You can get by with standard fluorescent shop lights, but honestly, modern LED grow lights are a much better investment. They're incredibly energy-efficient and provide the full light spectrum that encourages strong, bushy growth, not just flimsy height.
- Set a Timer: Tomato seedlings thrive with 14 to 16 hours of light each day. The easiest way to manage this is with a cheap outlet timer. I set mine to click on in the morning and off in the evening, giving the plants a consistent day/night cycle. No guesswork involved.
- Keep 'Em Close: This is the pro move that makes all the difference. Your light source should hang just 2 to 3 inches above the tops of your seedlings. This intense, direct light is what prevents them from stretching upwards and getting spindly.
- Adjust as They Grow: Your seedlings grow fast! You’ll need to raise the lights every few days to maintain that crucial 2-to-3-inch gap. Rigging up your lights with a simple adjustable chain or rope makes this a breeze.
It’s easy to think any bright bulb will work, but the science shows that the quality of light matters. Researchers have found that specific light intensity—measured as PPFD—dramatically impacts plant health. The sweet spot for tomato seedlings is a PPFD around 240 µmolm⁻²s⁻¹, which leads to optimal photosynthesis. You can read up on the lighting science yourself to see how it creates stronger plants.
Don't Forget the Temperature
While you needed a heat mat to get the seeds to sprout, it's time to turn it off now. Once you have good germination across your tray, remove that extra bottom heat.
From here on out, your seedlings actually prefer slightly cooler air temperatures. Aim for a steady room temperature between 65-70°F (18-21°C). This tells the plant to slow down its vertical growth and focus its energy on developing a thick, sturdy stem and a robust root system. It's a simple trick that produces a much more resilient plant for the garden.
5. Pot Up and Harden Off Your Seedlings
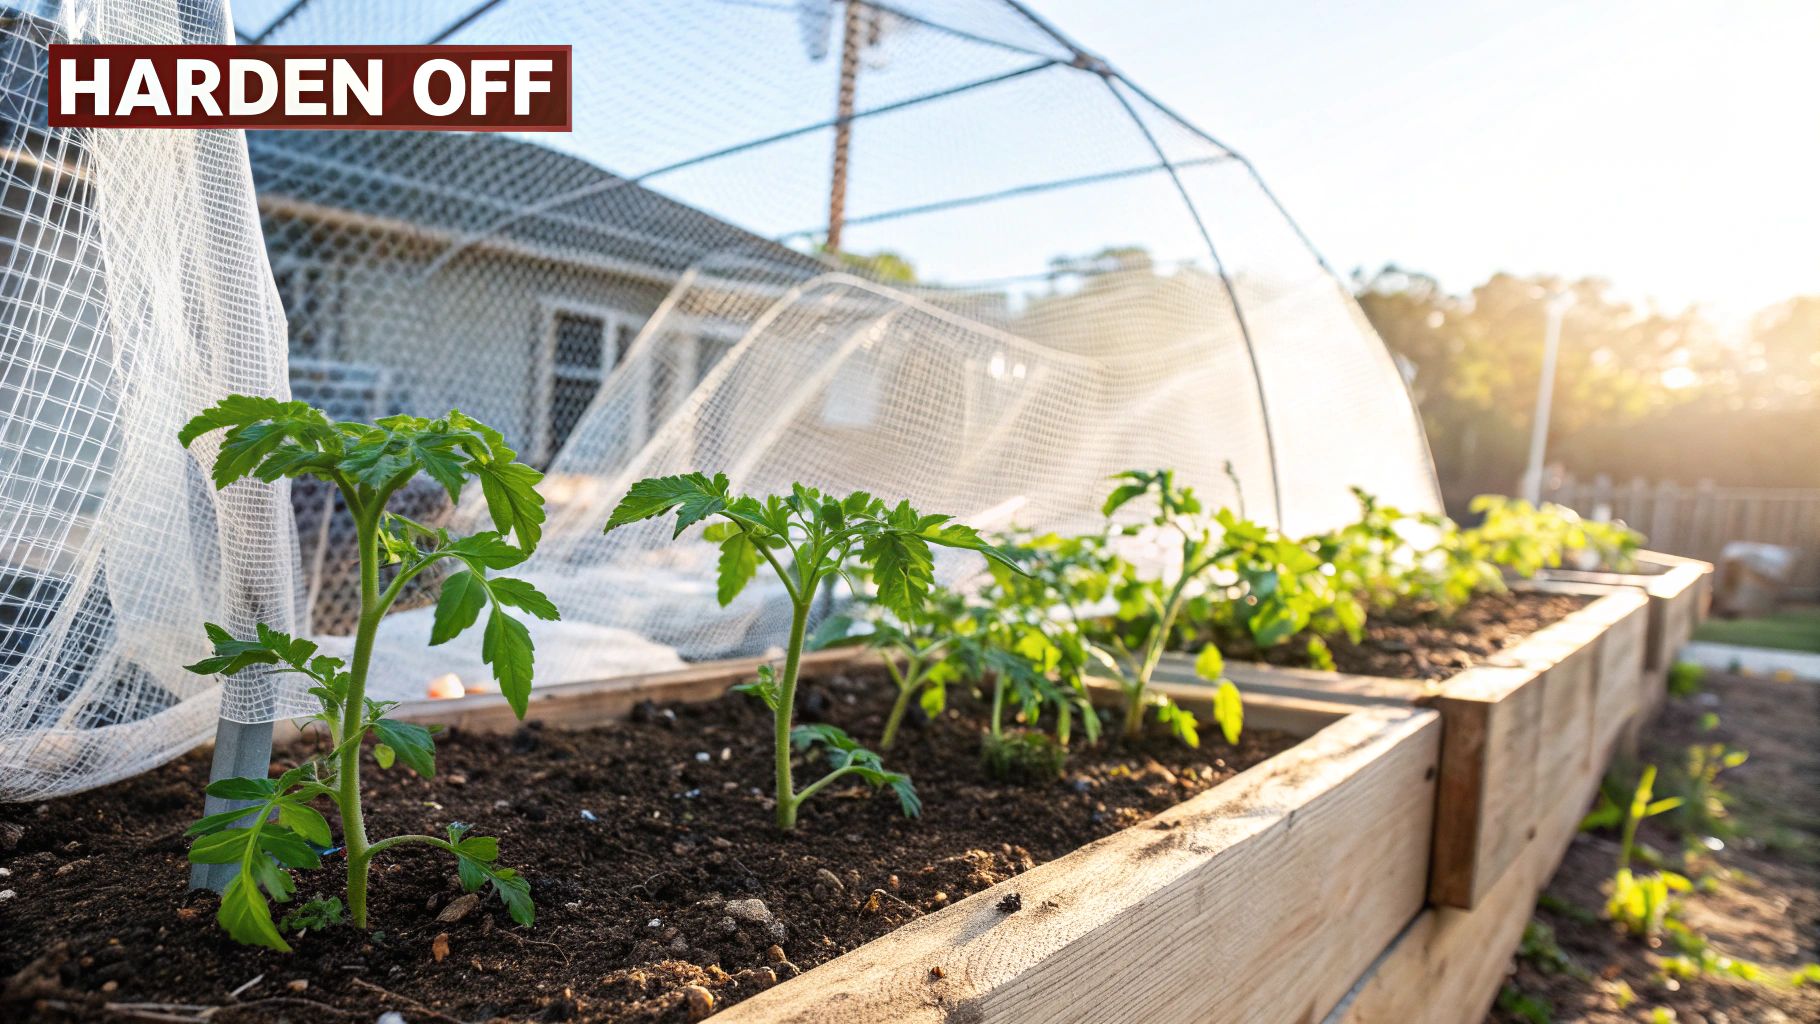
After a few weeks, your little seedlings will start getting antsy in their small starter cells. It's a good problem to have! This is where two of the most important steps come into play: potting them up and hardening them off. Getting this right is what separates a good start from a great one, setting your plants up for a smooth transition into the garden.
You'll know it's time to give your seedlings a bigger home when they've developed their second set of true leaves—the ones that actually look like tiny tomato leaves, not the first two rounded ones. They'll also be about 3 to 4 inches tall. If you peek at the bottom of the tray, you'll probably see little white roots poking out of the drainage holes. That's your cue.
Giving Roots More Room to Grow
When you move your seedling into a slightly larger pot (a 4-inch pot is usually perfect), you get a chance to use a fantastic trick unique to tomatoes. These plants have the amazing ability to grow roots all along their stems.
Before you repot, gently pinch off the lowest set of leaves. Then, plant the seedling deep into its new pot, burying the stem right up to the next set of leaves. This encourages a massive, robust root system to develop underground, which translates into a much stronger and more productive plant later on.
Once they're in their new pots, your tomatoes will hang out under the lights for a few more weeks, bulking up before the big move outside.
A Word of Warning: Do not skip the hardening-off process! Think of your seedlings as babies who've lived their whole lives in a climate-controlled nursery. Tossing them directly into the harsh sun and wind is a recipe for disaster. It can shock them so badly they'll stop growing or even die.
A Simple 7-Day Plan to Toughen Up Your Plants
About a week or two before your final frost date passes, it's time to start introducing your plants to the great outdoors. This slow and steady process gets them used to the elements.
- Days 1-2: Start with baby steps. Find a sheltered, shady spot and leave them outside for just 2 hours. Then bring them back in.
- Days 3-4: Let them stay out a bit longer, maybe 3-4 hours, and let them catch a little bit of that gentle morning sun.
- Days 5-6: Now they're getting tougher. You can increase their outdoor time to 5-6 hours with more direct sunlight.
- Day 7 and beyond: They should be ready for a full day outside. If nighttime temperatures are staying above 50°F (10°C), you can even let them spend the night.
After this week-long bootcamp, your tomato plants will be fully acclimated and ready to thrive in their permanent garden home.
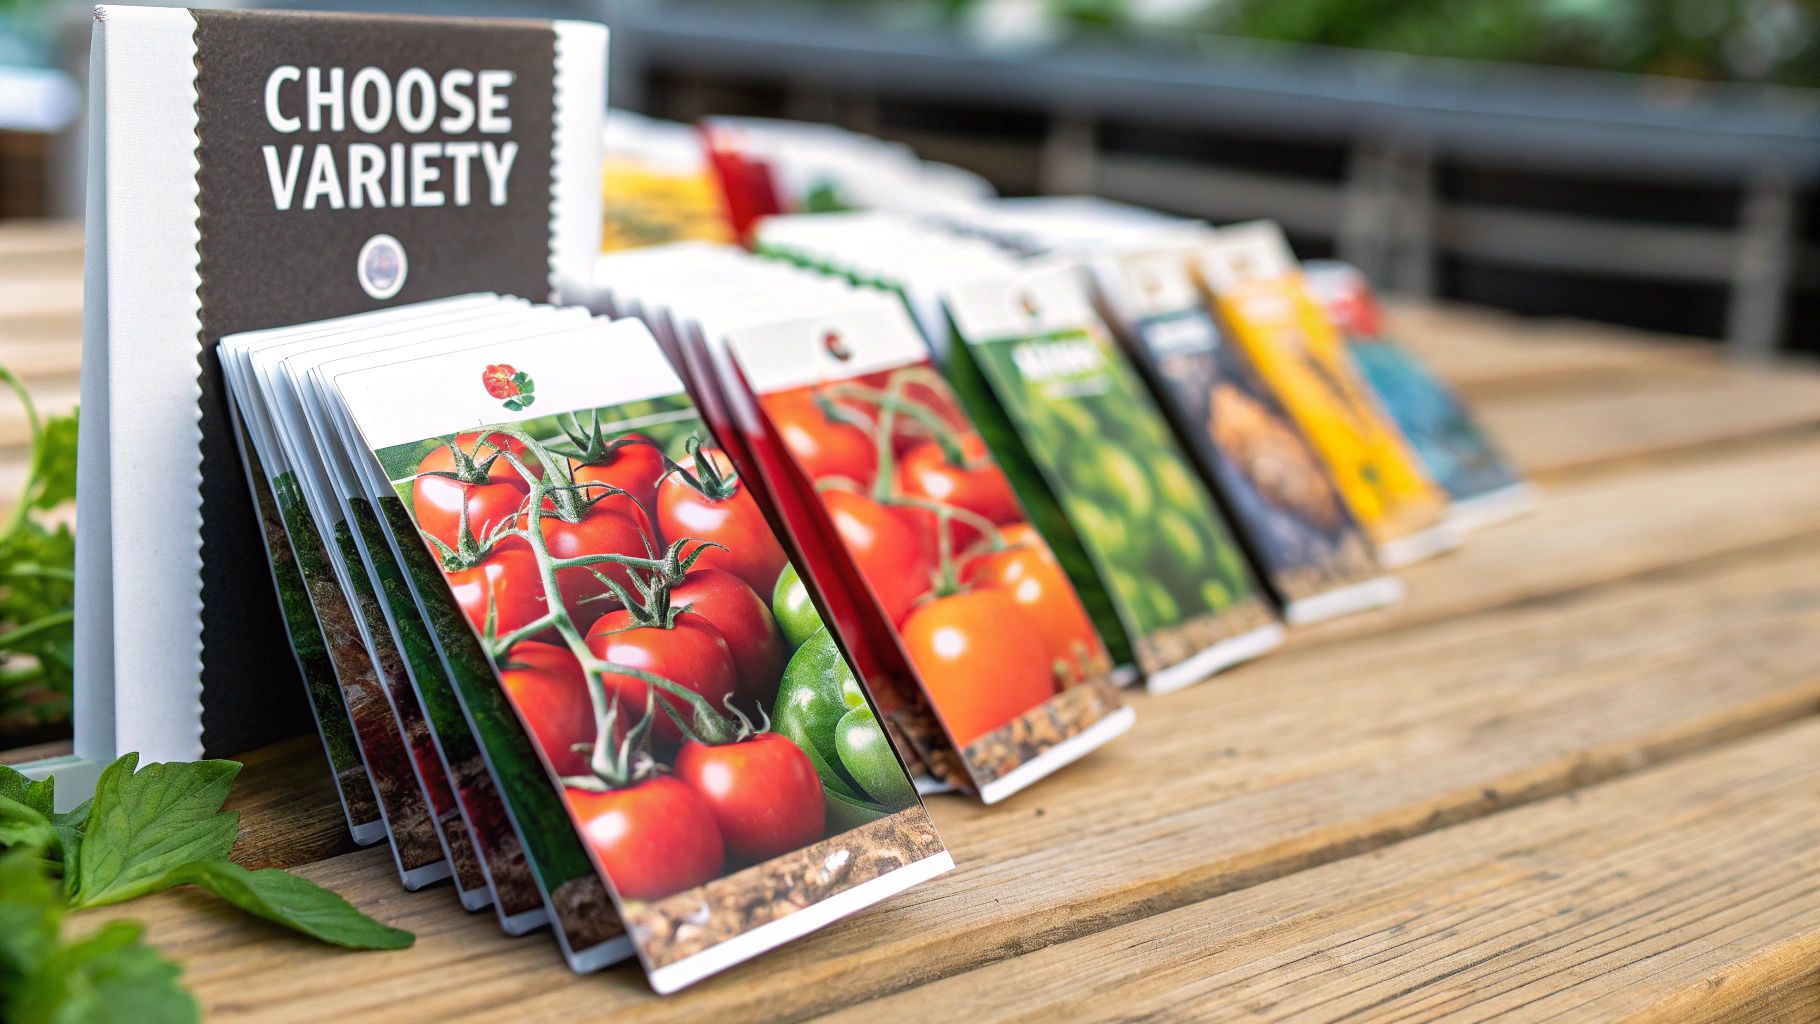
6. Choose Varieties That Match Your Climate
https://www.youtube.com/embed/wxeSHL-YcU4
Before you even think about grabbing a seed tray, the single most important decision you'll make is choosing the right tomato for your climate. This isn't just about flavor or color; it's about giving your plants a fighting chance to produce a full harvest before your season ends.
The key piece of information you're looking for is on the back of the seed packet: "days to maturity." This number tells you roughly how long it takes for a plant to bear ripe fruit after you've transplanted it into the garden. If you're gardening in a cooler northern climate like Zone 5, an 85-day tomato might be a real nail-biter, struggling to ripen before that first fall frost rolls in.
4 Tomato Types for Different Climates
Getting the timing right often comes down to the type of tomato you’re growing. Here’s a quick breakdown from my experience:
- Fast-Maturing Hybrids: If you have a short summer, these are your best friends. Varieties like 'Early Girl' or 'Celebrity' are workhorses, bred to produce reliably and quickly, often in just 55 to 70 days. Starting them the standard 6 to 8 weeks before your last frost date is a surefire way to get a great harvest.
- Classic Heirlooms: Ah, the heirlooms. If you have a long, warm growing season—think Zone 8 or 9—you can indulge in the rich flavors of slow-growers like 'Brandywine' or 'Cherokee Purple'. These can take 80 to 90 days (or even more!). I always give these the full 8-week head start indoors to ensure they have every possible moment to develop those incredible fruits. For more tips on these classics, our guide on how to grow heirloom tomatoes is a great place to start.
- Determinate (Bush) Tomatoes: Perfect for patios or small-space gardens, these plants grow to a predetermined size and set their fruit in a concentrated window. Think 'Roma' for canning. Their predictable, compact nature means they fit perfectly into that standard 6-to-8-week indoor sowing schedule.
- Indeterminate (Vining) Tomatoes: These are the marathon runners of the tomato world. They'll just keep growing and producing fruit right up until the frost finally stops them. While they're incredibly productive and forgiving, giving them a solid 8-week start indoors builds a strong, vigorous foundation for a long season of growth.
The global tomato seed market, valued at an estimated $1.33 billion in 2023, is booming for a reason. Gardeners and farmers are demanding varieties specifically suited to their local conditions. This push for tailored seeds means we now have access to plants optimized for everything from short seasons to greenhouse growing, which directly influences our planting schedules and care routines.
7. Troubleshoot 3 Common Seedling Problems
Even with the best-laid plans, questions always come up. It's just part of the gardening process! After years of talking with fellow gardeners, I've noticed a few concerns pop up time and time again when it comes to starting tomatoes inside.
1. What If I Start My Seeds Too Early?
This is probably the most common mistake I see, and it’s an easy one to make when you're excited for spring. When you start seeds too early, you often end up with "leggy" seedlings. Their stems get long and weak because they're desperately stretching for more light than they can get indoors.
These overgrown plants can also become root-bound in their little starter pots. This chokes their growth and sets them up for a serious case of transplant shock when they finally make it outside. Your best bet is to stick firmly to that 6-8 week window before your last frost date.
2. Can I Use a Sunny Windowsill Instead of a Grow Light?
I get this question a lot. While a bright, south-facing windowsill seems like a great natural option, it rarely provides the intense, direct light that tomato seedlings crave. They really need 14-16 hours of light each day to develop strong, stocky stems.
Unfortunately, a windowsill in late winter or early spring just can't deliver that kind of power or duration. Investing in a simple grow light setup is one of the single best things you can do to guarantee healthy, robust seedlings ready for the garden.
A tell-tale sign of not enough light is when your seedlings get tall and spindly. They are literally reaching for a stronger light source. The trick is to keep your grow light just a few inches above the tops of the plants to prevent this stretching.
3. Why Are My Seedling Leaves Turning Yellow?
Seeing yellow leaves can be a bit alarming, but don't panic! The fix is usually pretty straightforward.
First, check which leaves are yellowing. If it's just the first two little round leaves (the cotyledons), that’s perfectly normal. They are the seedling's first food source and are supposed to wither away.
However, if the "true" leaves—the ones that look like actual tomato leaves—are turning yellow, it's a signal. The two most common culprits are overwatering or a nutrient deficiency. Make sure the soil is consistently moist but never soggy. Once your seedlings have developed a few sets of true leaves, you can start feeding them with a balanced liquid fertilizer, diluted to about a quarter of its normal strength.
For all the heirloom seeds, starter kits, and expert guidance you need to grow with confidence, explore the collections at Homegrown Garden. Start your garden journey today by visiting https://www.homegrown-garden.com.

